Post User Guide & Visual Walkthrough
Complete visual walkthrough and reference manual for Post.
A complete visual walkthrough and reference manual for Post, a native macOS application for HTTP API testing, local webhook debugging, and Model Context Protocol (MCP) tool inspection.
View on GitHub 🍳 Open Practical Cookbook →
Table of Contents
- HTTP Workbench & Request Construction
- Environments, Keychain & 1Password (
op://) Secrets - Authentication Presets & Zero-Copy Response Chaining
- JSONPath Querying, Response Diffing & Code Generation
- Local Webhook Listener, Mock Rules & Live Replay
- Model Context Protocol (MCP) Inspector (HTTP/SSE & stdio)
- Stash-Model Auto-Suggest & Keyboard Navigation
- Sample Use Cases & cURL Import/Export
1. HTTP Workbench & Request Construction
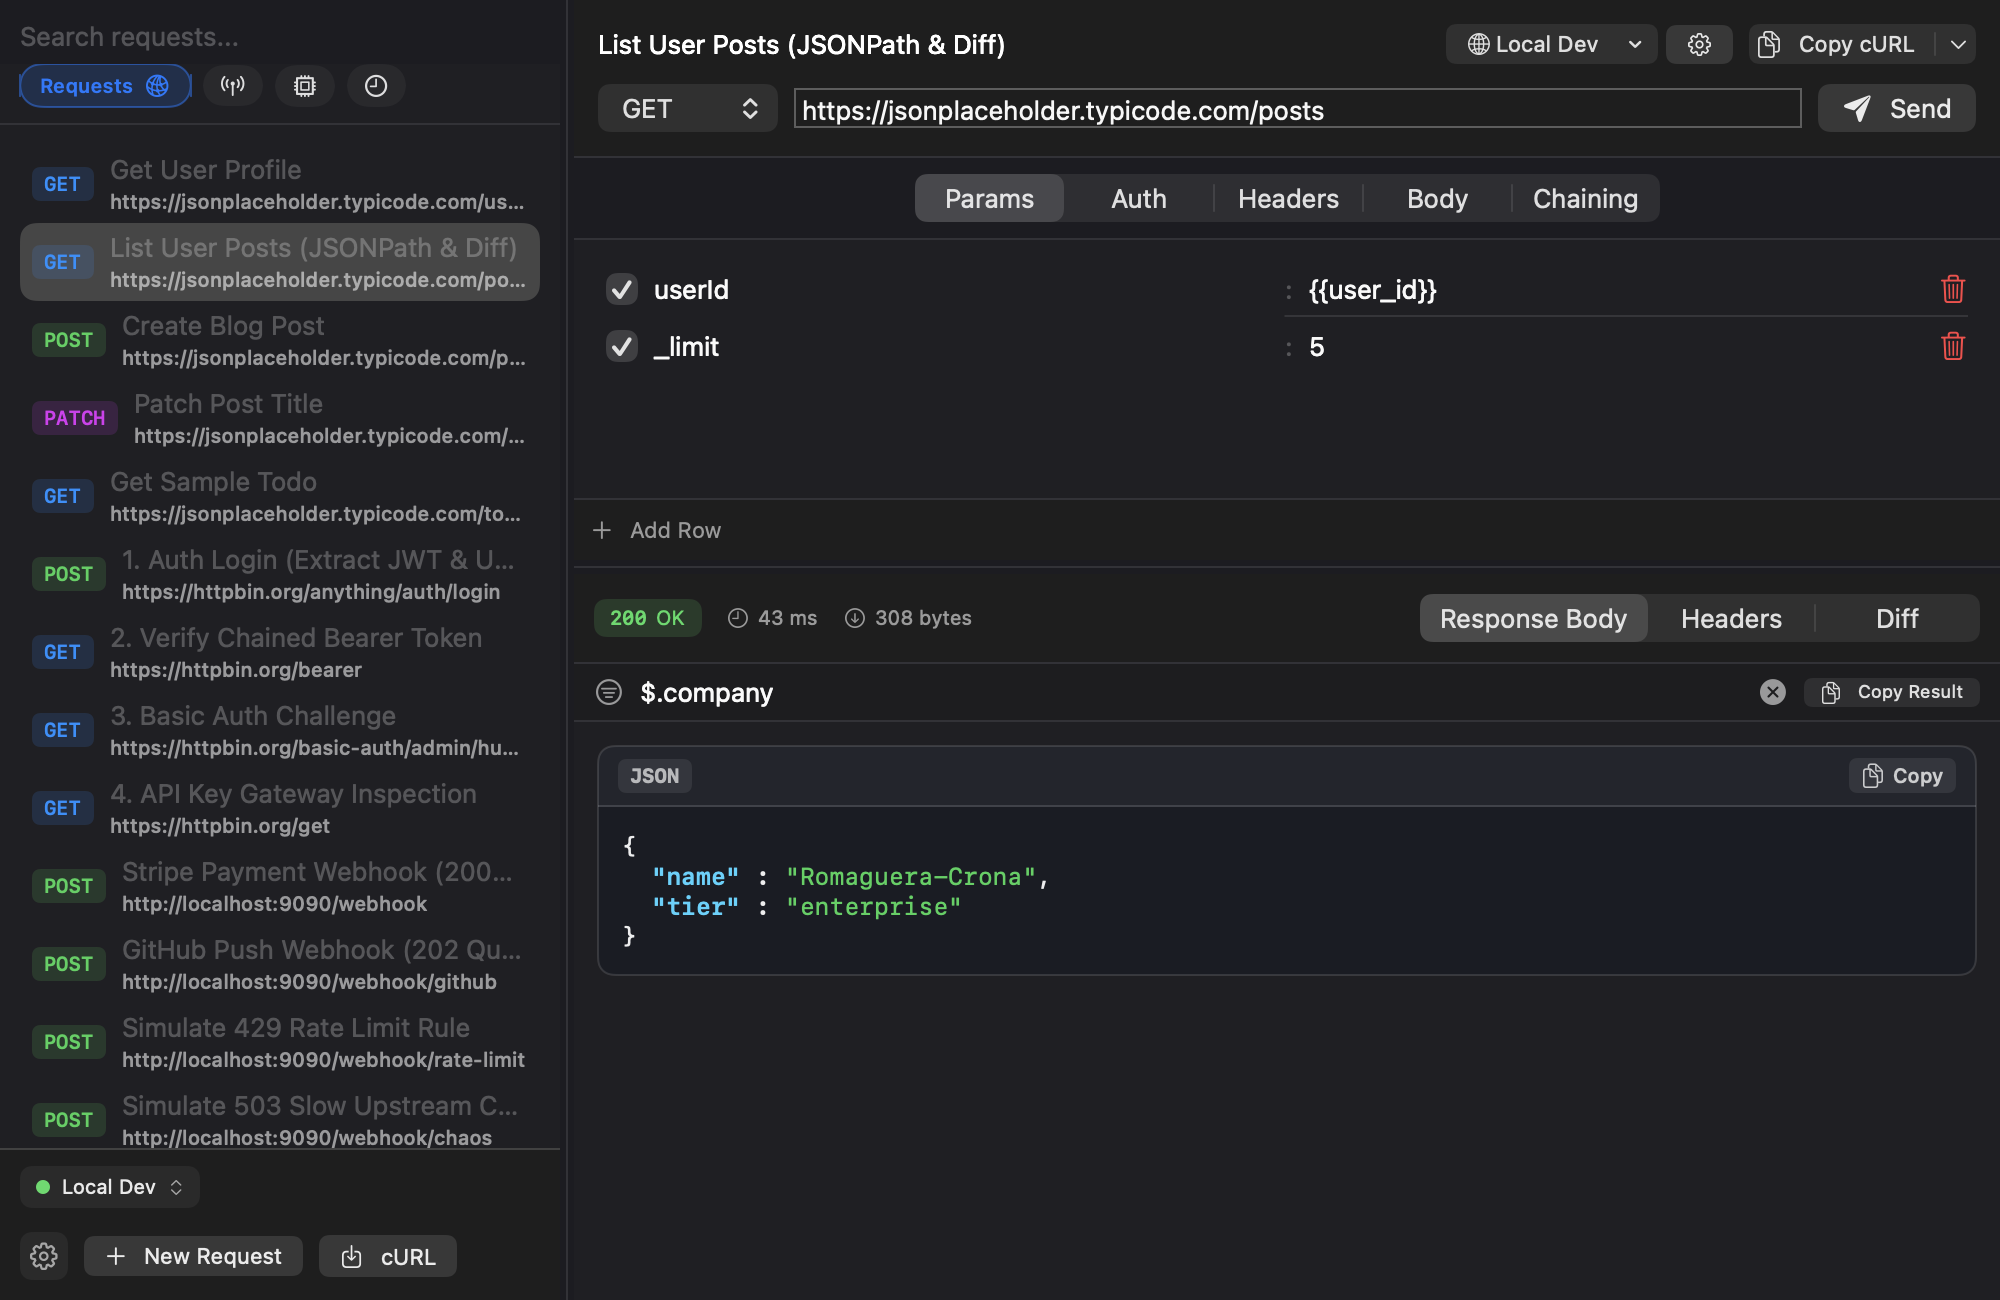
The HTTP Workbench is your primary workspace for building, parameterizing, and executing HTTP API calls.
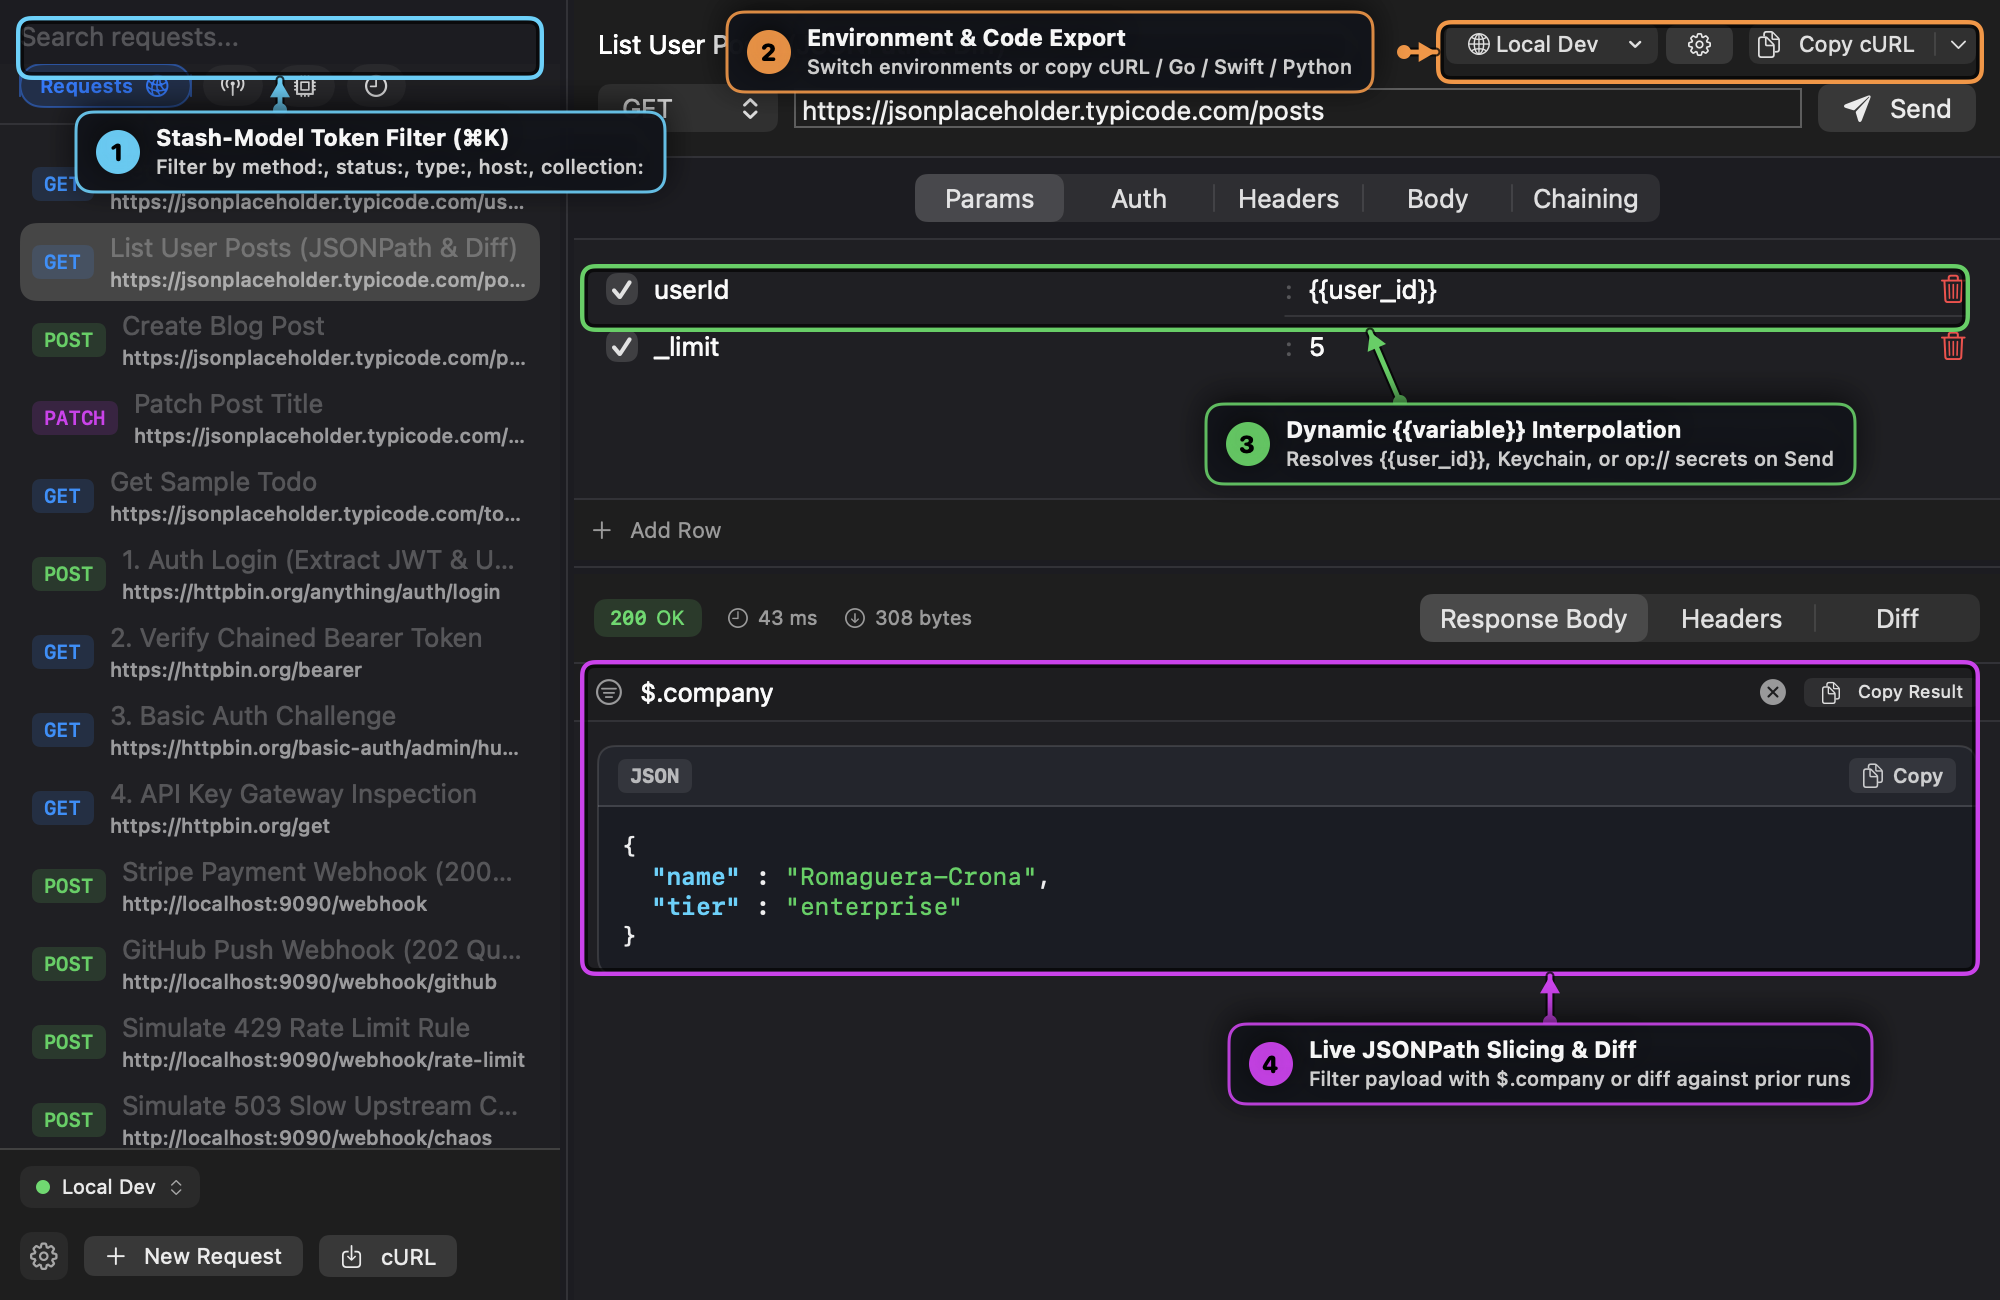
Visual Callout Guide
- ① Stash-Model Token Filter (
⌘K): Press⌘K(or⌘F) to jump to the search bar. PressTabto browse filter keys (method:,status:,type:,host:,collection:) and filter your requests or history without touching the mouse. - ② Environment & Code Export Toolbar:
- Environment Menu: Switch between
Local Dev,Production,HomeLab & Home Assistant, orHTTPBin Sandbox. - Gear Button (
⌘E): Open the Environments & Collections Manager sheet. - Copy cURL / Code Export Split Button: Click the primary side to copy a runnable
curlcommand, or click the chevron to export idiomatic Go (net/http), Swift (URLSession), or Python (httpx) code.
- Environment Menu: Switch between
- ③ Dynamic
{{variable}}Interpolation: Use{{variable_name}}placeholders in URLs, query parameters (userId = {{user_id}}), headers, auth tokens, or request bodies. Values are resolved dynamically at execution time. - ④ Live JSONPath Slicing & Diff: Enter a dot/bracket JSONPath query (such as
$.companyor$.items[0].id) in the response filter bar to slice large payloads on the fly, and click Copy Result to copy only the matched fragment.
2. Environments, Keychain & 1Password (op://) Secrets
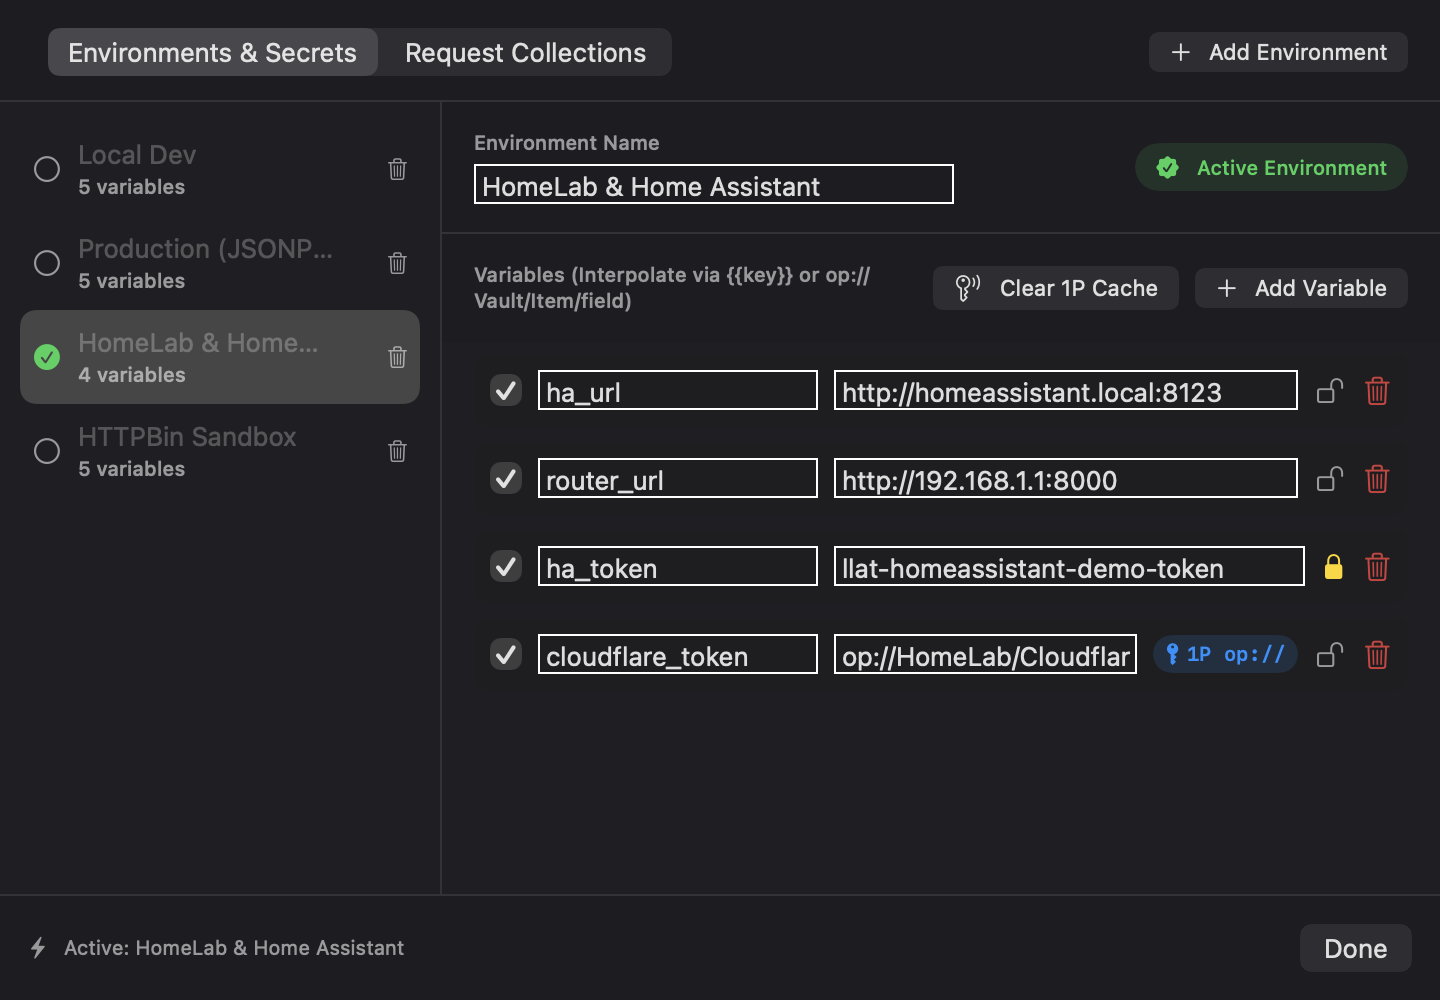
Post provides three tiers of variable and secret storage so sensitive tokens never leak into plain-text files or Git repositories.
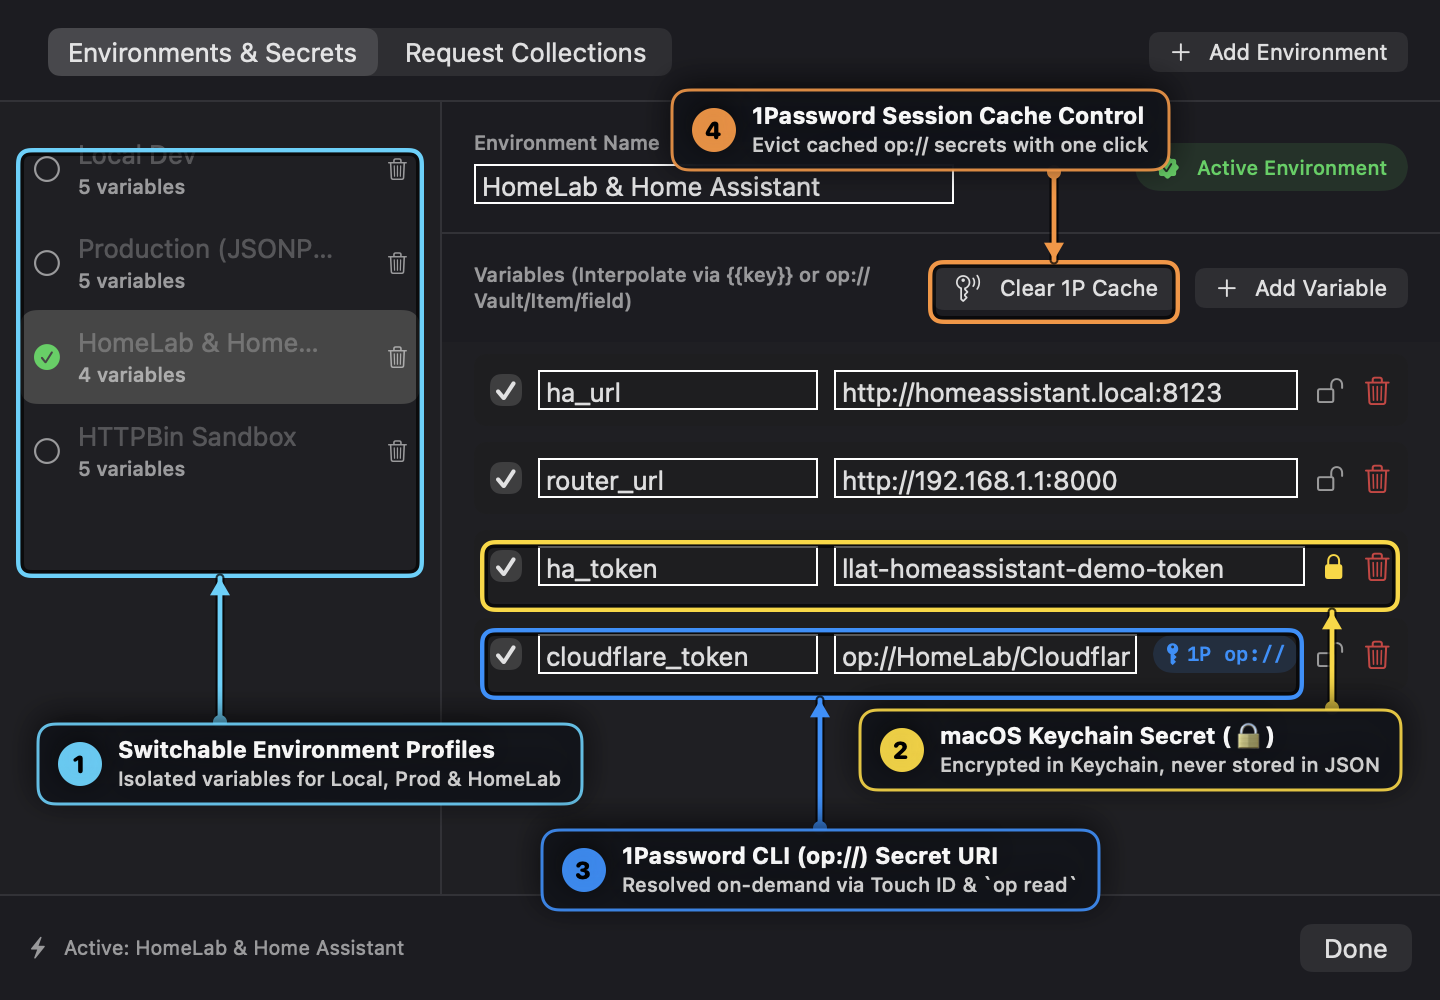
Visual Callout Guide
- ① Switchable Environment Profiles: Create dedicated profiles for each deployment target (
Local Dev,Production,HomeLab & Home Assistant,HTTPBin Sandbox). Switching the active profile immediately re-evaluates all{{variable}}placeholders across the workbench. - ② macOS Keychain Secrets (
🔒): Click the lock icon on any variable row to mark it as a Keychain Secret. Post stores the value in the native macOS Keychain (kSecClassGenericPasswordundercom.msjurset.post-mac.env) and omits the secret string from~/Library/Application Support/Post/workspace.json. - ③ 1Password CLI (
op://) Secret URIs: Paste a 1Password secret reference (op://Vault/Item/field) into any variable value—or use{{op://Vault/Item/field}}directly inline in a request header or Auth field. Post automatically detects the URI, displays a blue1P op://badge, and resolves the secret at request time viaop read --no-newline(prompting once via Touch ID). - ④ 1Password Session Cache Control: Resolved
op://secrets are cached in memory for the current app session so repeated requests don’t re-prompt Touch ID. Click Clear 1P Cache at any time to evict all cached secrets from memory.
3. Authentication Presets & Zero-Copy Response Chaining
Chain authentication responses directly into downstream requests without manual copy-paste.
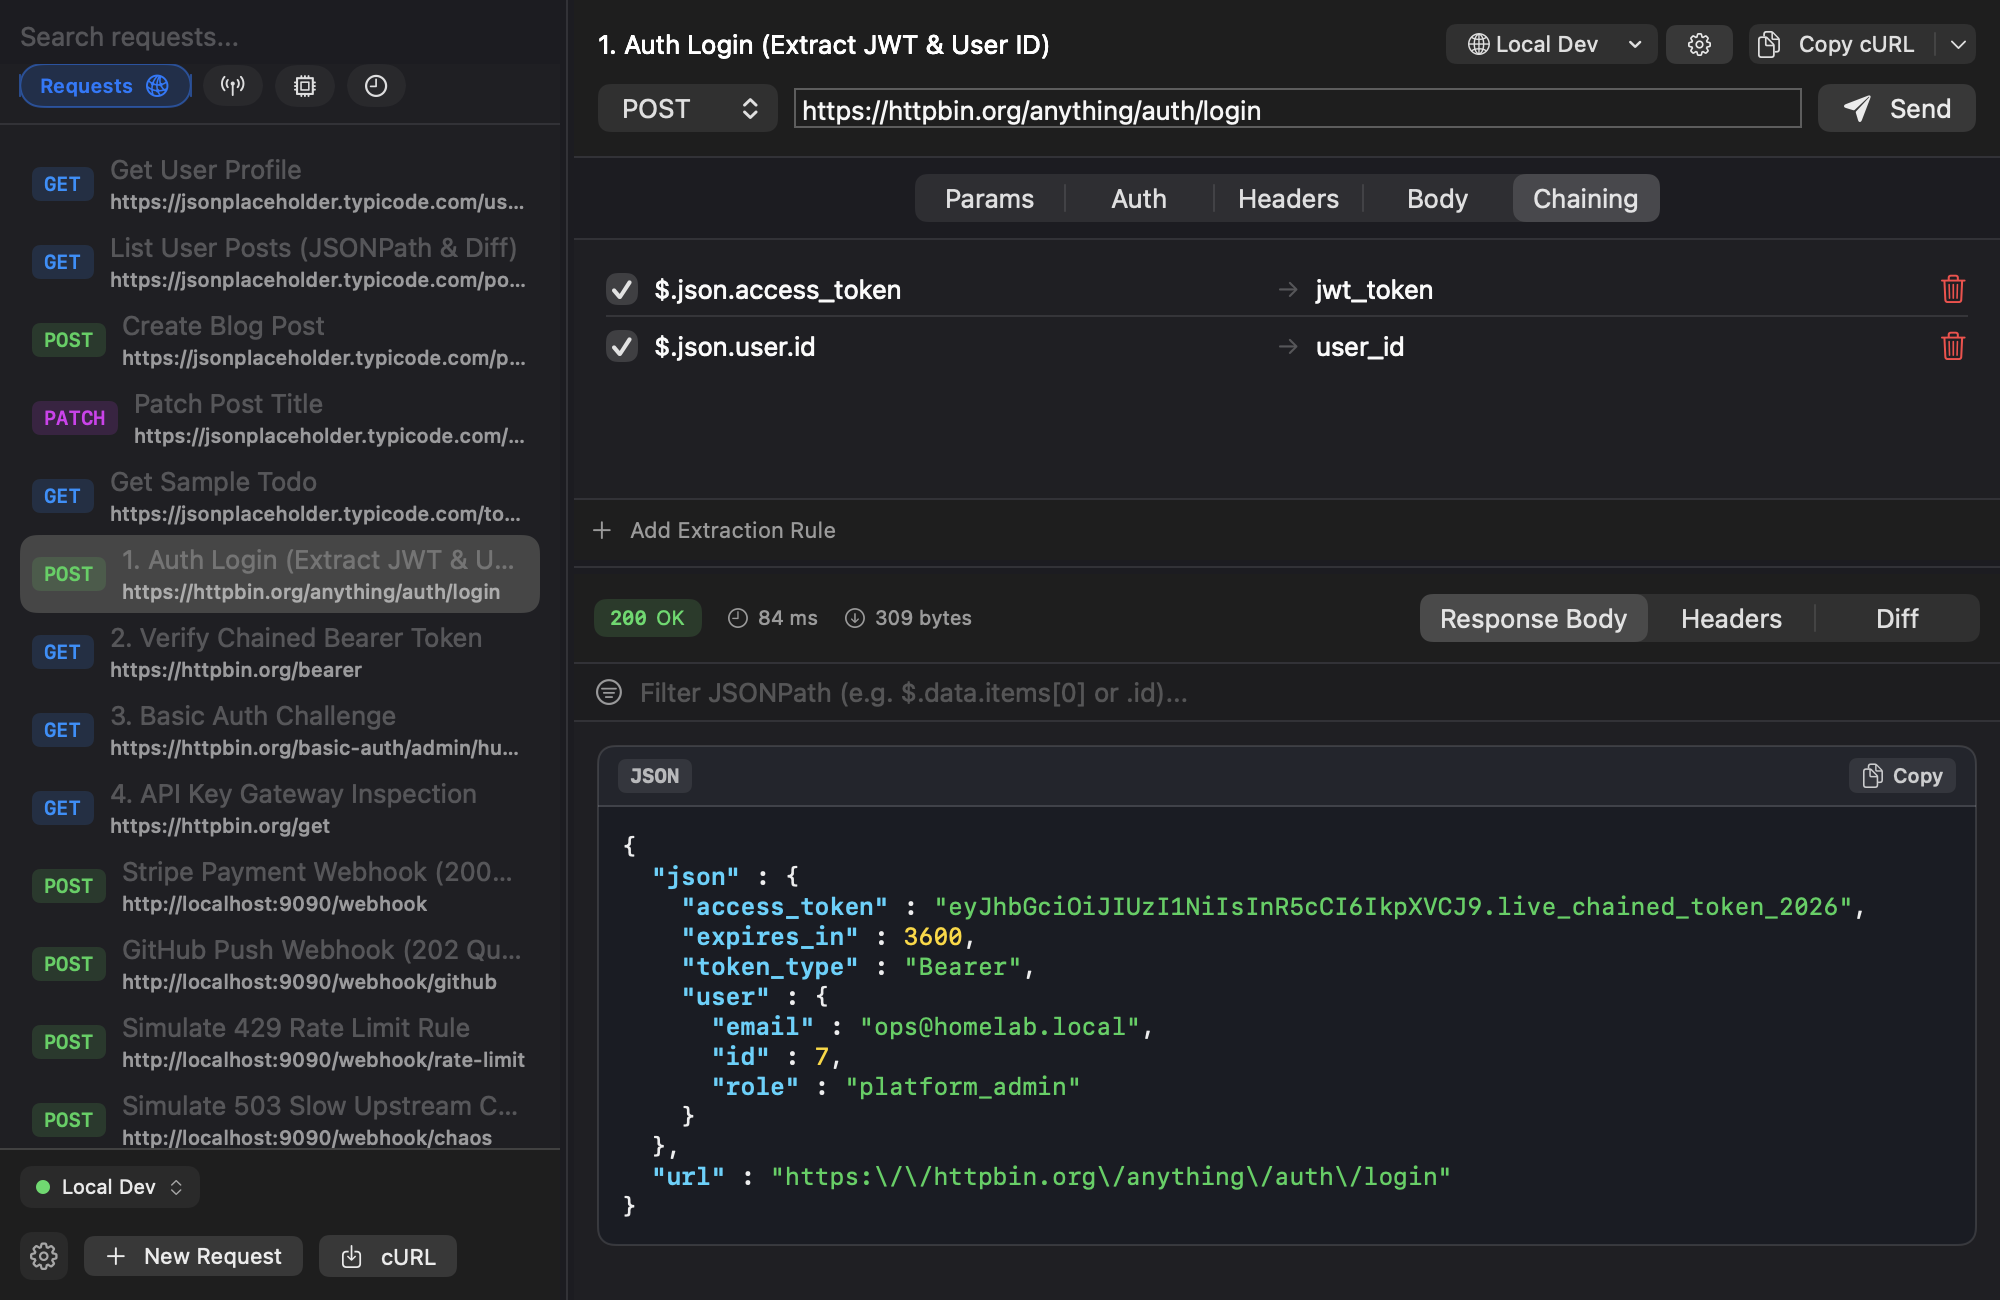
Step A: Extract Tokens on Login (Chaining Tab)
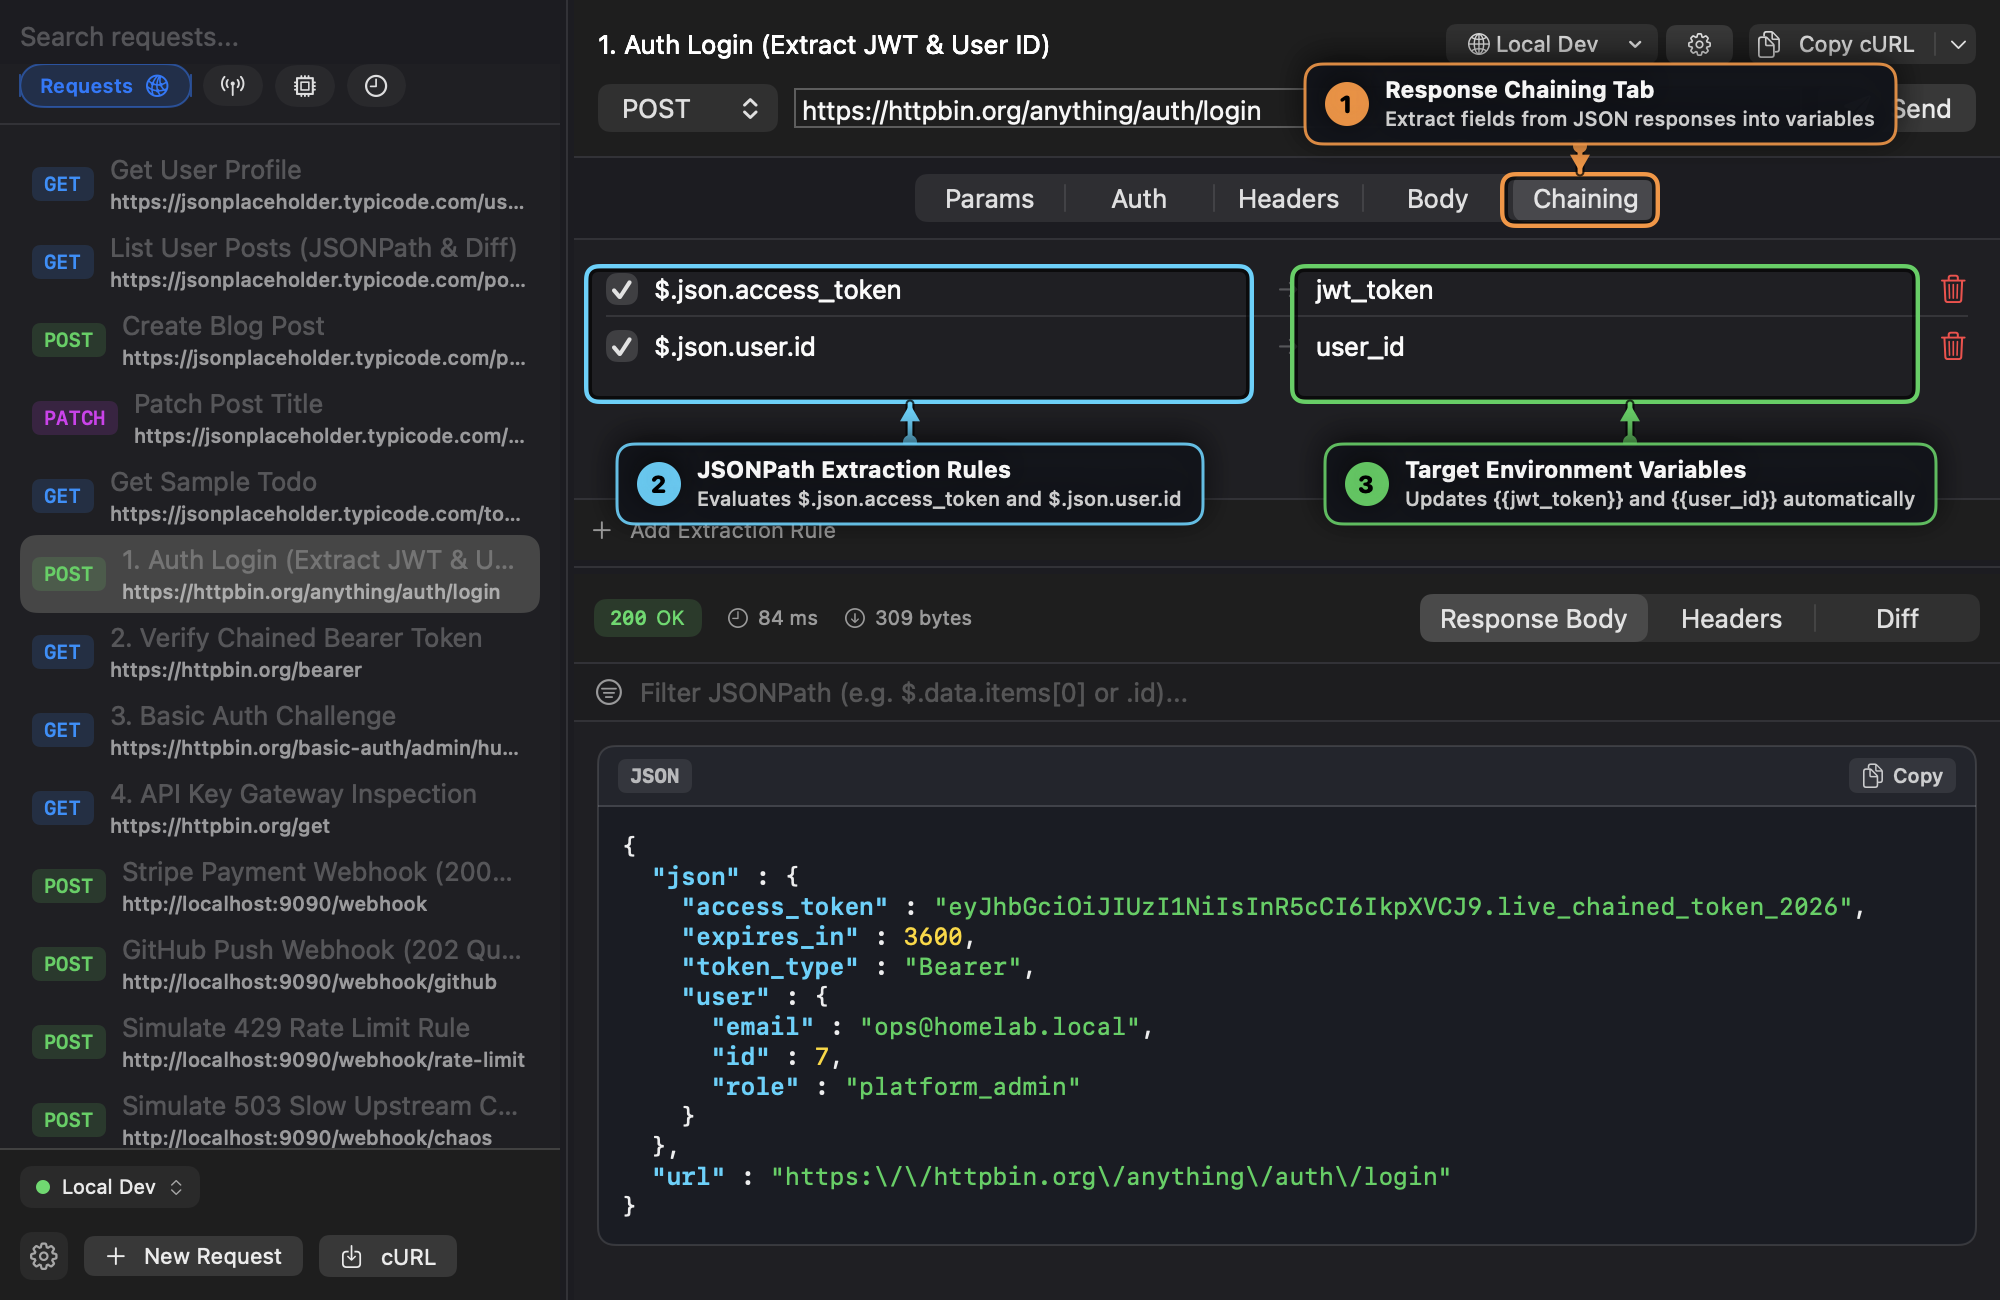
- ① Response Chaining Tab: Select the Chaining tab on any login or token-exchange request (e.g.,
1. Auth Login (Extract JWT & User ID)). - ② JSONPath Extraction Rules: Specify the JSONPath expression to evaluate against the response body (e.g.,
$.json.access_tokenand$.json.user.id). - ③ Target Environment Variables: Specify the environment variable name (
jwt_token,user_id) where the extracted value should be written upon receiving an HTTP response.
Step B: Consume Extracted Tokens (Auth Tab)
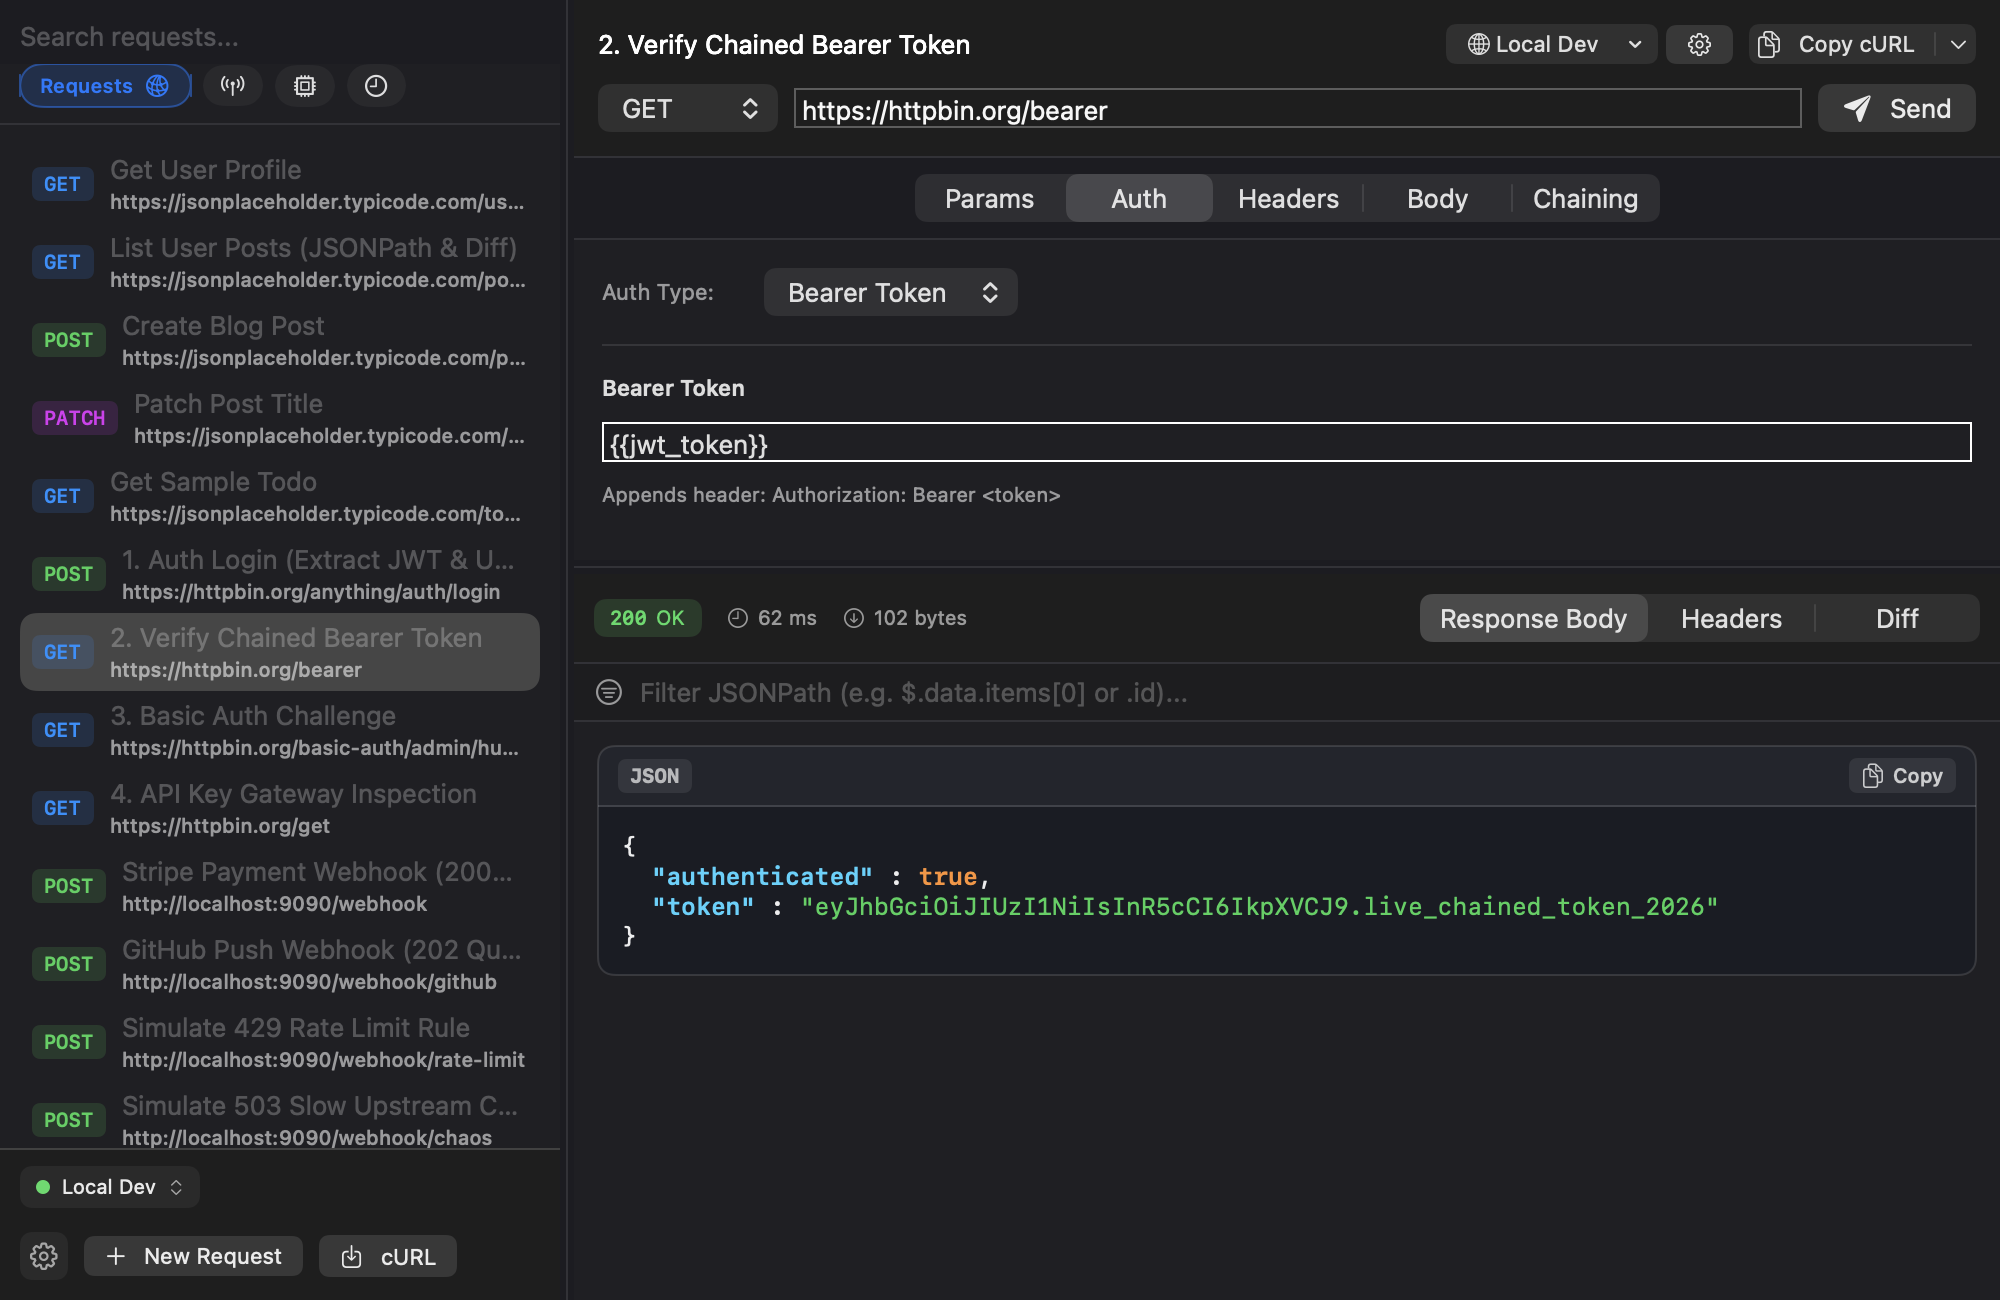
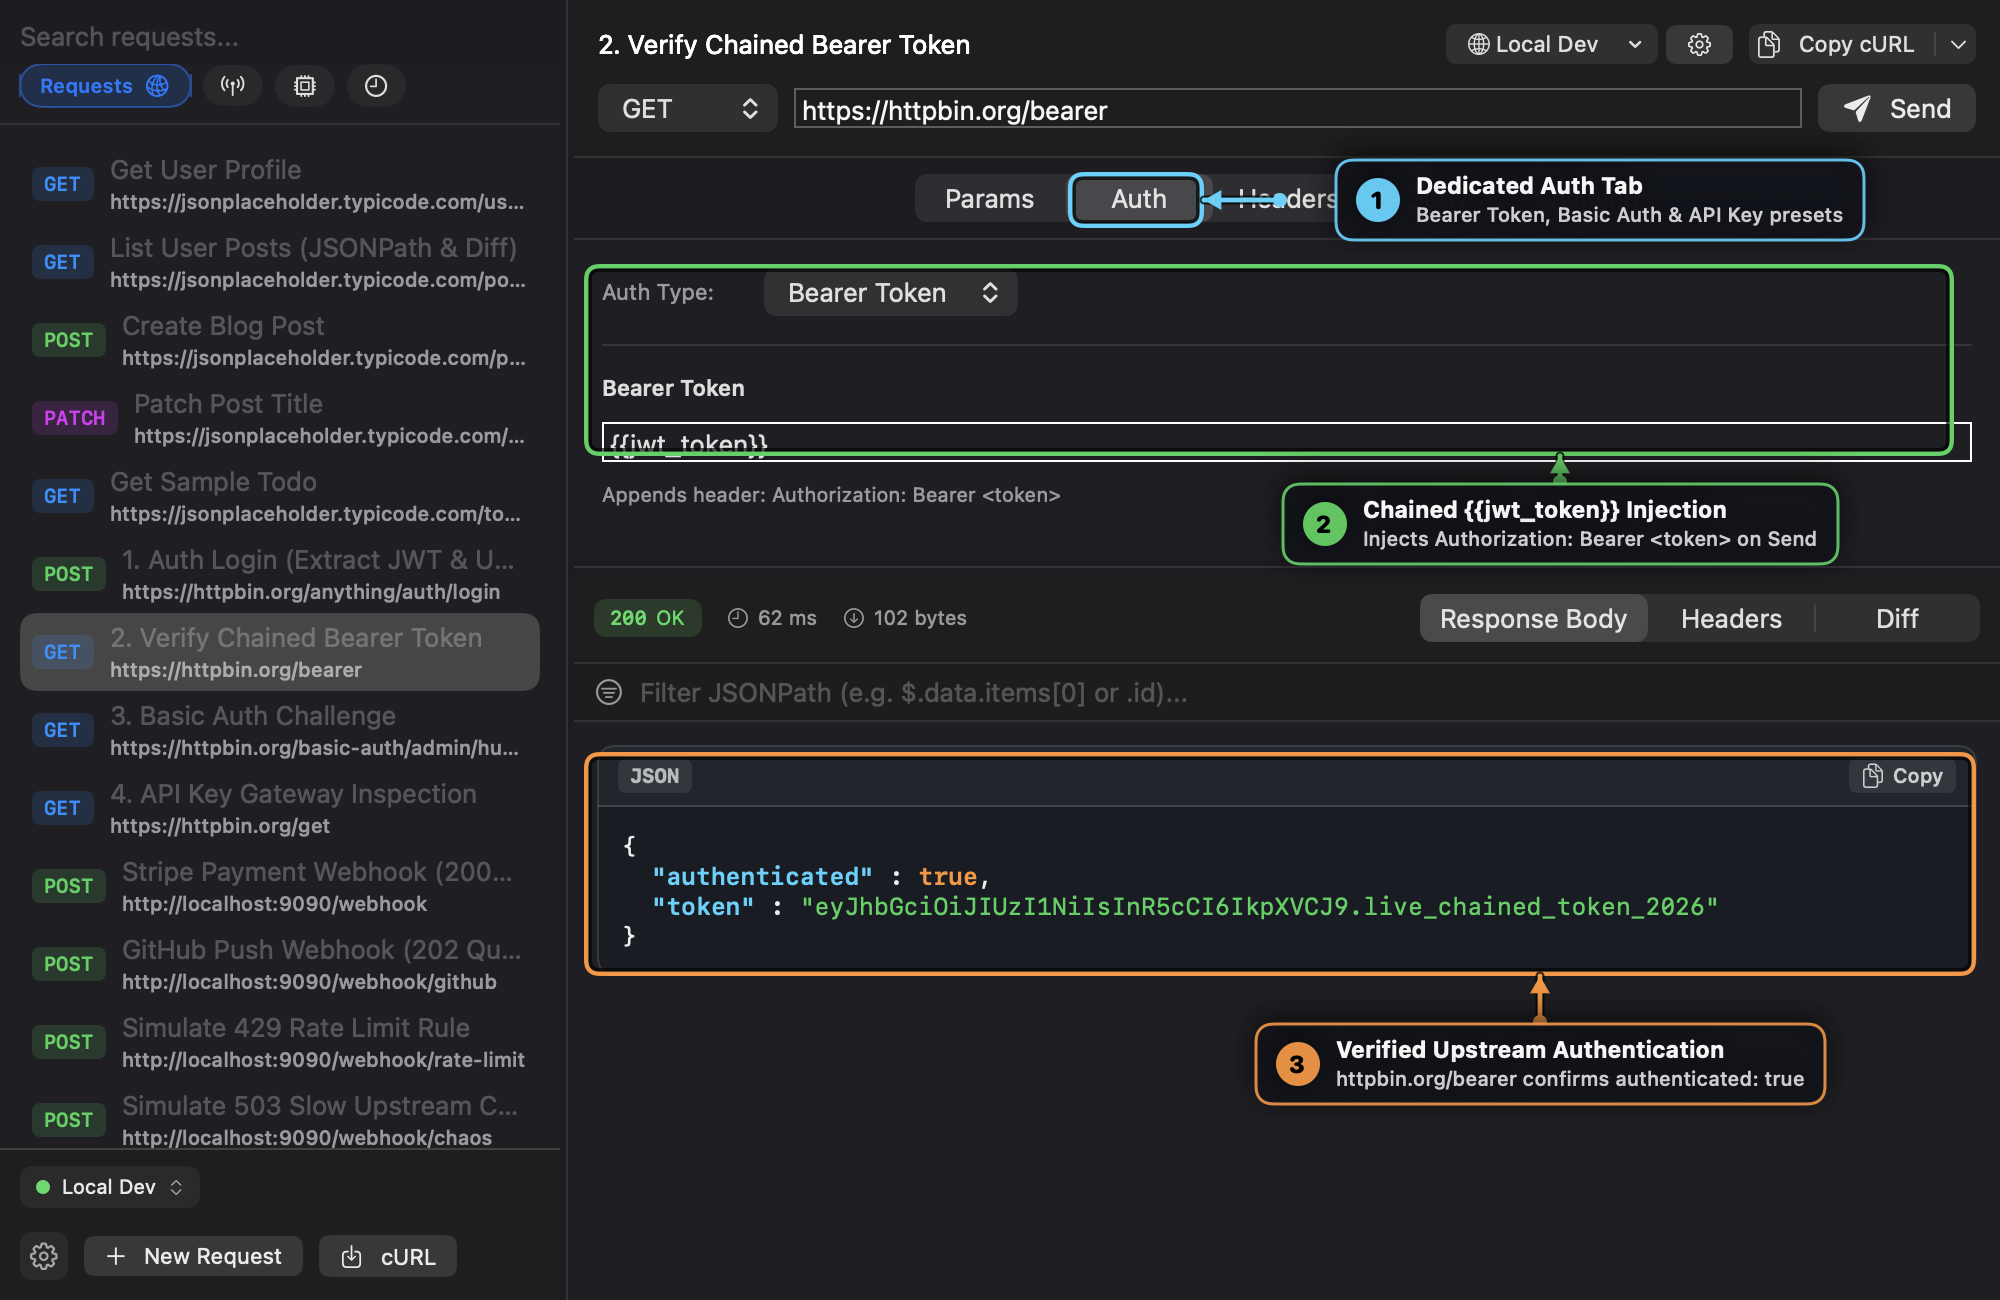
- ① Dedicated Auth Tab: Select the Auth tab on any downstream request and choose from None, Bearer Token, Basic Auth, or API Key (Header or Query Param).
- ② Chained
{{jwt_token}}Injection: Reference{{jwt_token}}in the Bearer Token field. Post automatically constructs theAuthorization: Bearer <token>header when sending the request or generating client code. - ③ Verified Upstream Authentication: The upstream server (
https://httpbin.org/bearer) confirms"authenticated": truewith the chained token.
4. JSONPath Querying, Response Diffing & Code Generation
Inspect API responses and audit schema or data changes across runs.
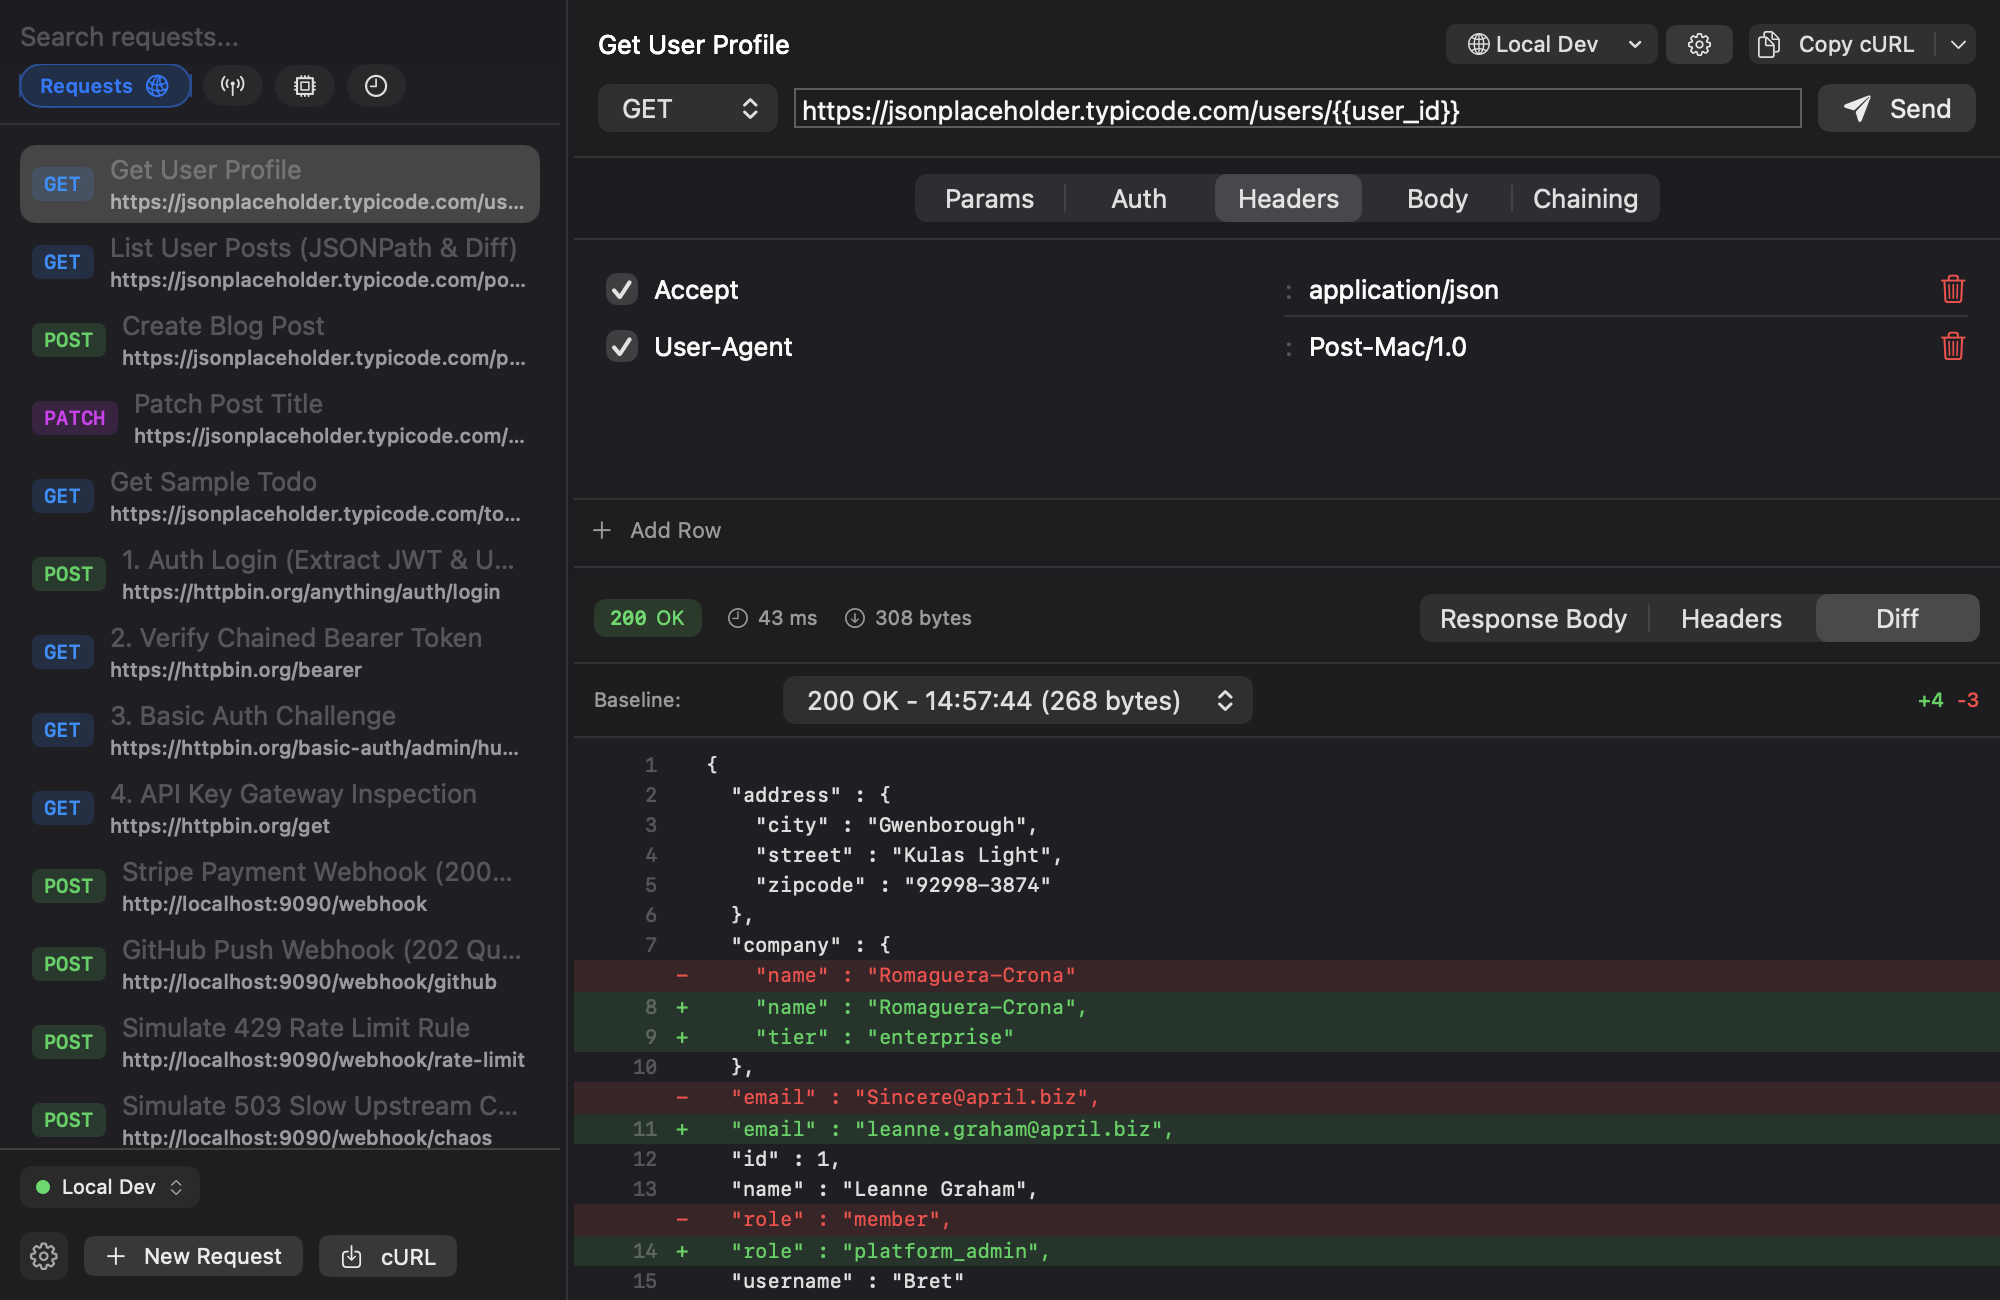
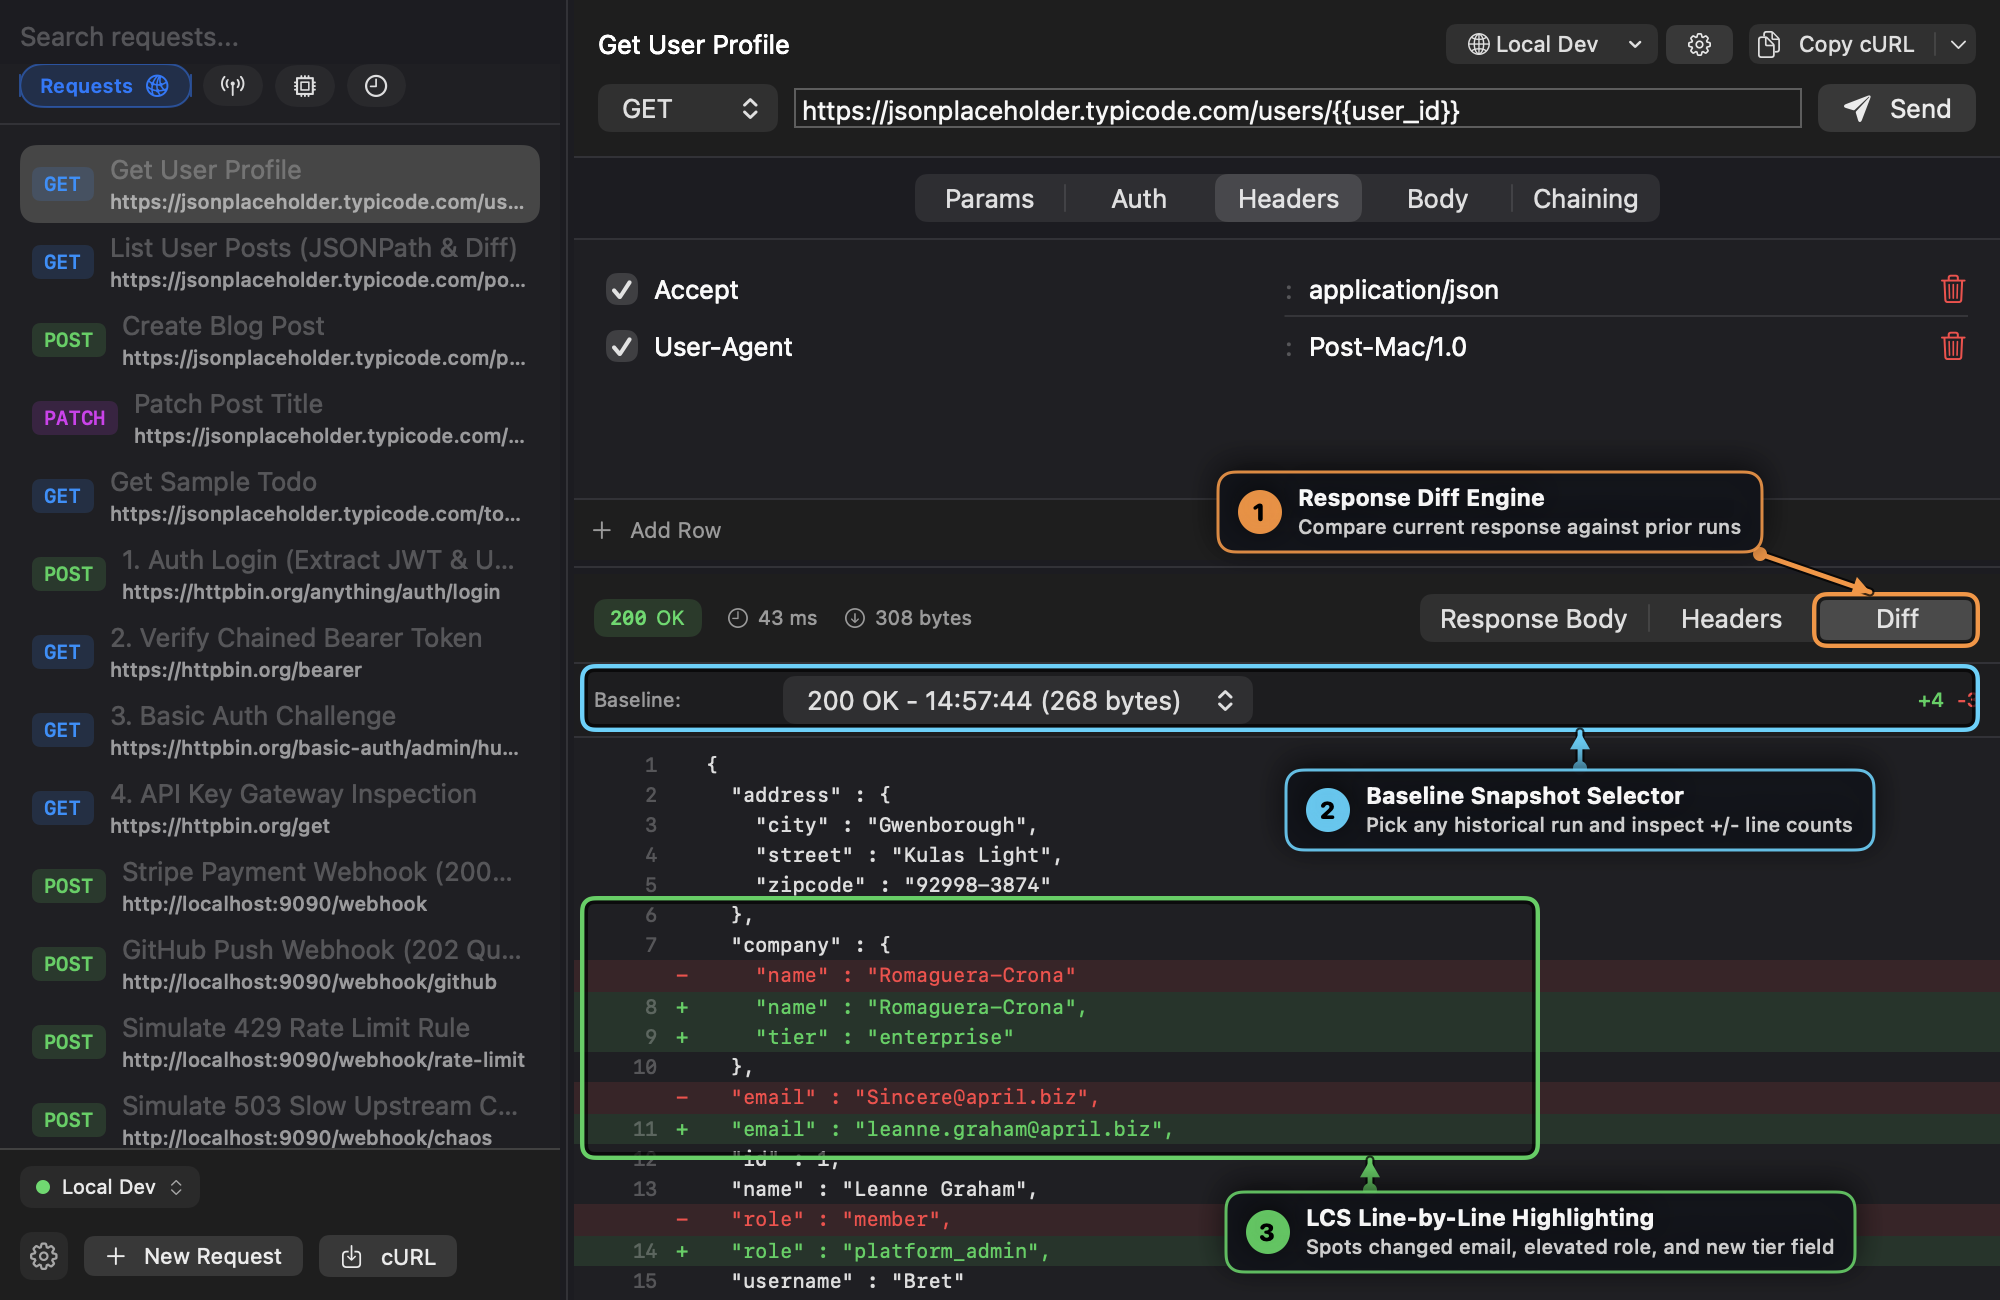
Visual Callout Guide
- ① Response Diff Engine: Switch the response sub-tab from Response Body to Diff to compare the current response against prior runs of the same request.
- ② Baseline Snapshot Selector: Choose any previous response from the Baseline dropdown menu and view the total added (
+4) and removed (-3) line counts on the right. - ③ LCS Line-by-Line Highlighting: Post runs a Longest-Common-Subsequence (LCS) line diff over the pretty-printed JSON payloads, highlighting removed lines in red (
-) and newly added or mutated fields in green (+).
5. Local Webhook Listener, Mock Rules & Live Replay
Post embeds a zero-dependency local HTTP server (NWListener) so you can capture, mock, delay, and replay webhooks locally.
Captured Payloads, Live Replay & Workbench Export
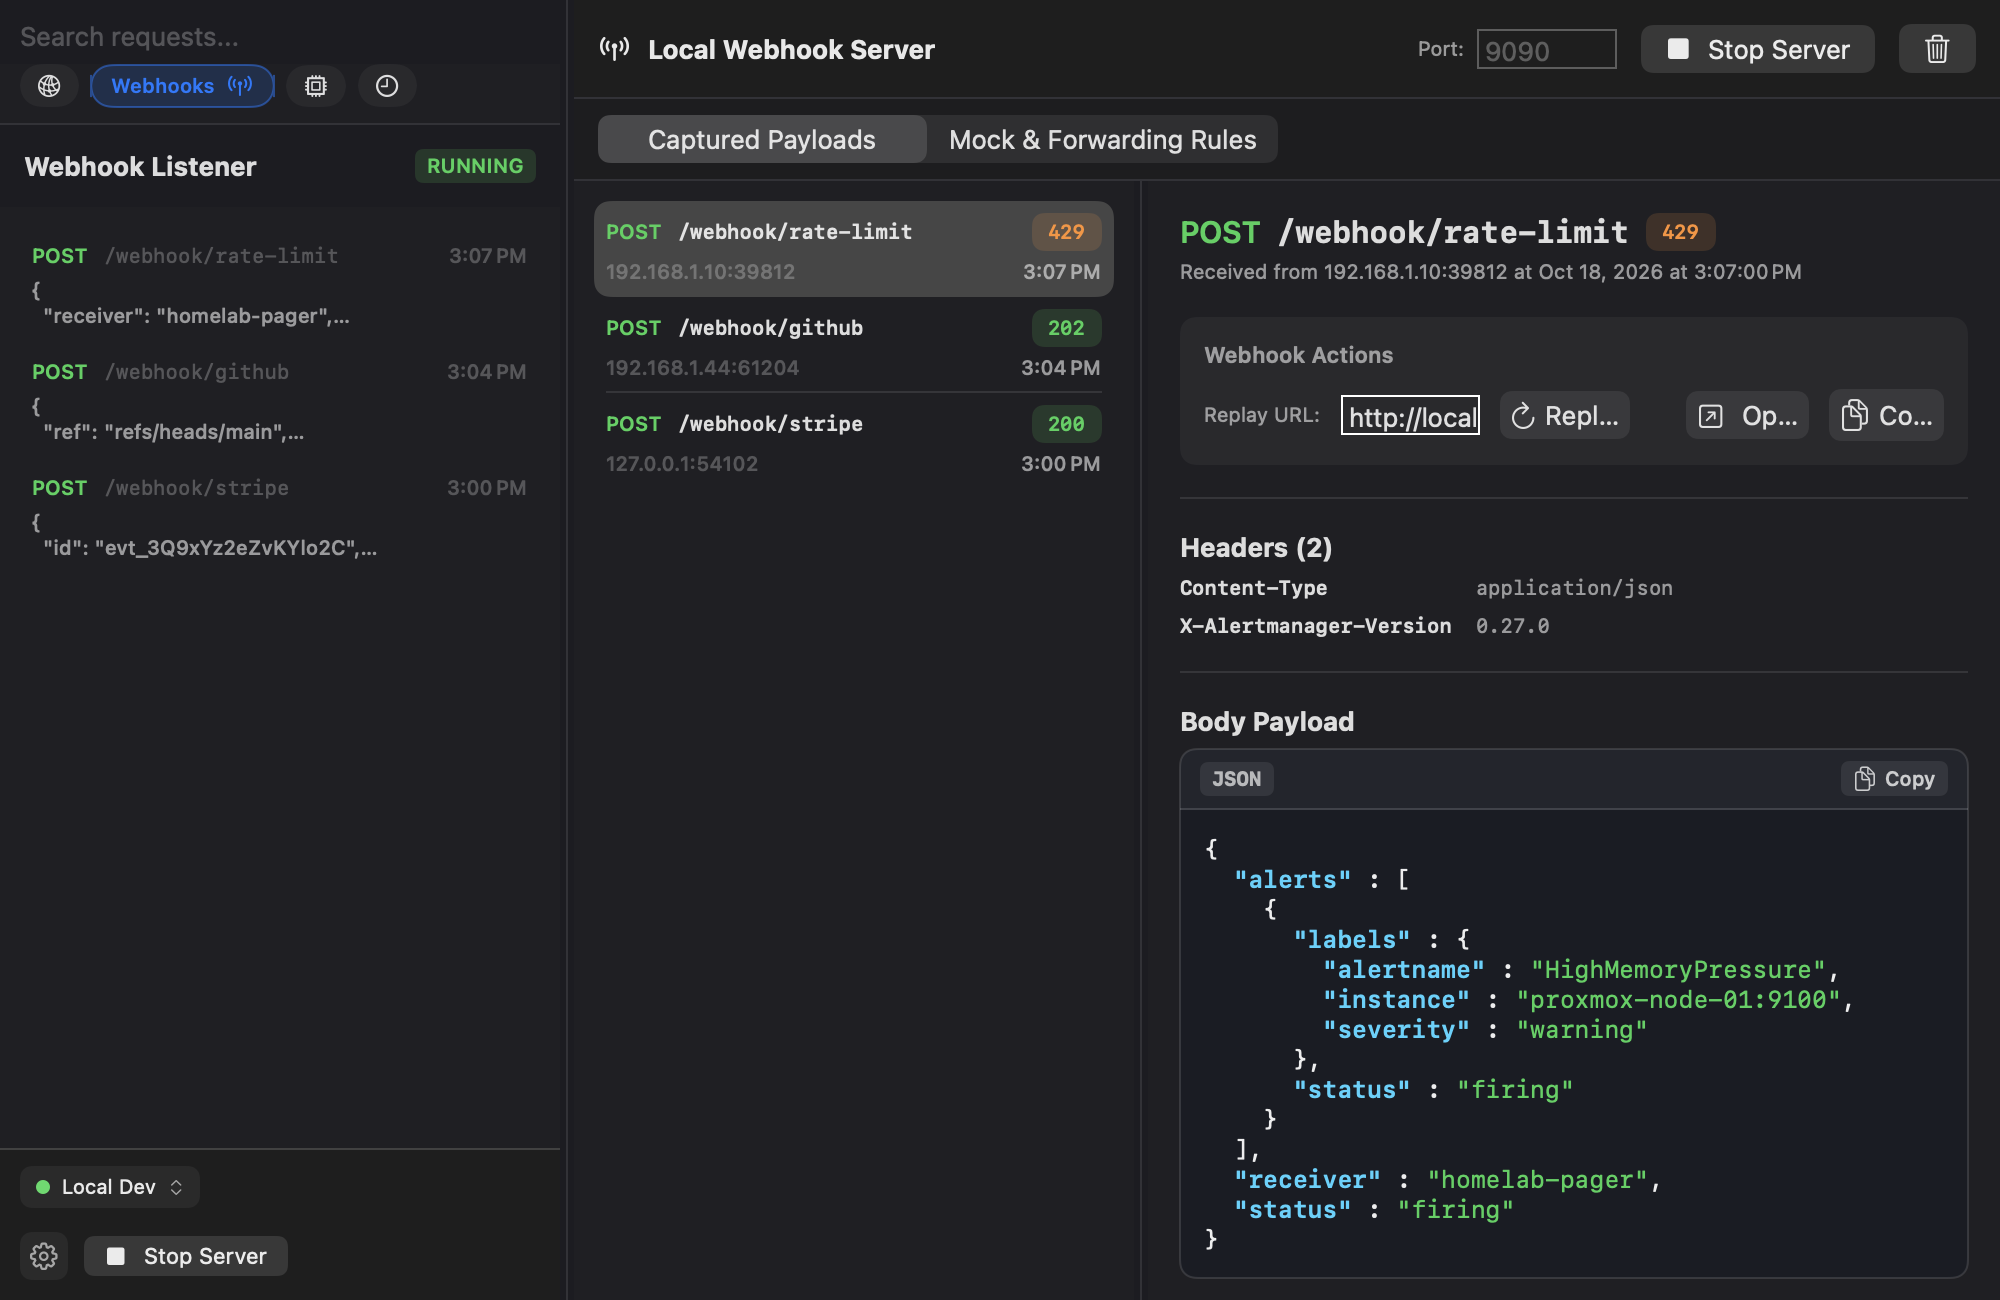
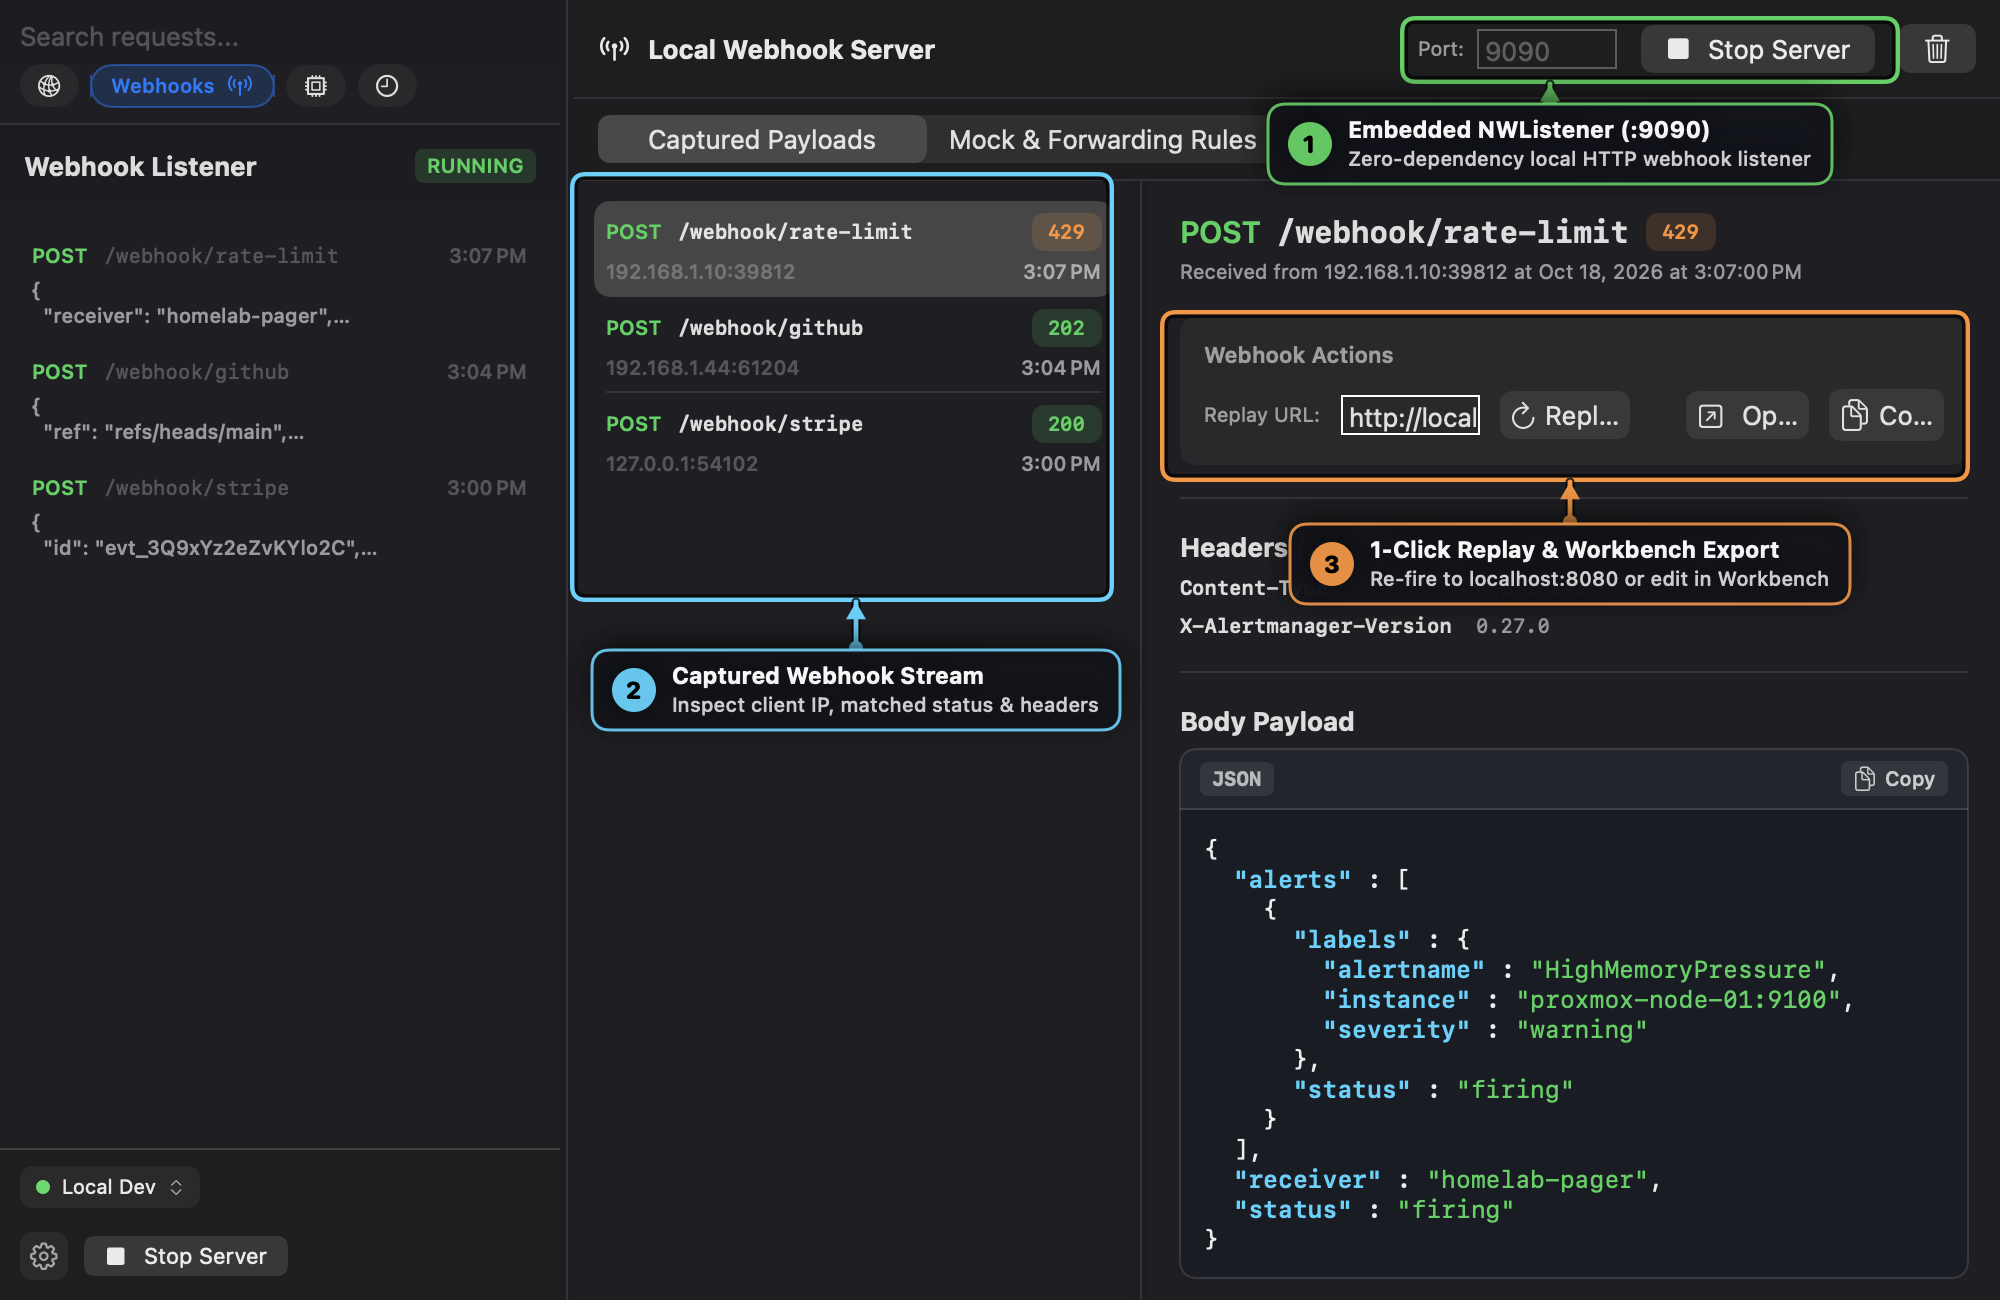
- ① Embedded
NWListener(:9090): Configure the listening port (default9090) and start/stop the server from the header or sidebar footer. - ② Captured Webhook Stream: Inspect every incoming webhook in real time, including the HTTP method, path, client IP/port, timestamp, and the status code returned (
429,202,200). - ③ 1-Click Replay & Workbench Export:
- Replay Now: Re-fire the captured webhook payload (method, headers, and body) to any local microservice URL (e.g.,
http://localhost:8080/webhook). - Open in Workbench: Convert the captured webhook into a permanent, editable request inside the HTTP Workbench.
- Copy cURL: Copy a runnable
curlcommand reproducing the exact webhook call.
- Replay Now: Re-fire the captured webhook payload (method, headers, and body) to any local microservice URL (e.g.,
Mock Rules, Artificial Latency & Auto-Forwarding
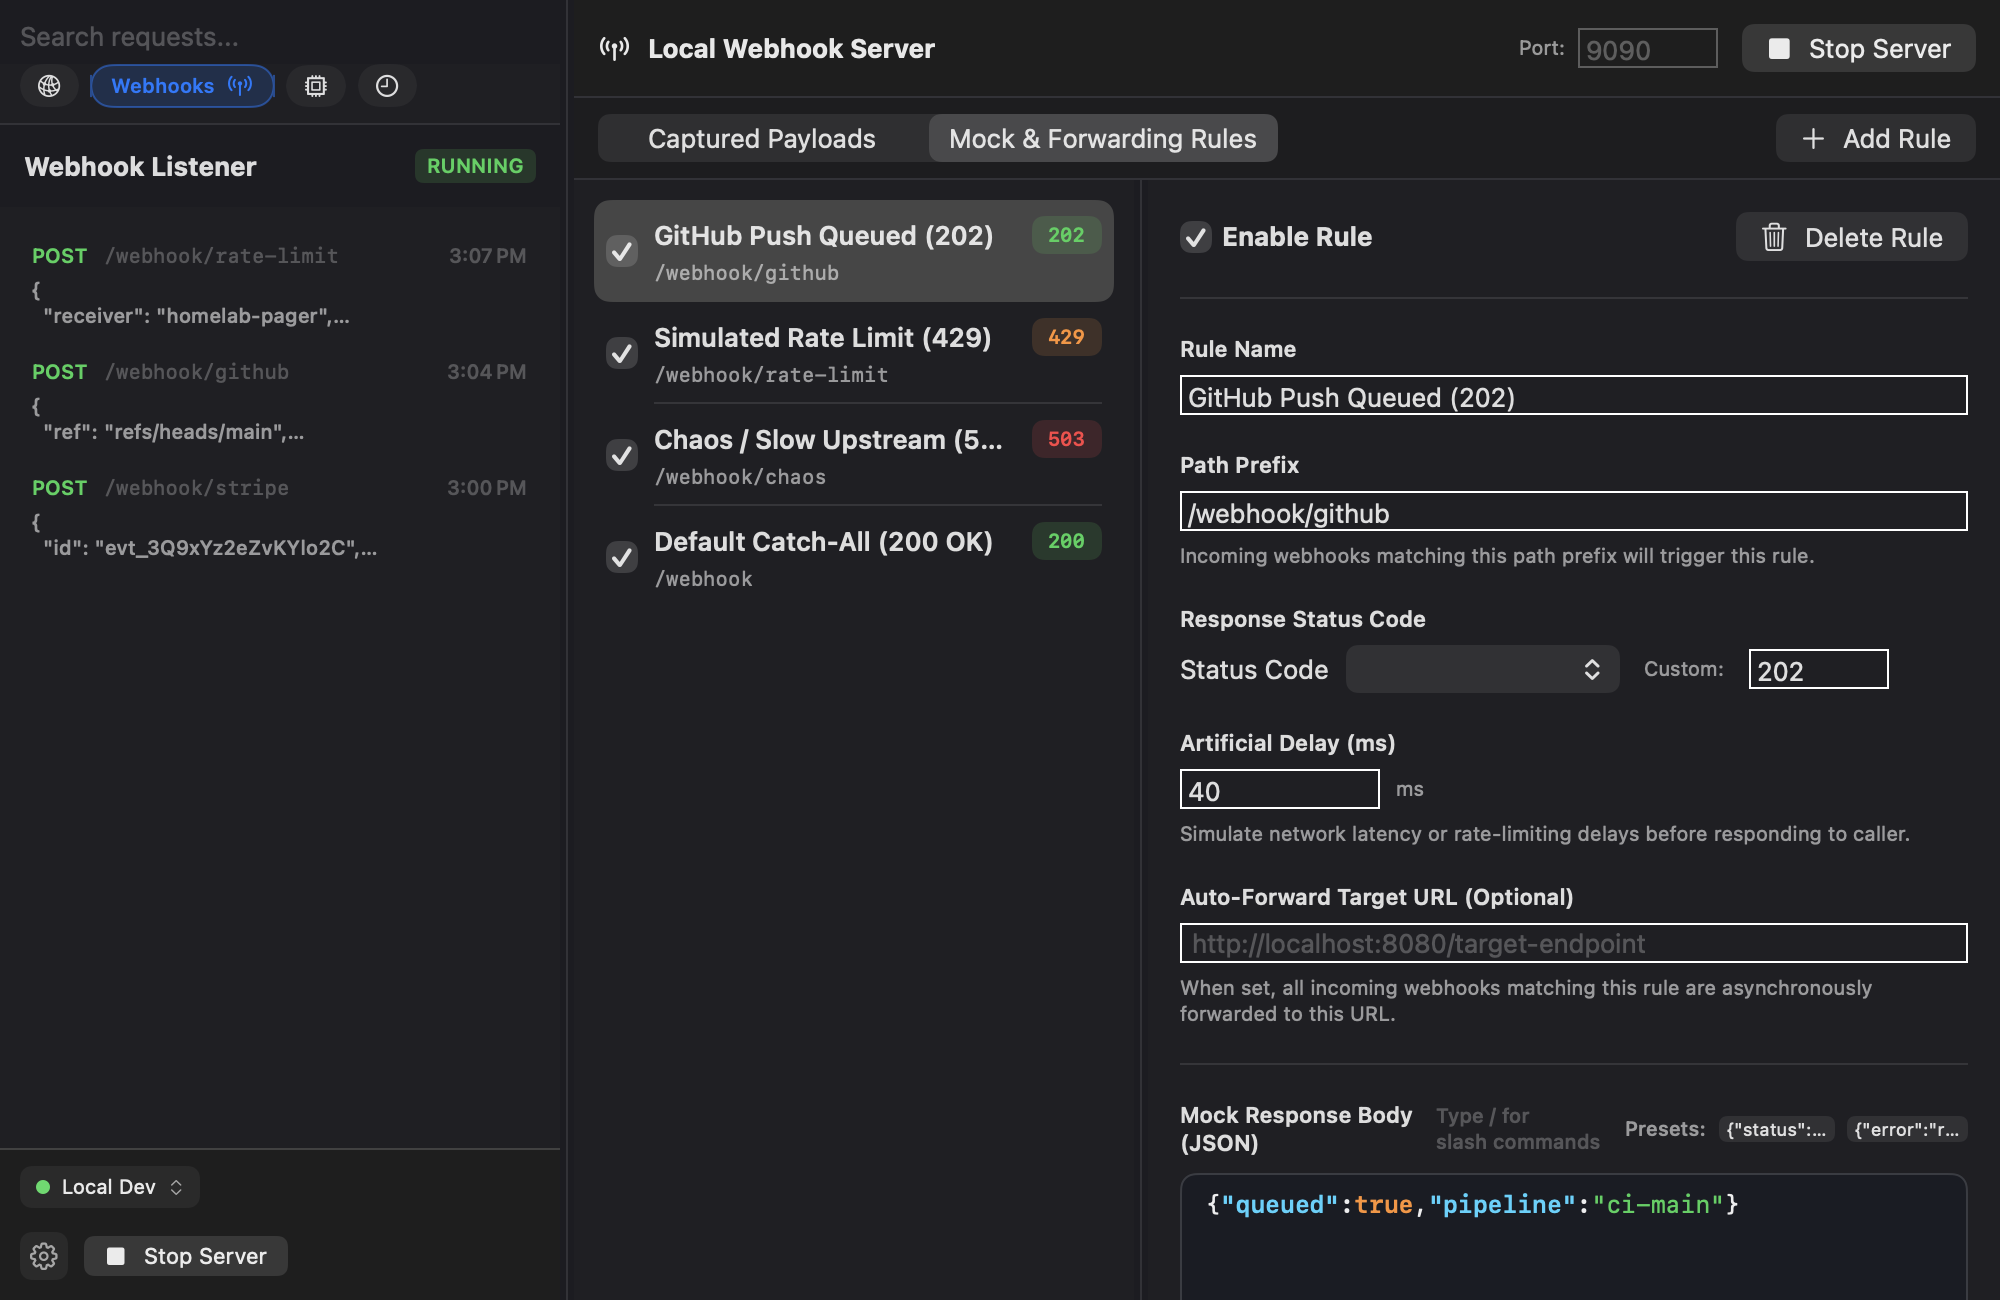
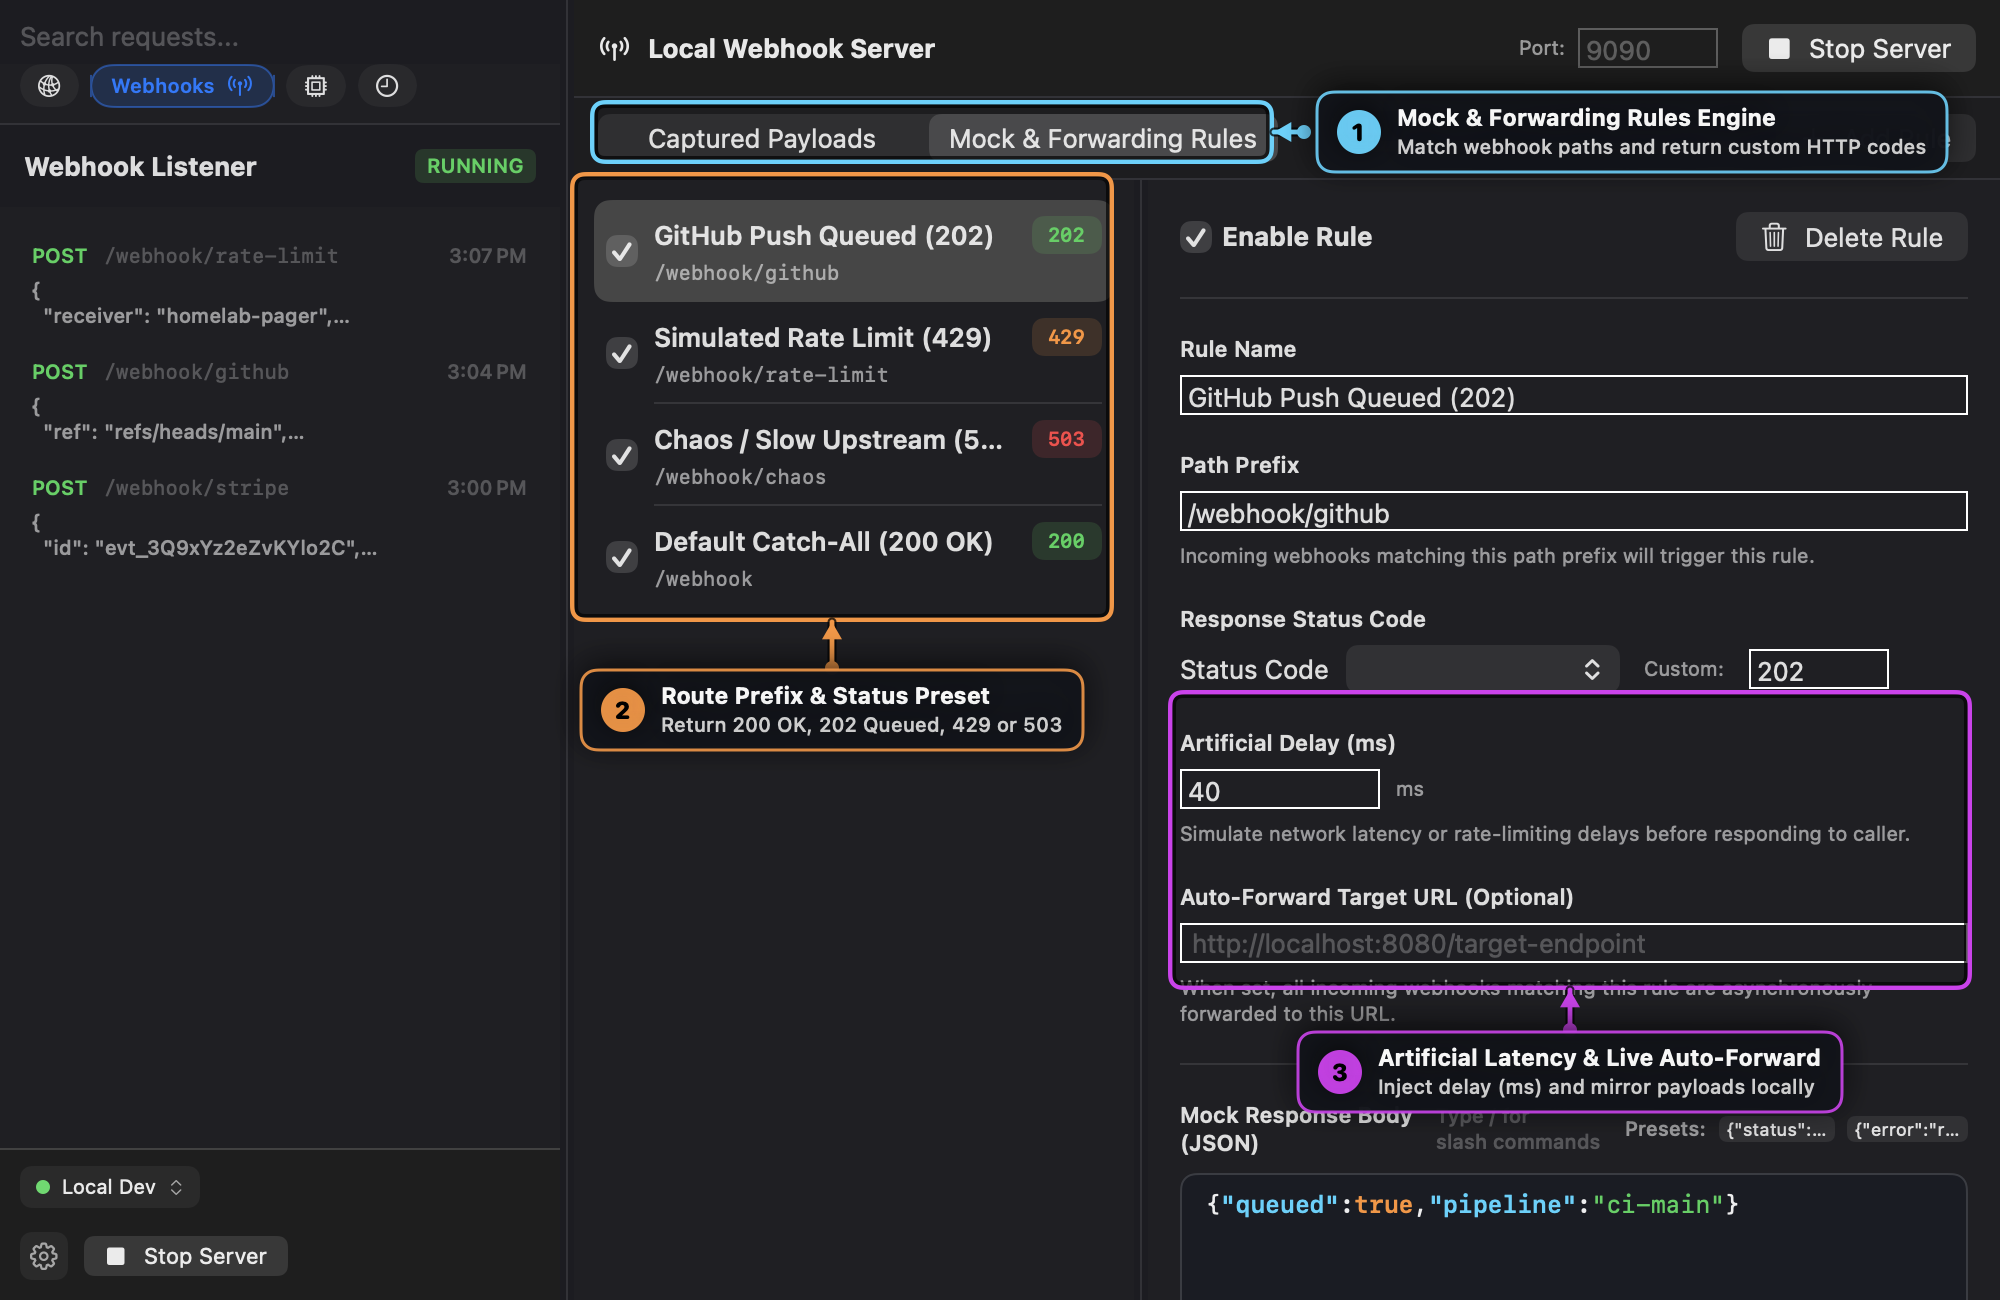
- ① Mock & Forwarding Rules Engine: Switch to Mock & Forwarding Rules to define how the local listener responds to specific URL path prefixes.
- ② Route Prefix & Status Presets: Match paths like
/webhook/github,/webhook/rate-limit, or/webhook/chaosand return200 OK,202 Accepted,429 Too Many Requests, or503 Service Unavailable. - ③ Artificial Latency & Live Auto-Forward:
- Artificial Delay (
ms): Pause before returning the HTTP response (e.g.,1200 ms) to test timeout handling and exponential backoff in your callers. - Auto-Forward Target URL: Automatically mirror matching incoming webhooks to a downstream local server in real time.
- Artificial Delay (
6. Model Context Protocol (MCP) Inspector (HTTP/SSE & stdio)
Test, debug, and audit Model Context Protocol (MCP) servers over both HTTP / SSE and local stdio subprocesses.
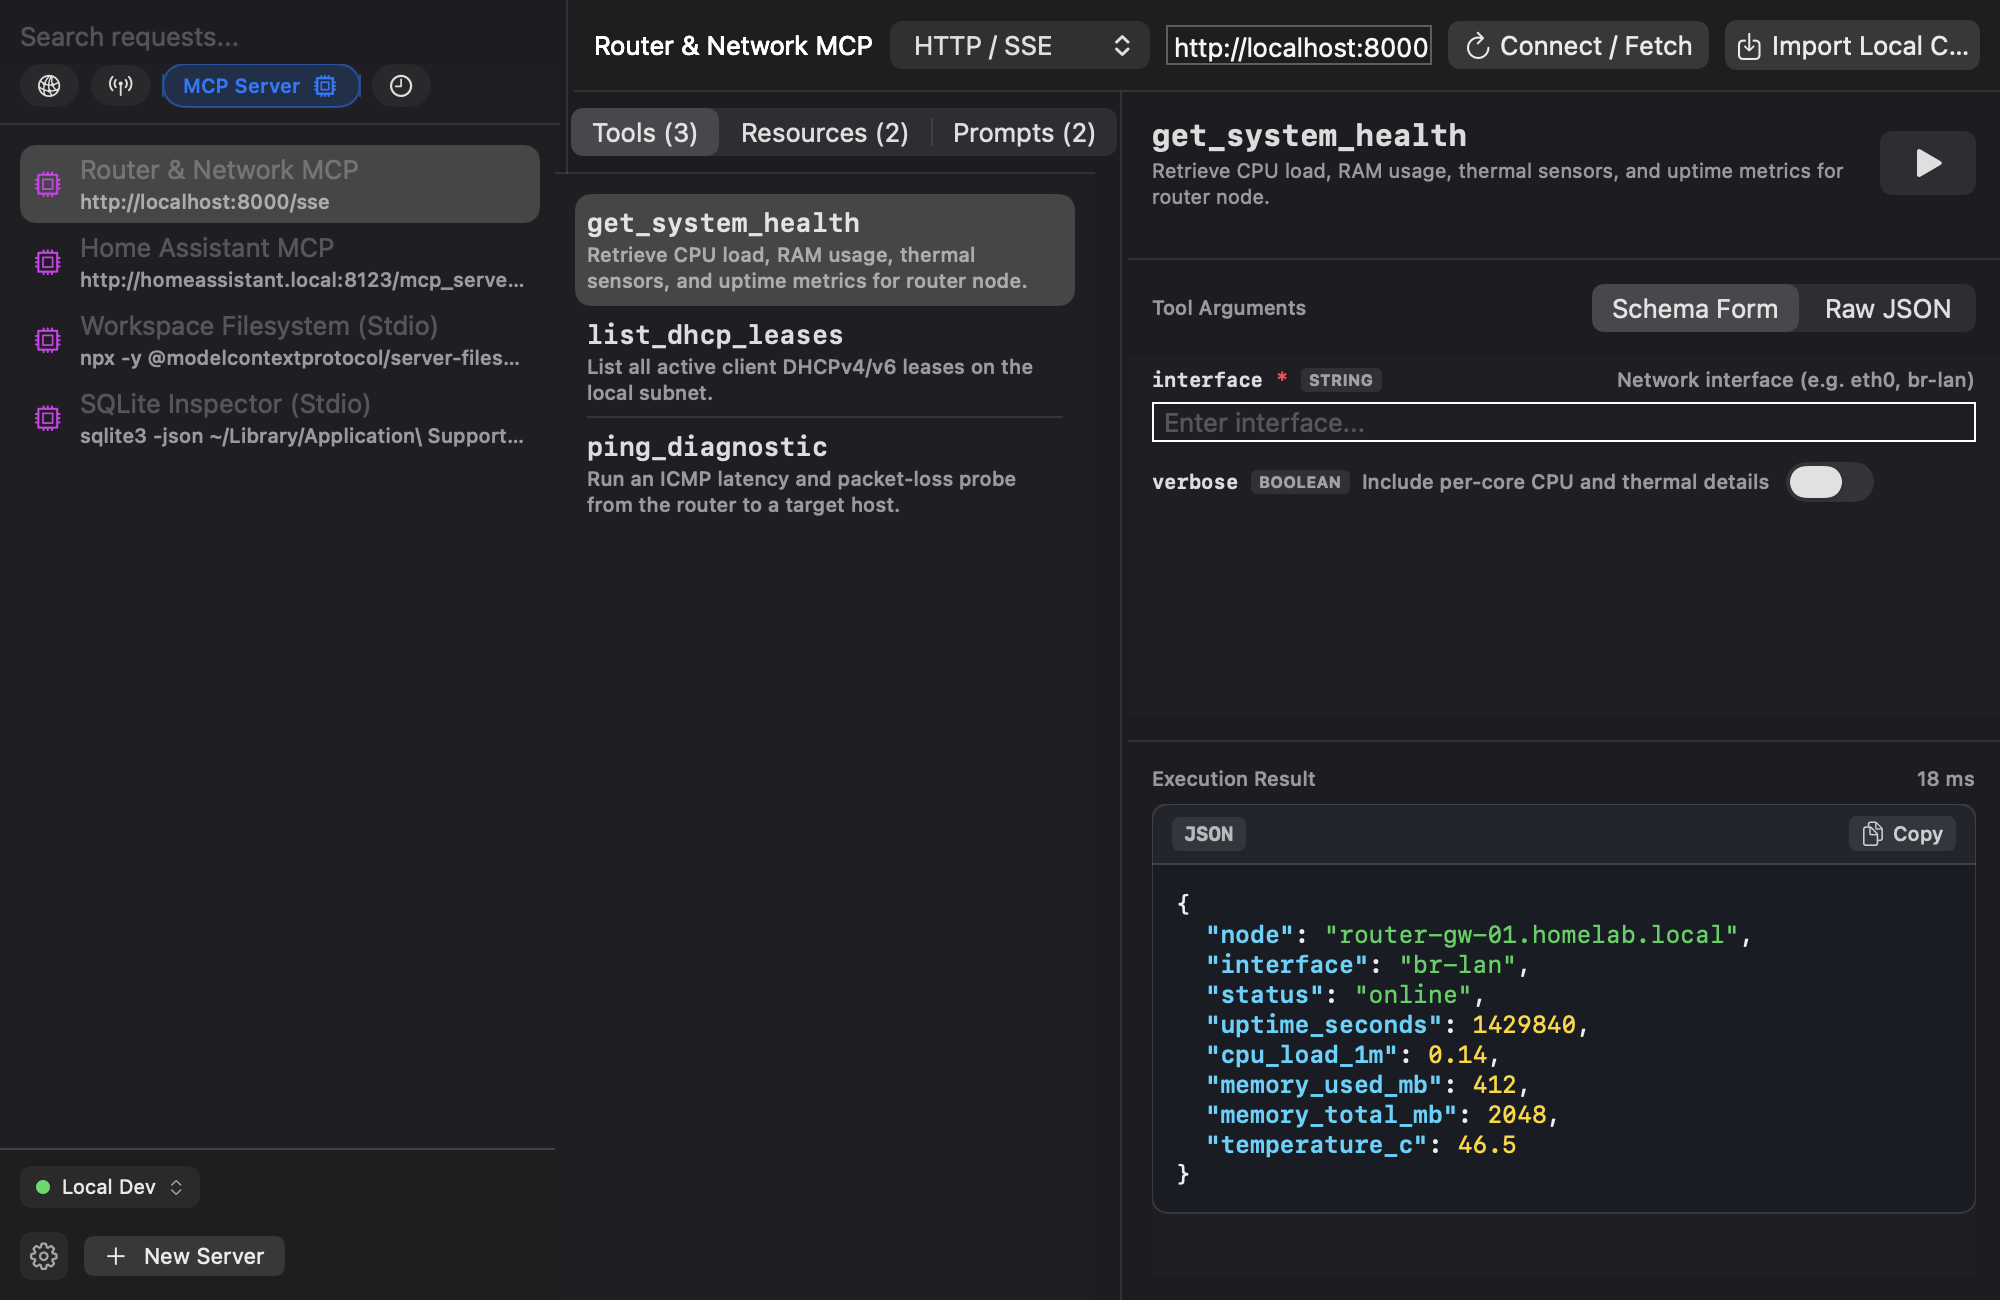
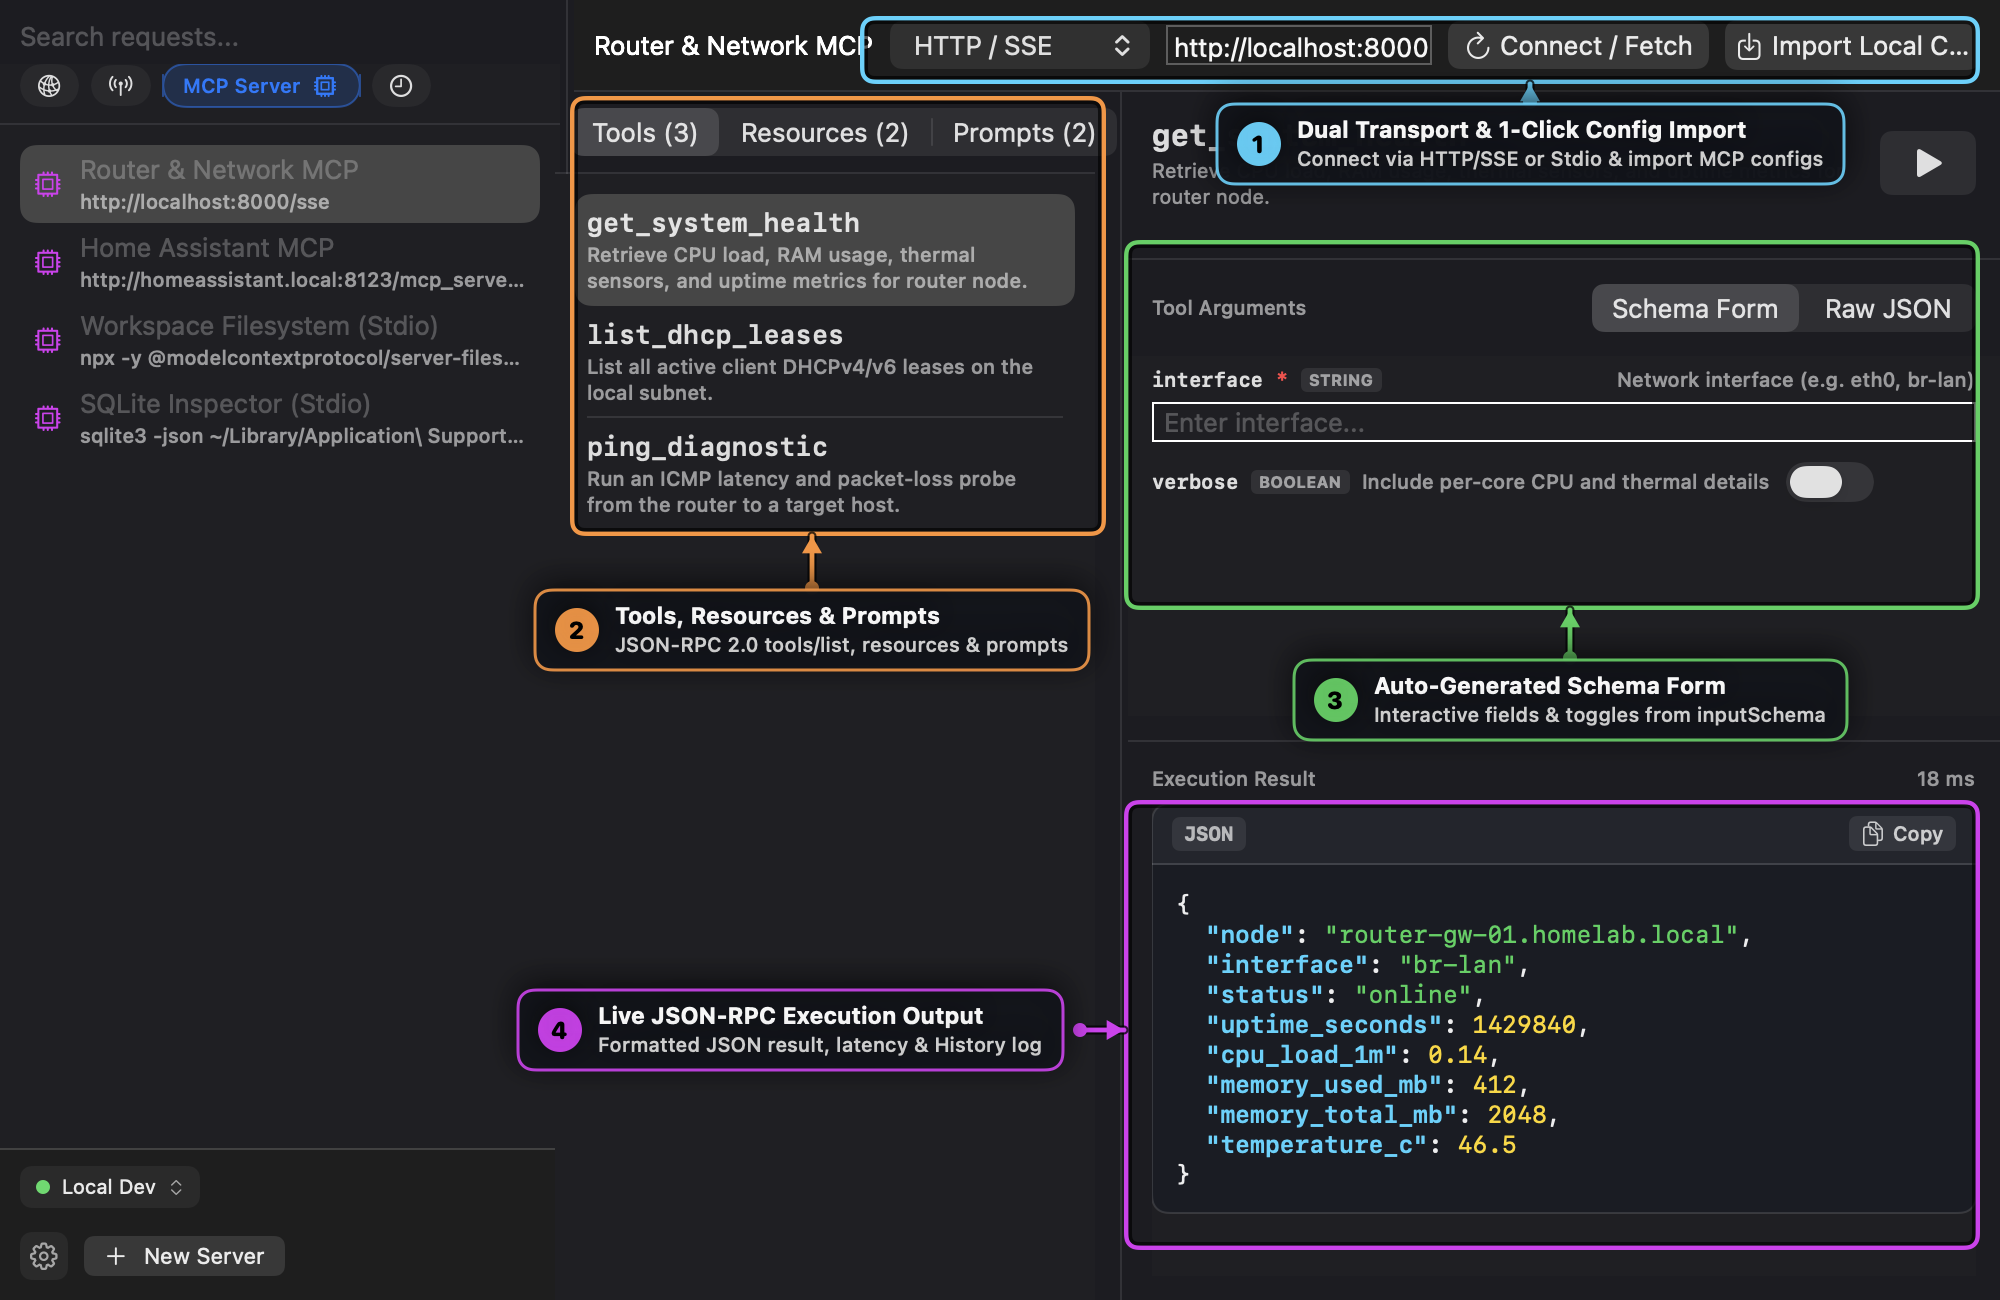
Visual Callout Guide
- ① Dual Transport & 1-Click Config Import:
- Choose between HTTP / SSE (for web/gateway MCP servers) and Stdio Command (spawns local CLI servers via
npx,uvx,python3, orsqlite3over stdin/stdout JSON-RPC 2.0). - Click Import Local Configs to automatically scan
~/.gemini/antigravity-cli/mcp/,~/.cursor/mcp.json, and Claude Desktop configurations.
- Choose between HTTP / SSE (for web/gateway MCP servers) and Stdio Command (spawns local CLI servers via
- ② Tools, Resources & Prompts: Browse discovered tools (
tools/list), server resources (resources/list), and prompt templates (prompts/list) in the left pane. - ③ Auto-Generated Schema Form: In Schema Form mode, Post parses each tool’s JSON Schema (
inputSchema) into typed input fields, required badges (*), descriptions, and boolean toggles—or switch to Raw JSON for freeform editing. - ④ Live JSON-RPC Execution Output: Click the green Play button to execute
tools/call, inspect the formatted JSON output and execution latency (18 ms), and record the call in Activity History.
7. Stash-Model Auto-Suggest & Keyboard Navigation
Post’s search bar implements the Stash model for predictable, flicker-free keyboard filtering:
Supported Filter Tokens
method::GET,POST,PUT,DELETE,PATCH,HEAD,OPTIONSstatus::200,201,204,400,401,403,404,429,500type::HTTP,Webhook,MCPhost:: Dynamically extracted hostnames from your workspace (jsonplaceholder.typicode.com,httpbin.org,localhost,homeassistant.local)collection:: Collection folder names
Keyboard Shortcuts
| Shortcut | Action |
|---|---|
⌘ + Return | Execute current HTTP request |
⌘ + N | Create new HTTP request |
⌘ + K or ⌘ + F | Focus tokenized search bar |
⌘ + E | Open Environments, Secrets & Collections sheet |
⌘ + , | Open Editor Settings (Slash Commands, Vim Mode, Syntax Highlighting) |
Tab / Down Arrow | Open suggestion dropdown or advance highlight / cycle slash pills |
Shift + Tab / Up Arrow | Move suggestion highlight or slash pill backward |
Enter | Commit highlighted token or slash command |
Esc | Dismiss dropdown / exit Vim Insert or Visual mode |
8. Code Syntax Highlighting, Vim Engine, Slash Commands & Settings (⌘,)
- Code Syntax Highlighting: All read-only response panes (
Response Body,JSONPathresults,Webhook Payload Body,MCP Execution Result) and live multiline editors highlight JSON keys (cyan), strings (green), numbers (yellow), booleans/null (orange),{{template_var}}tokens (pink),op://1Password references (teal), and cURL flags/commands. - Subtle Watermark (
:_) & Vim Mode (swift-vim-engine):- Toggling Enable Vim Mode Support ON in Settings never forces text areas into Vim mode by default—every editor starts in standard editing mode (
VIM=OFF). - Click the subtle
:_watermark in the bottom-right corner of any multiline editor (or type/vim) to activate Vim Normal mode (VIM:N,VIM:I,VIM:V). - Click the
?icon next to theVIM:Nbadge to open the interactive Vim Mode Cheatsheet popover, or click×(or:q) to exit back to standard editing.
- Toggling Enable Vim Mode Support ON in Settings never forces text areas into Vim mode by default—every editor starts in standard editing mode (
- Dynamic-Growth Slash Command Bar:
- Type
/at the start of a line in any multiline editor to dynamically expand the field and reveal the slash command bar (no permanent blank line is ever reserved when idle). - Cycle pills with
Tab/Shift+Tab/Up/Downand pressEnterorSpaceto execute:/vim— Toggle Vim normal mode/pretty— Pretty-print / format the JSON buffer/json— Insert a structured JSON payload template/graphql— Insert a GraphQL query and variables JSON body/uuid— Insert a fresh random UUID v4/iso8601— Insert the current UTC ISO-8601 timestamp/timestamp— Insert the current Unix epoch timestamp/op— Insert anop://Private/API_Credential/token1Password secret reference/env— Insert a{{base_url}}environment variable placeholder/clear— Clear the entire editor buffer
- Type
- Bottom-Left Settings Cog (
⚙/⌘,): Click the cog icon in the bottom-left corner of the sidebar to enable or disable Slash Commands, Vim Mode Support, and Code Syntax Highlighting at any time.
9. Sample Use Cases & cURL Import/Export
- Reset / Load Sample Use Cases: Select Request → Reset / Load Sample Use Cases from the macOS menu bar at any time to restore all 6 sample collections, 19 requests, 4 environments, webhook mock rules, diff baselines, and 4 MCP servers.
- cURL Import: Click cURL in the bottom-left sidebar bar and paste any multi-line
curlcommand (including-X,-H,-d,--data-raw,-u) to import it into the workbench.