Post Practical Cookbook & Recipes
Step-by-step practical recipes and power workflows for Post.
A collection of step-by-step, visual recipes for testing APIs, managing Keychain and 1Password secrets, chaining authentication tokens, chaos-testing webhooks, and auditing Model Context Protocol (MCP) servers using Post on macOS.
View on GitHub 📖 Open User Guide →
Table of Recipes
- Recipe 1: Multi-Environment Setup with macOS Keychain & 1Password (
op://) Secrets - Recipe 2: Zero-Copy Auth Chaining (
POST /auth/login→{{jwt_token}}) - Recipe 3: Local Microservice & Webhook Chaos Testing (Mock Rules, Latency & Live Replay)
- Recipe 4: Auditing & Testing
stdioand HTTP Model Context Protocol (MCP) Servers - Recipe 5: Slicing Large Payloads with JSONPath & Auditing Regressions with Response Diff
- Recipe 6: Generating Production-Ready Go, Swift, and Python Clients
- Recipe 7: Keyboard-First Power Workflows (Stash-Model Token Filtering & Hotkeys)
Recipe 1: Multi-Environment Setup with macOS Keychain & 1Password (op://) Secrets
Scenario
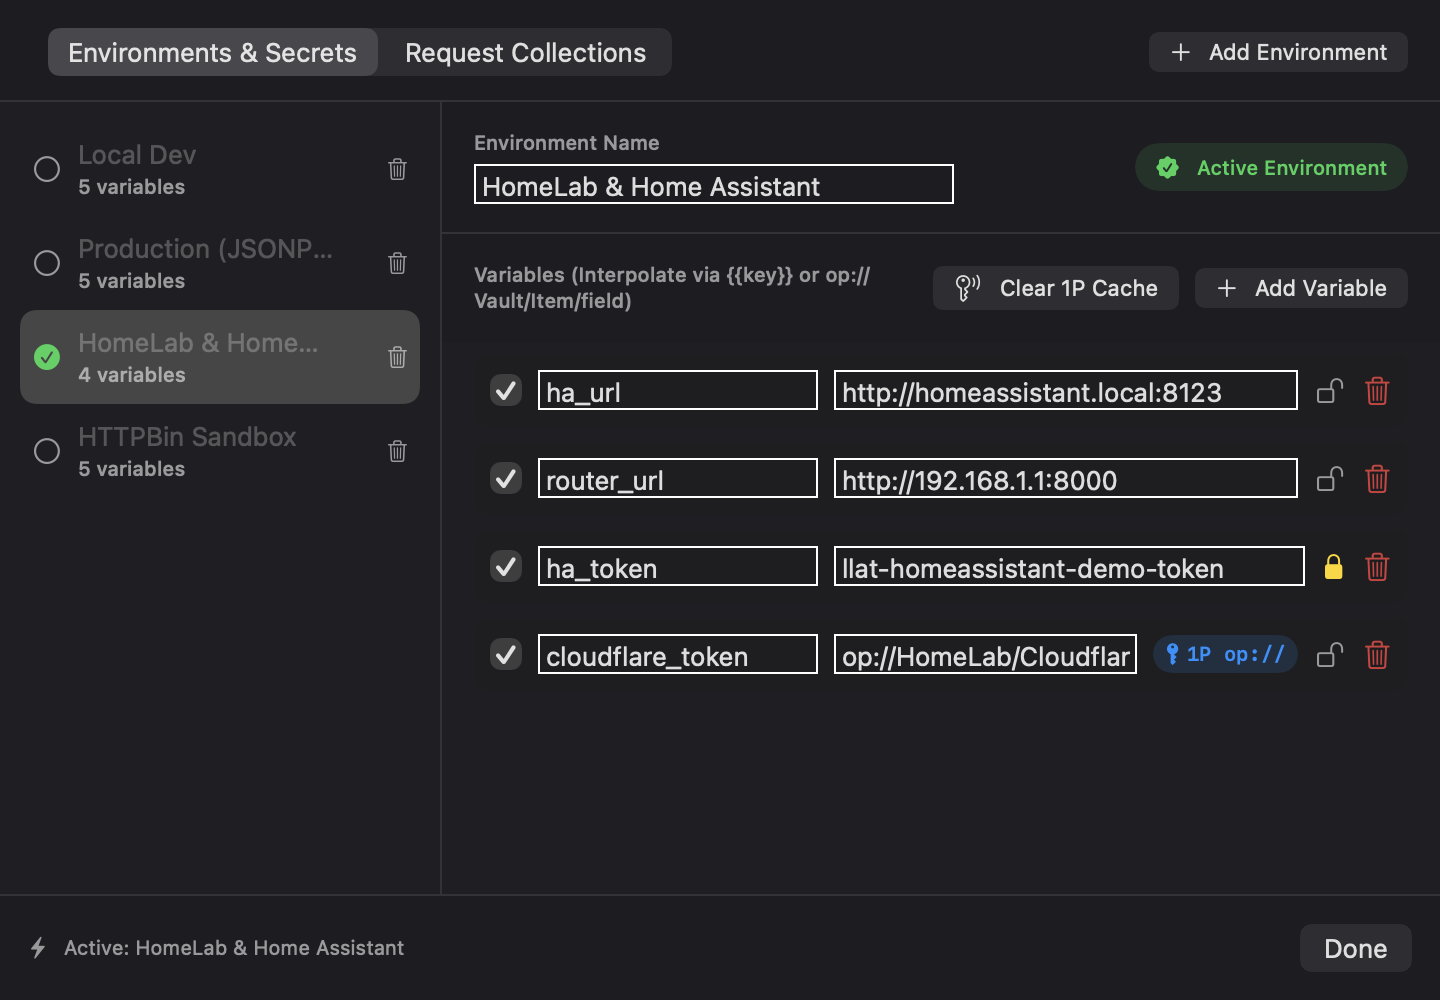
You are developing against a local backend on http://localhost:8080, managing a Home Assistant / HomeLab stack on http://homeassistant.local:8123, and querying production APIs. You want to switch environments in one click while keeping tokens encrypted in macOS Keychain or referenced directly from 1Password via op:// URIs.
Step-by-Step Instructions
1. Open the Environments & Secrets Manager (⌘E)
Press ⌘E (or click the gear icon in the top-right of the HTTP Workbench).
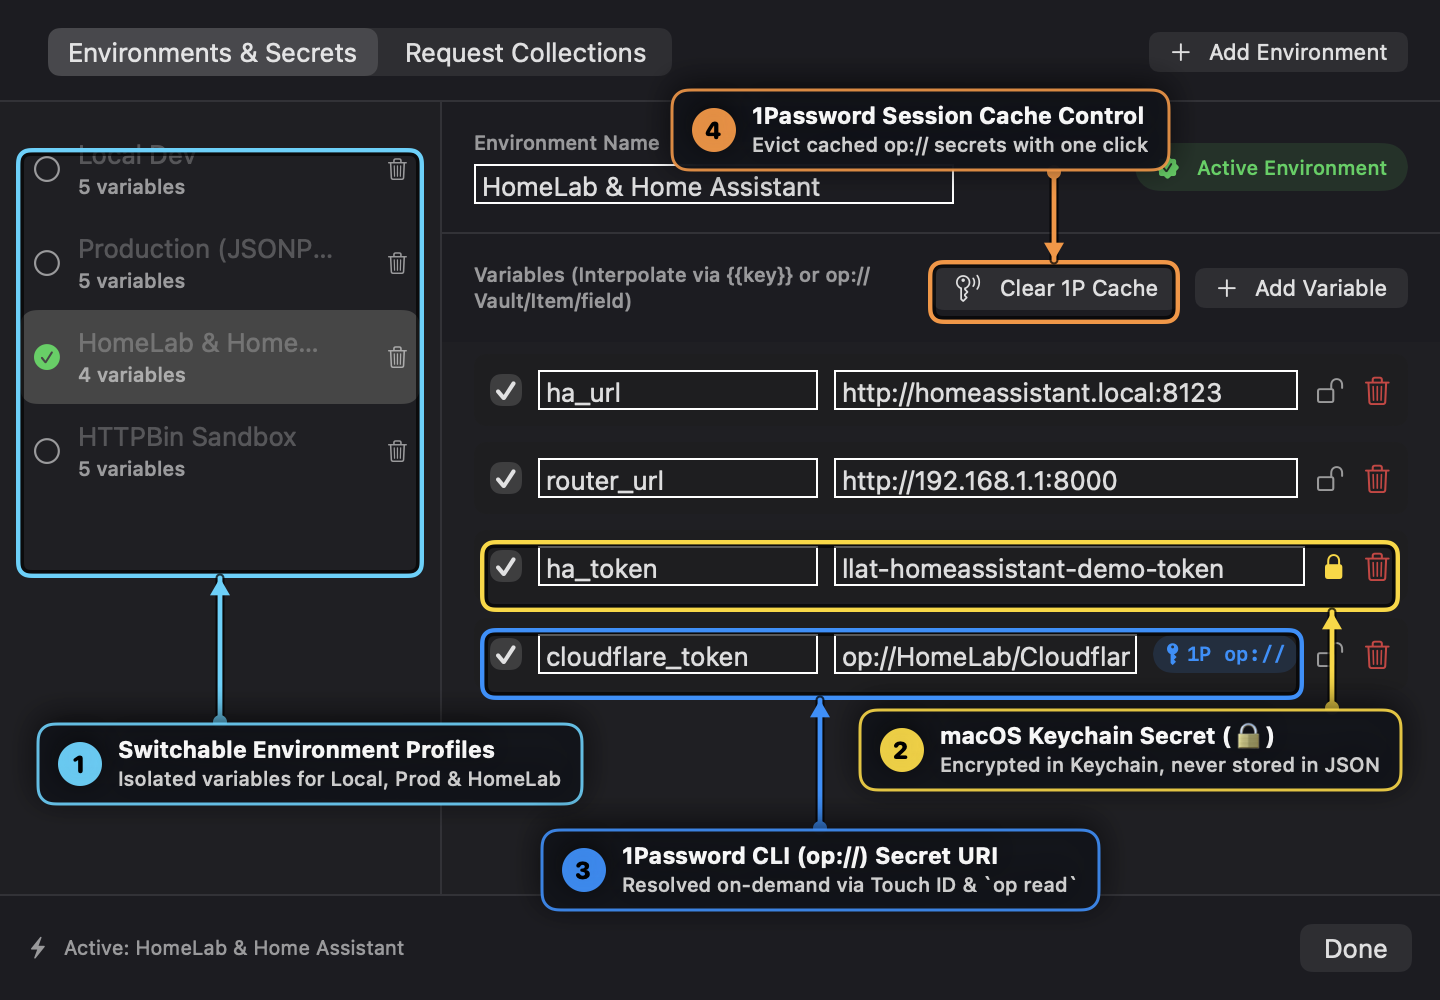
2. Configure Isolated Environment Profiles (Callout ①)
- Select or create profiles in the left sidebar (
Local Dev,Production,HomeLab & Home Assistant,HTTPBin Sandbox). - Add plain-text variables for non-sensitive configuration such as:
ha_url:http://homeassistant.local:8123router_url:http://192.168.1.1:8000entity_id:light.office_desk
3. Store Secrets in macOS Keychain (🔒, Callout ②)
- Add a variable named
ha_token. - Click the Lock (
🔒) button on the right side of the row so it turns yellow. - Paste your token value. Post encrypts and persists the secret inside the native macOS Keychain (
kSecClassGenericPassword, servicecom.msjurset.post-mac.env) and strips the plaintext value fromworkspace.json.
4. Reference Secrets Directly from 1Password (op://, Callout ③ & ④)
If you already keep API keys in 1Password, you don’t need to copy the raw secret into Post at all:
- In 1Password, open the item, click the dropdown next to the field, and choose Copy Secret Reference (e.g.,
op://HomeLab/Cloudflare/api_token). - Paste the
op://...URI directly into the variable’s value field in Post (or use it inline in any header/URL as{{op://HomeLab/Cloudflare/api_token}}). - Post displays a blue
1P op://badge (Callout ③). - When you execute a request, Post invokes
/opt/homebrew/bin/op read --no-newline, authenticates via macOS Touch ID, and caches the resolved secret in memory for the current session. - To evict cached 1Password secrets at any time, click Clear 1P Cache (Callout ④).
Recipe 2: Zero-Copy Auth Chaining (POST /auth/login → {{jwt_token}})
Scenario
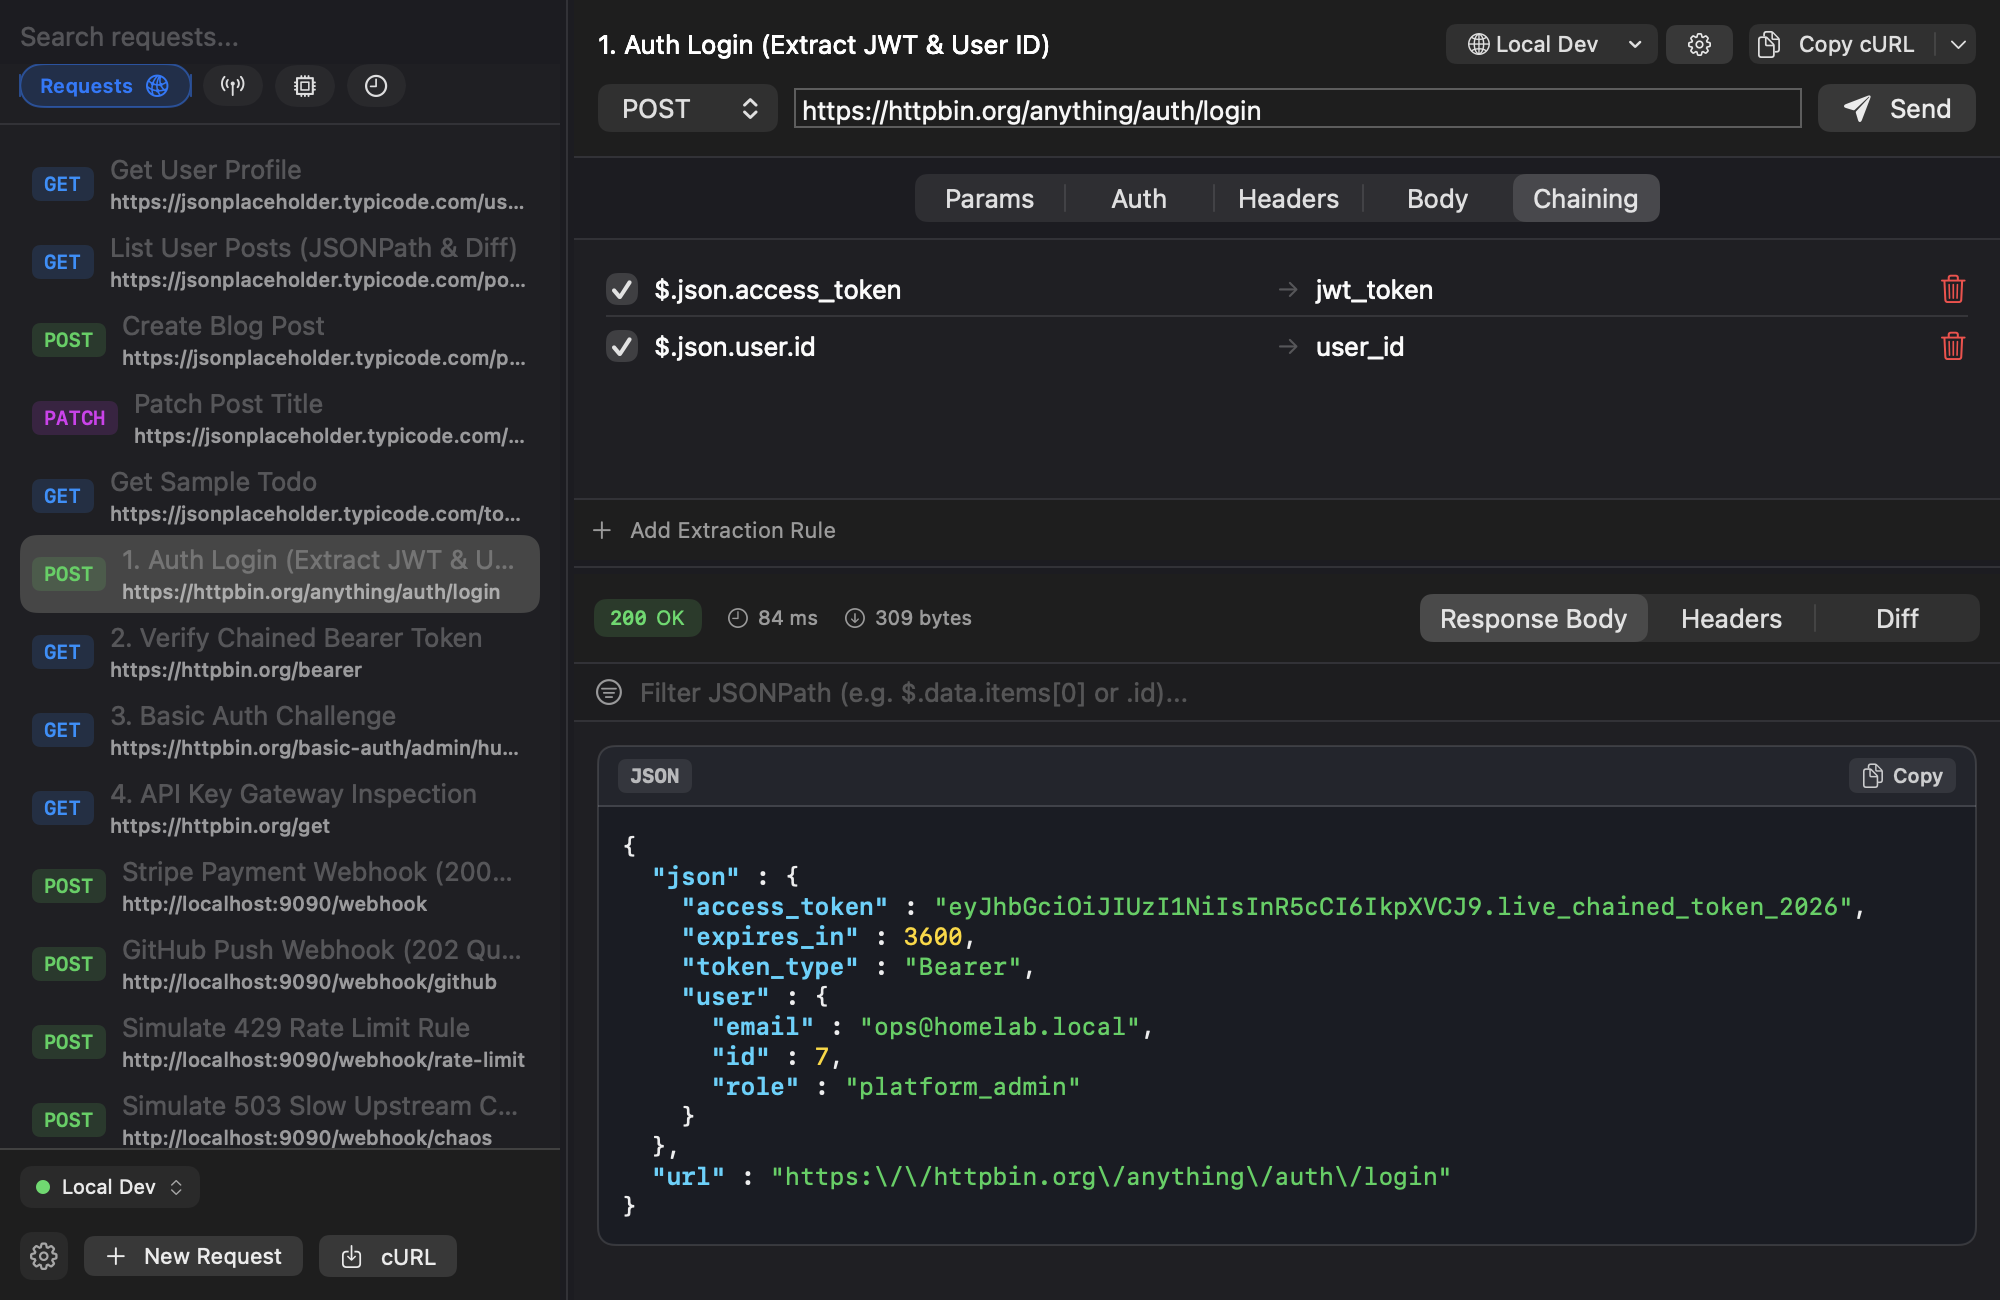
Your API requires posting credentials to /auth/login to obtain a short-lived JWT access_token and user.id. Instead of manually copying tokens from the response body and pasting them into other requests, you can chain them automatically.
Part A: Extract the Token from the Login Response
- Select
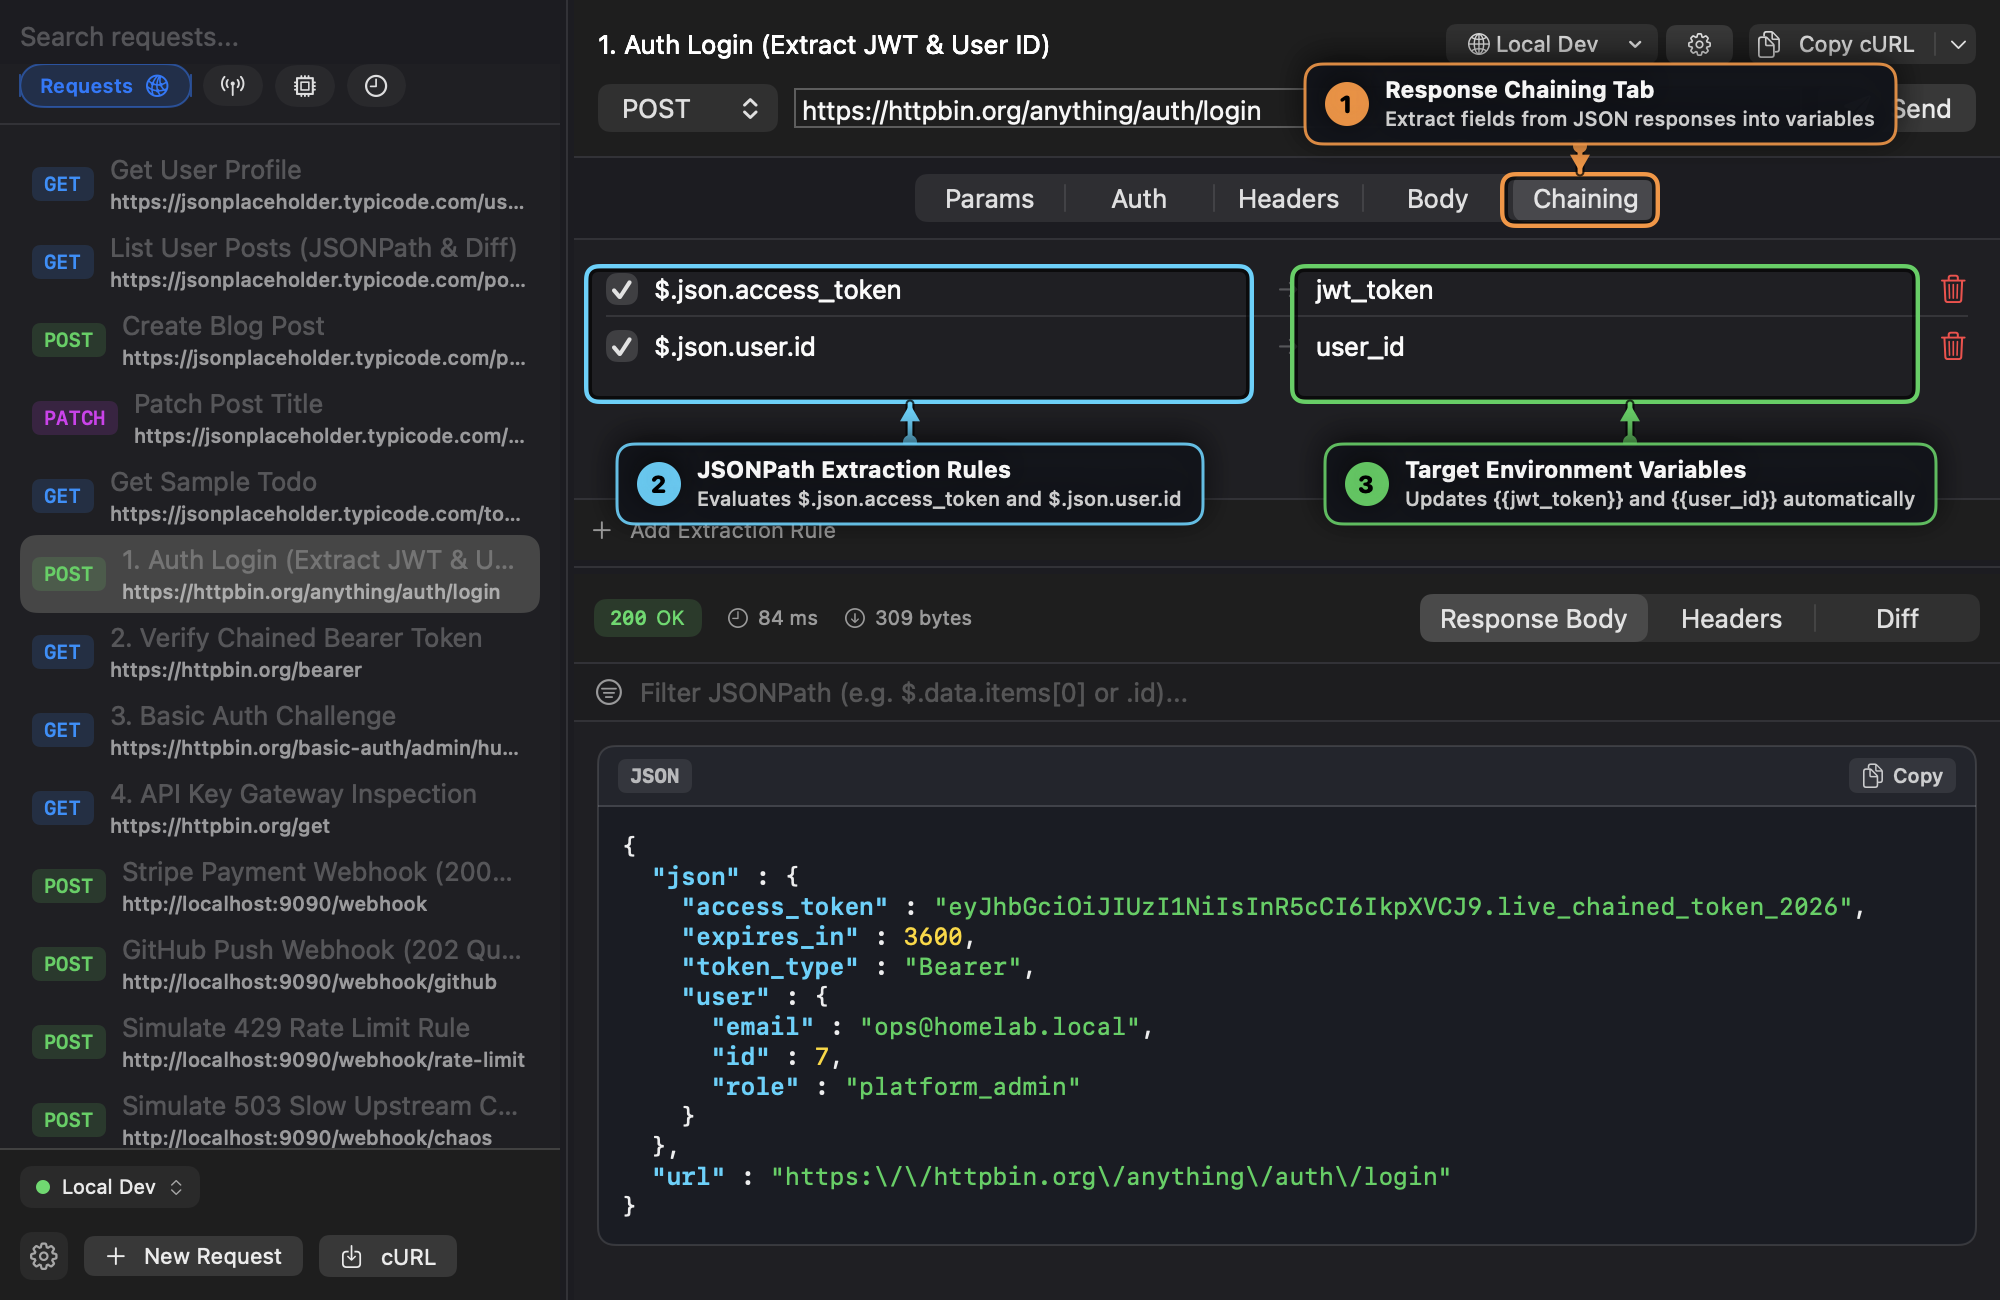
1. Auth Login (Extract JWT & User ID)in the sidebar. - Switch to the Chaining tab (Callout ①).
- Add two extraction rules (Callout ② & ③):
- Rule 1: JSONPath
$.json.access_token→ Target Variablejwt_token - Rule 2: JSONPath
$.json.user.id→ Target Variableuser_id
- Rule 1: JSONPath
- Press
⌘Returnto execute the login request. As soon as the200 OKresponse arrives, Post evaluates both JSONPath expressions and updates{{jwt_token}}and{{user_id}}in the active environment.
Part B: Inject the Chained Token via Auth Presets
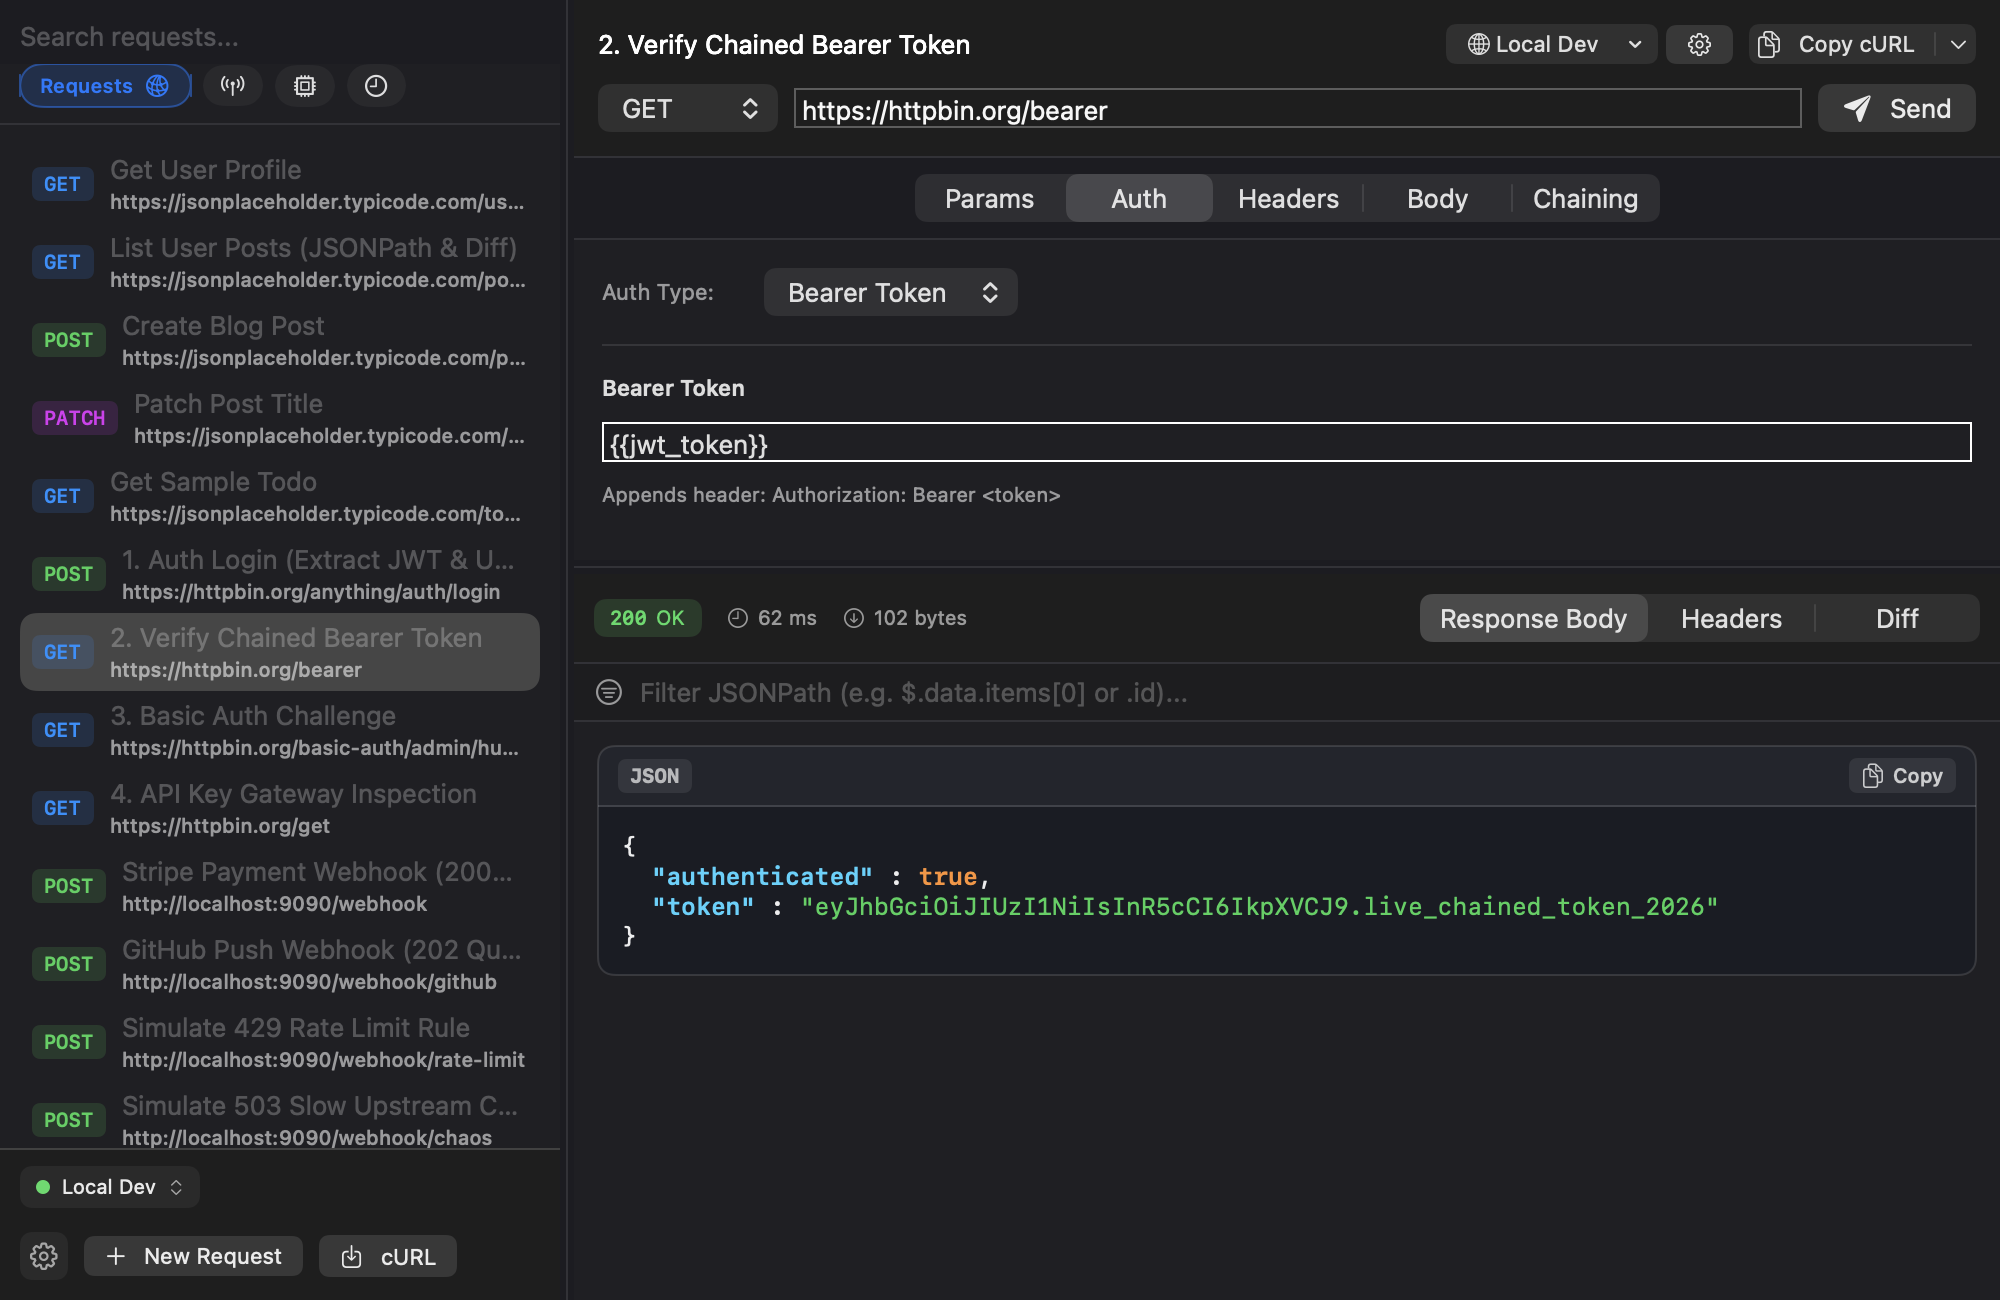
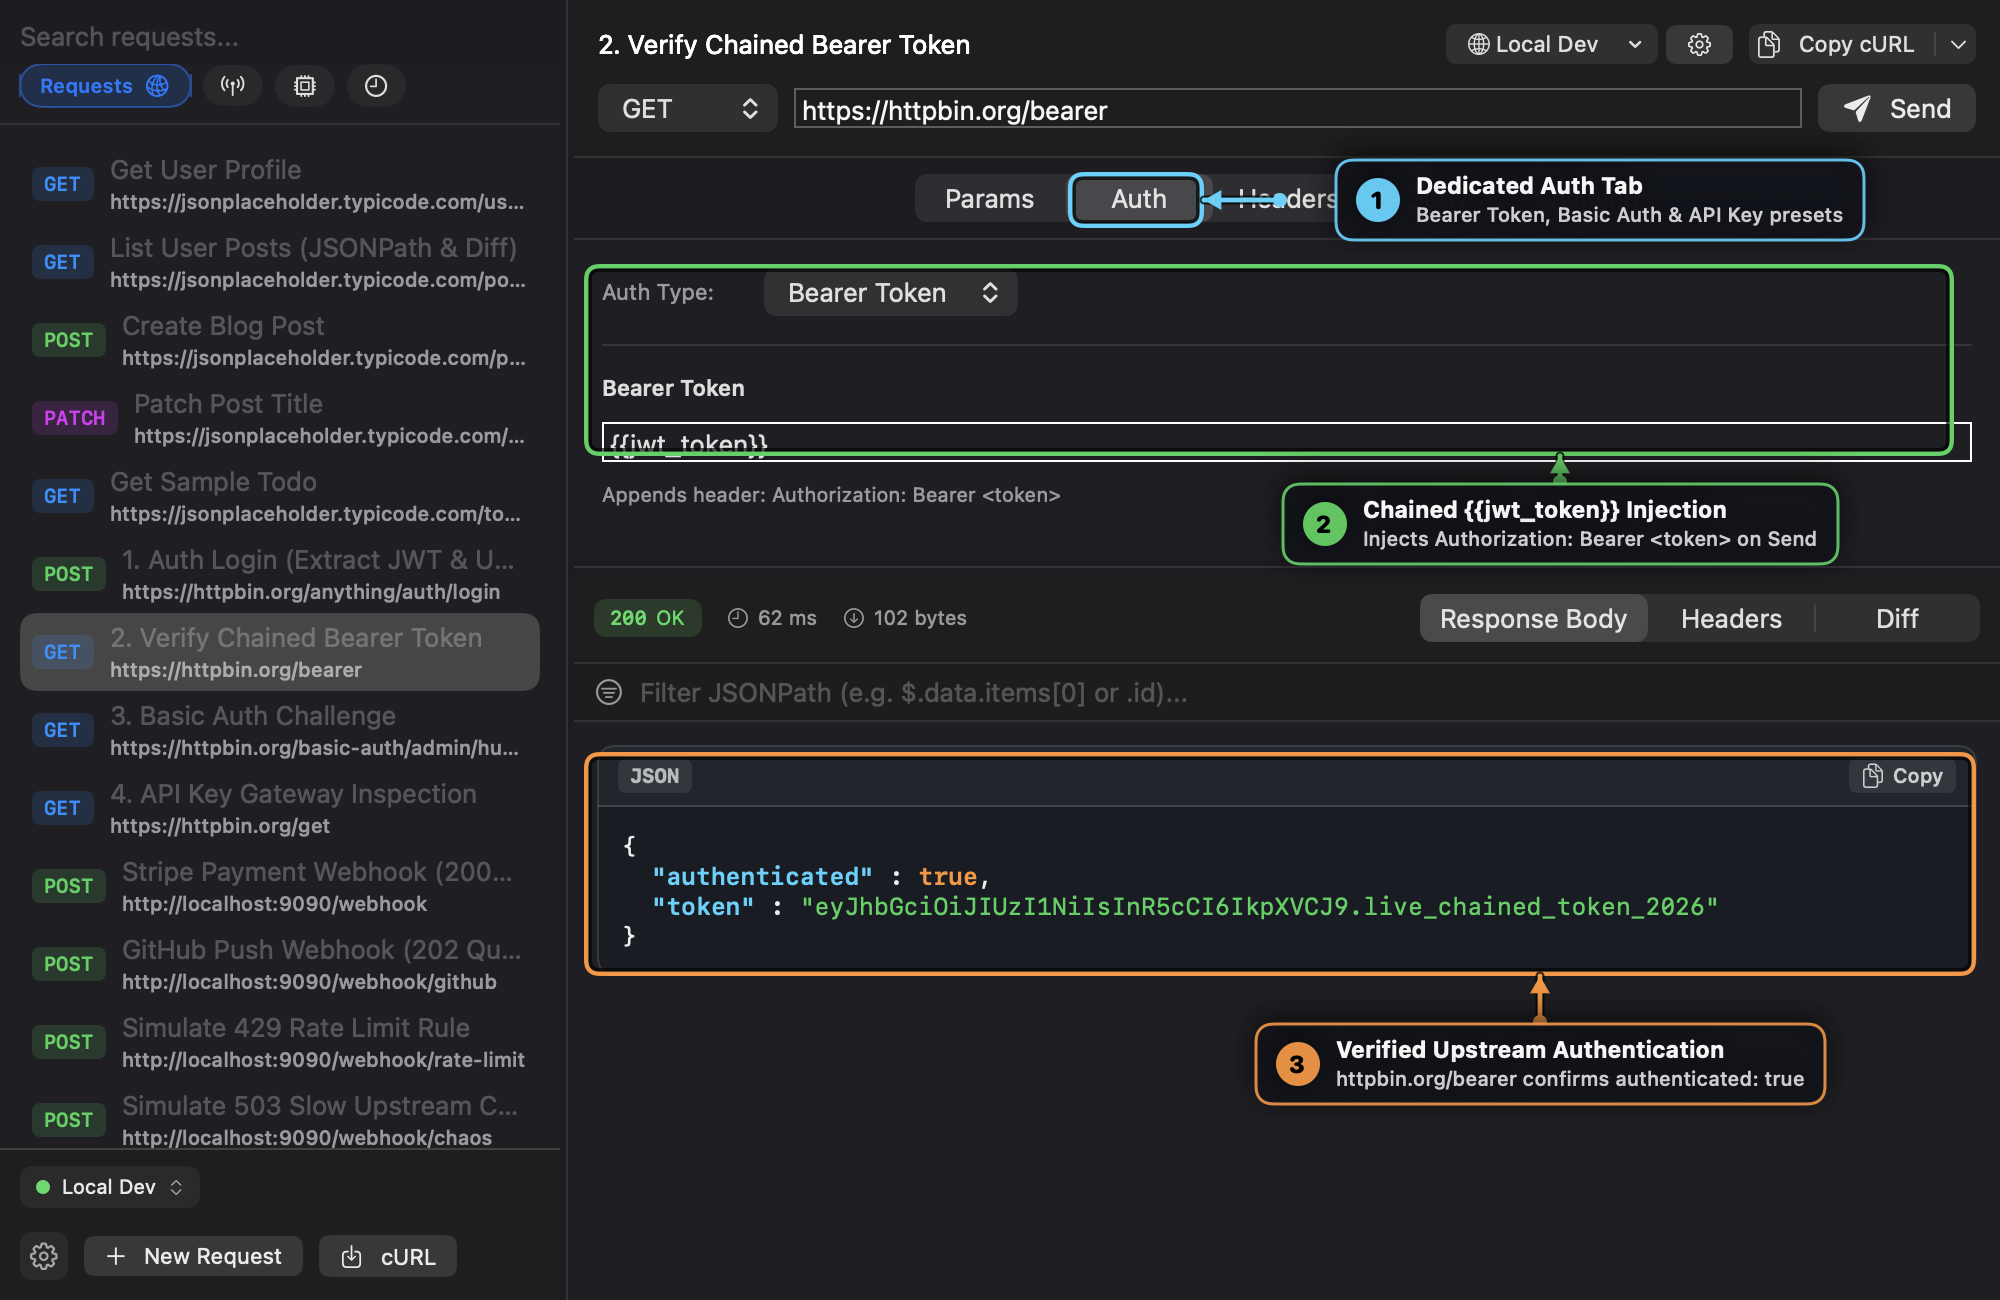
- Select
2. Verify Chained Bearer Token(GET https://httpbin.org/bearer). - Open the Auth tab (Callout ①).
- Choose Bearer Token from the Auth Type menu and set the token field to
{{jwt_token}}(Callout ②). - Press
⌘Return. Post interpolates the freshly extracted JWT intoAuthorization: Bearer <token>andhttpbin.org/bearerconfirms"authenticated": true(Callout ③).
Recipe 3: Local Microservice & Webhook Chaos Testing (Mock Rules, Latency & Live Replay)
Scenario
You are building a local webhook consumer on http://localhost:8080/webhook and need to capture sample Stripe/GitHub/Alertmanager payloads, replay them on demand, and test how your caller handles 429 Too Many Requests rate limits and 503 slow-network outages.
Part A: Capture & Replay Webhooks (Captured Payloads)
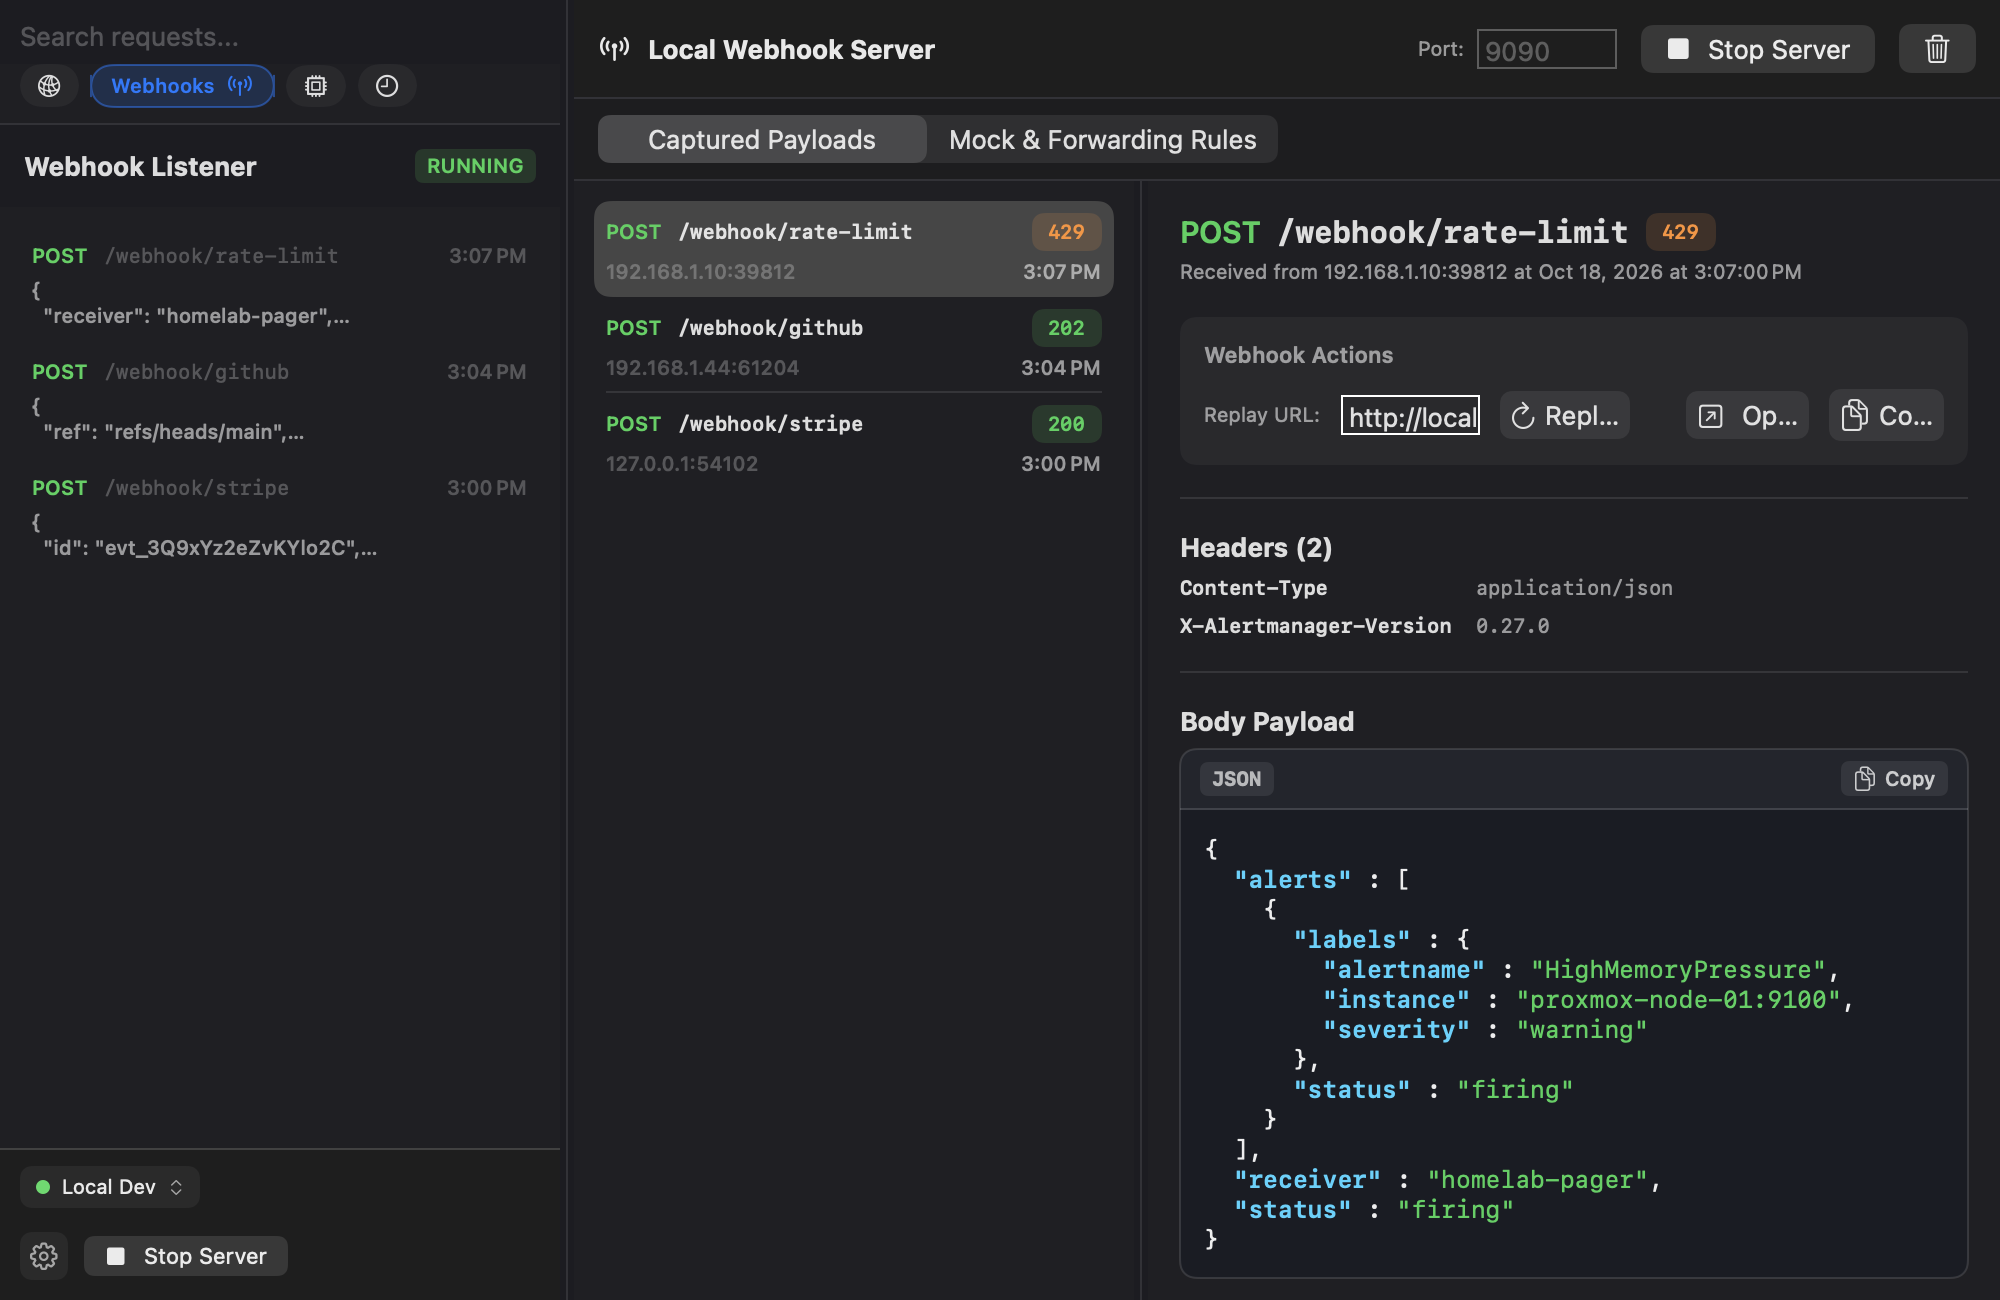
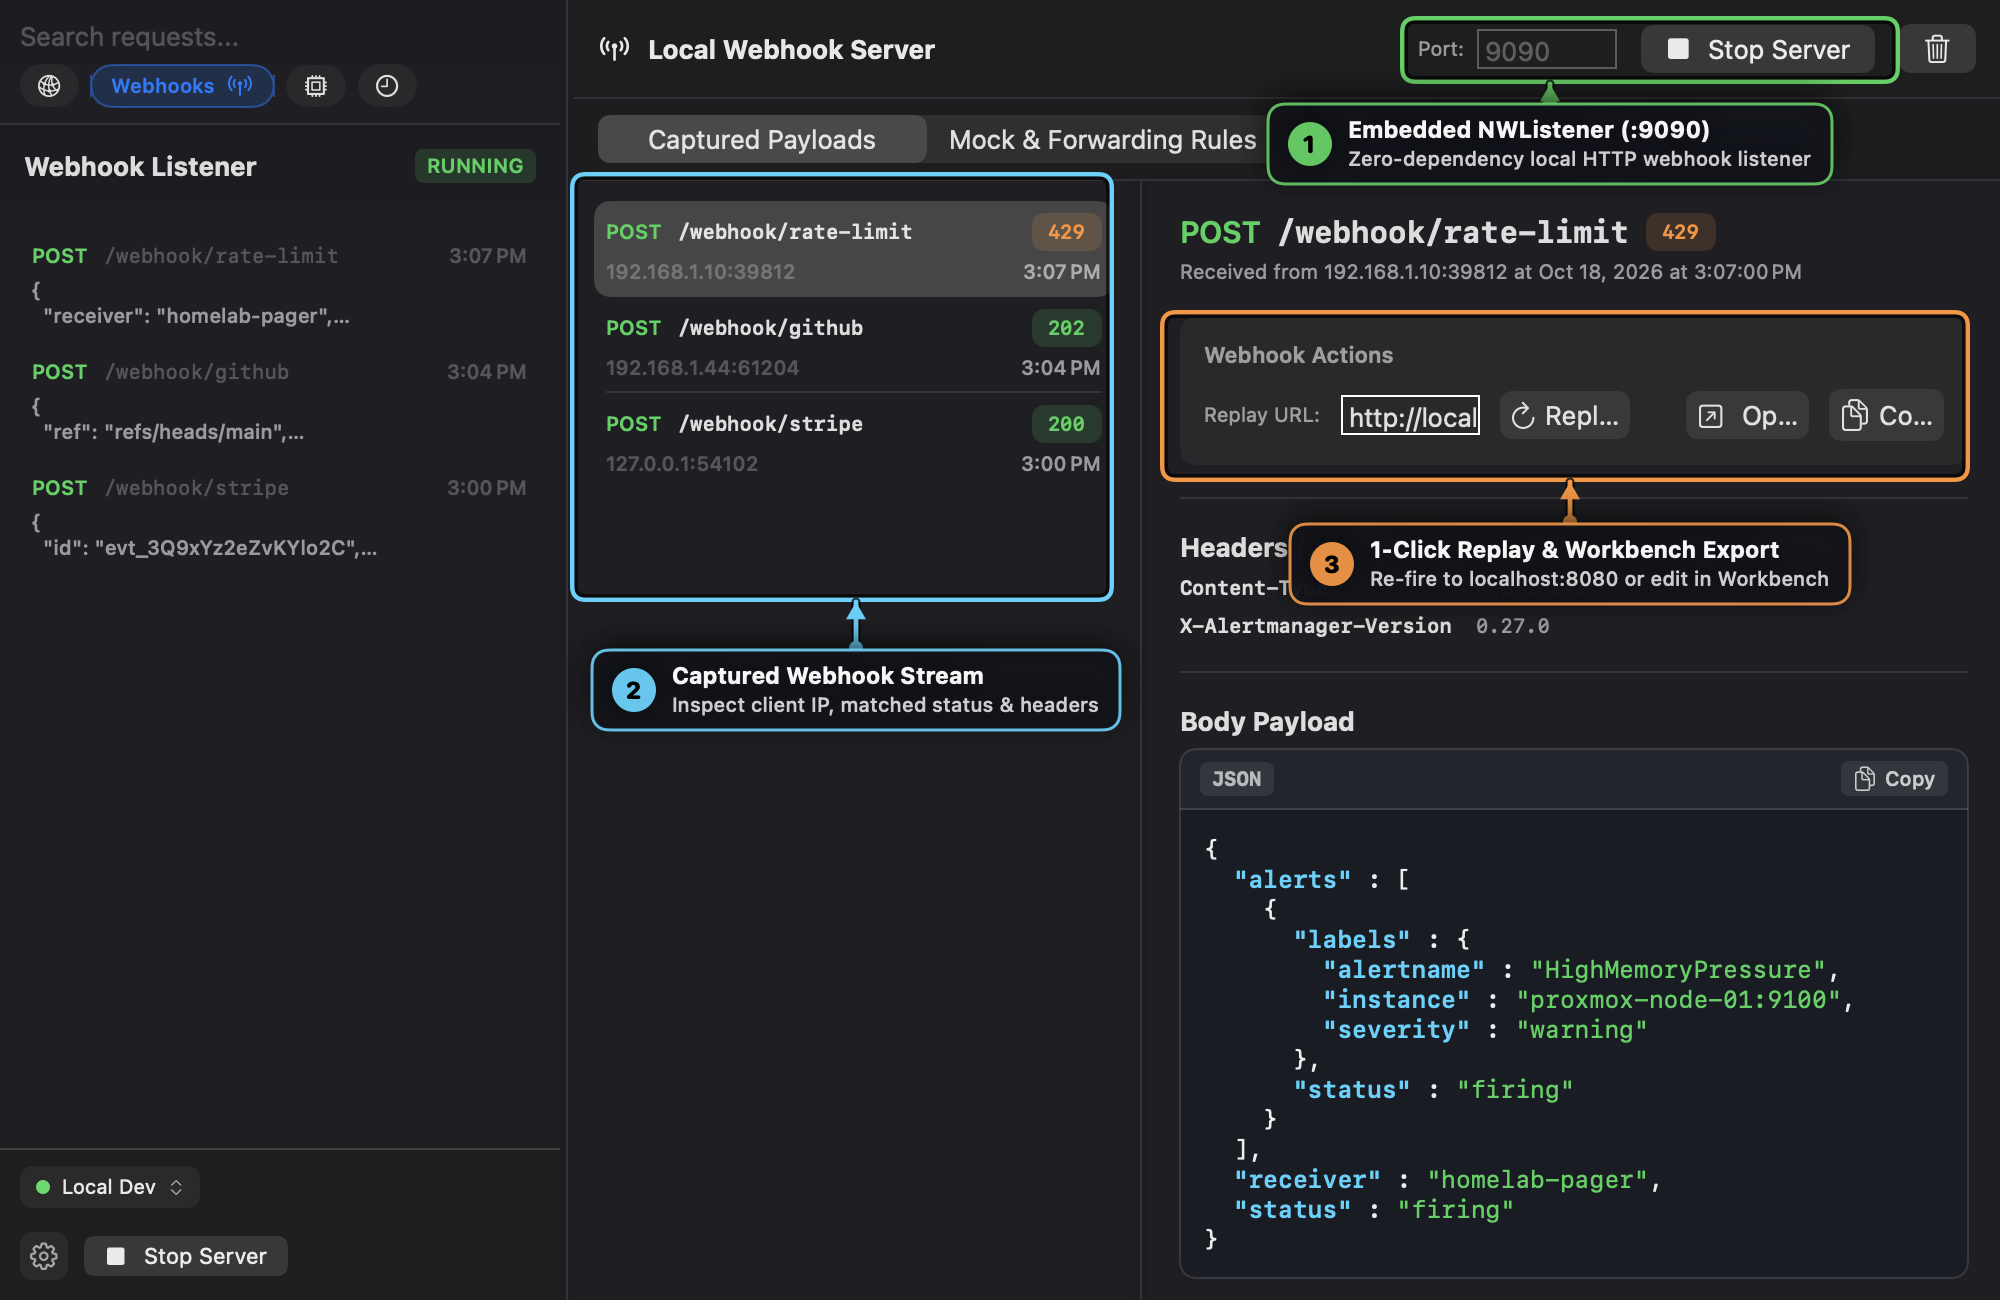
- Switch to the Webhooks tab in the sidebar.
- Verify the embedded
NWListeneris running on port9090(Callout ①). - Fire any webhook request at
http://localhost:9090/webhook/stripeor select one of the pre-loaded requests in the Webhook Sandbox (:9090) collection. - Select a captured event in the stream (Callout ②) to inspect its client IP, status badge (
429,202,200), headers, and JSON body. - In the Webhook Actions bar (Callout ③):
- Enter your local service URL (
http://localhost:8080/webhook) and click Replay Now to re-send the exact payload. - Or click Open in Workbench to turn the captured webhook into a saved HTTP request for further editing.
- Enter your local service URL (
Part B: Simulate Rate Limits, Latency & Auto-Forwarding (Mock & Forwarding Rules)
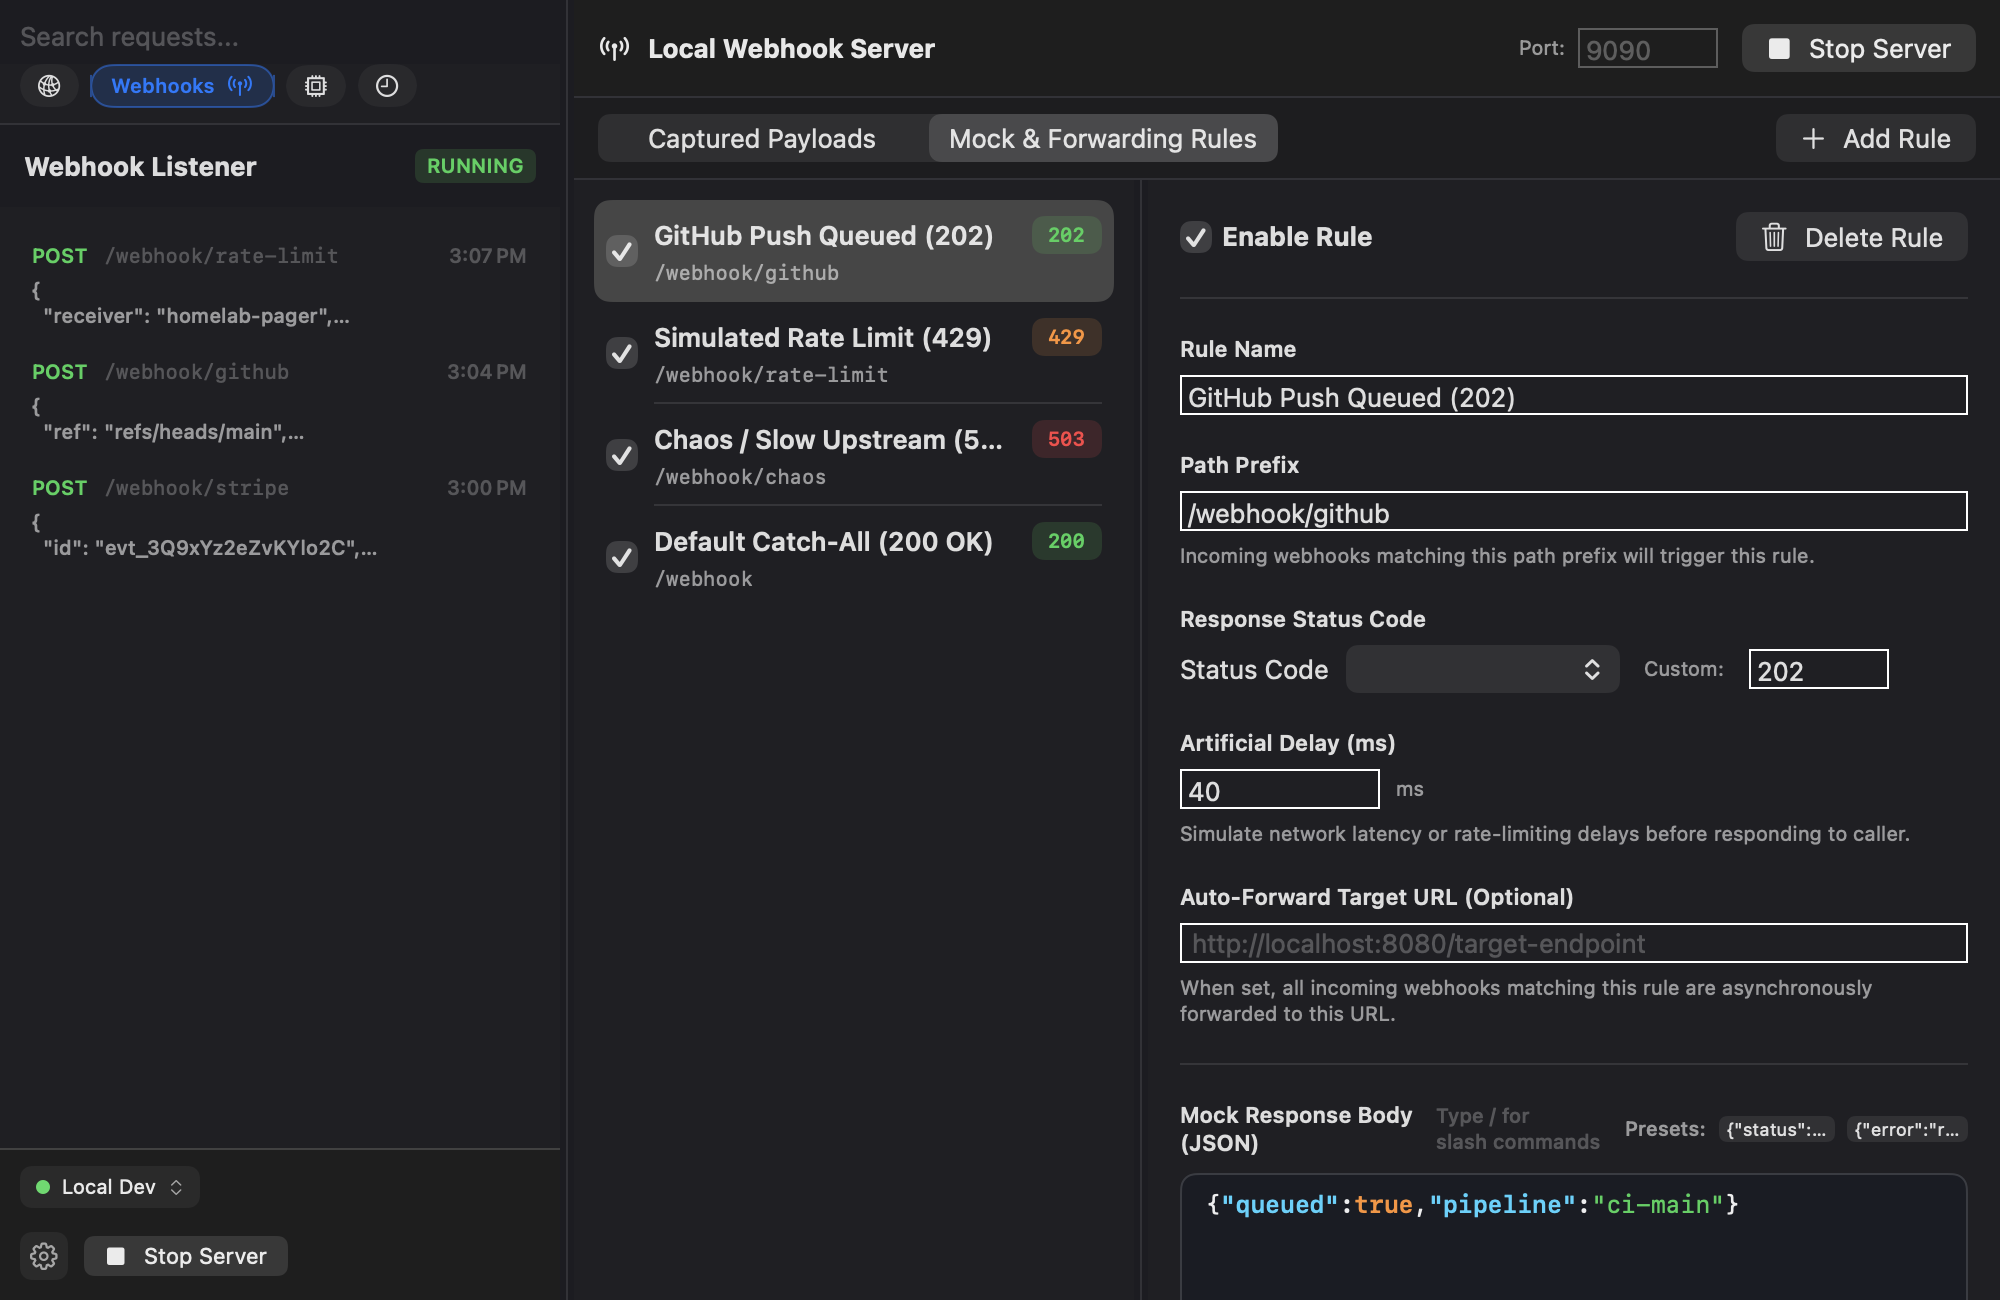
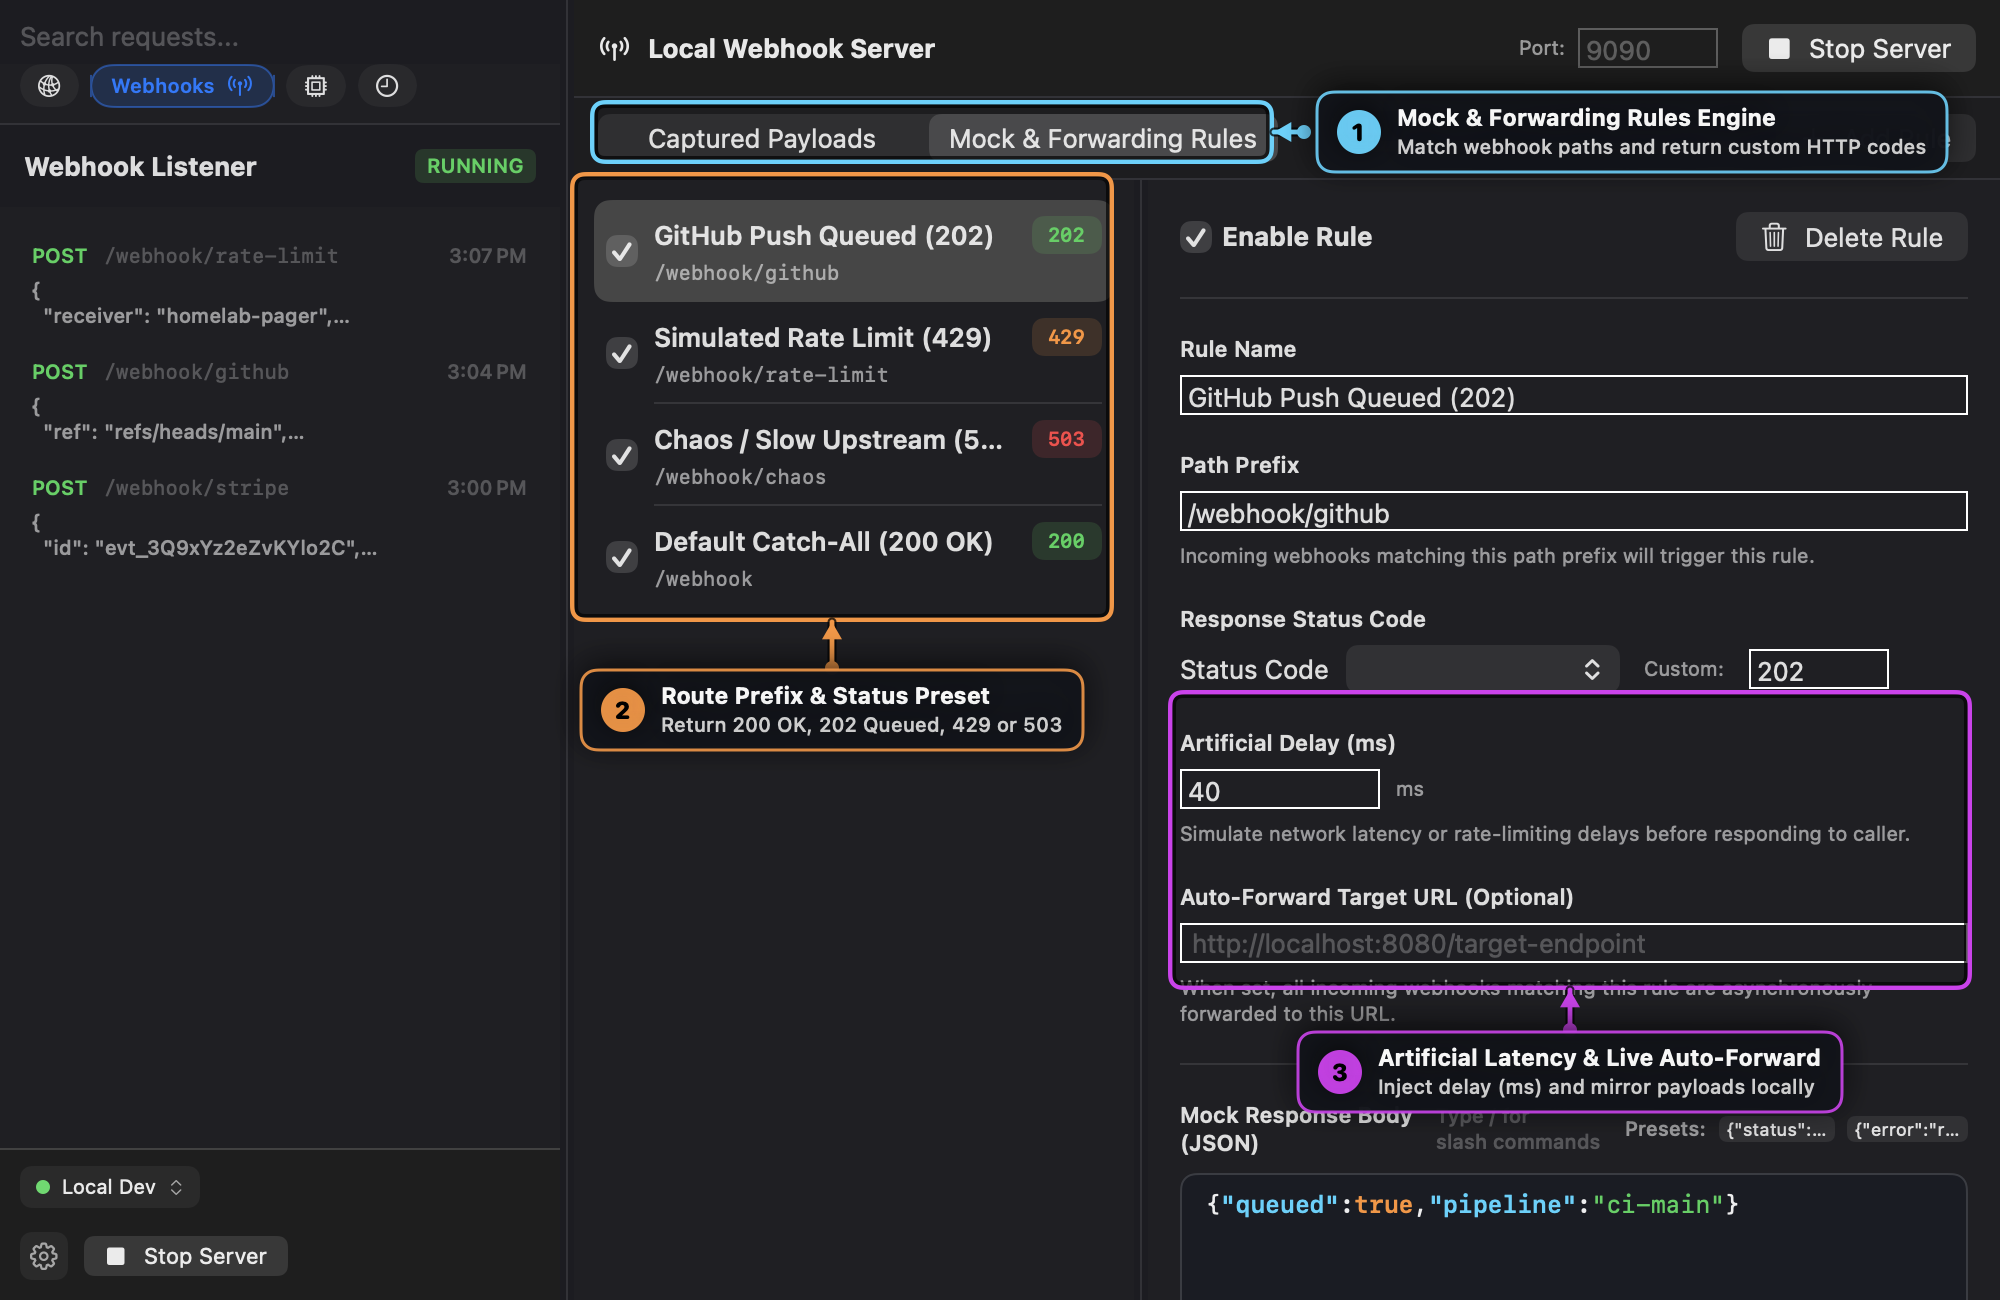
- Switch the mode bar to Mock & Forwarding Rules (Callout ①).
- Select or create a rule in the left list (Callout ②), such as:
GitHub Push Queued (202)on/webhook/github→ returns202 Acceptedwith40 mslatency.Simulated Rate Limit (429)on/webhook/rate-limit→ returns429 Too Many Requestswith350 mslatency.Chaos / Slow Upstream (503)on/webhook/chaos→ returns503 Service Unavailablewith1200 mslatency.
- Configure Artificial Delay (
ms) and Auto-Forward Target URL (Callout ③) to test client retry logic and mirror incoming traffic to your local backend.
Recipe 4: Auditing & Testing stdio and HTTP Model Context Protocol (MCP) Servers
Scenario
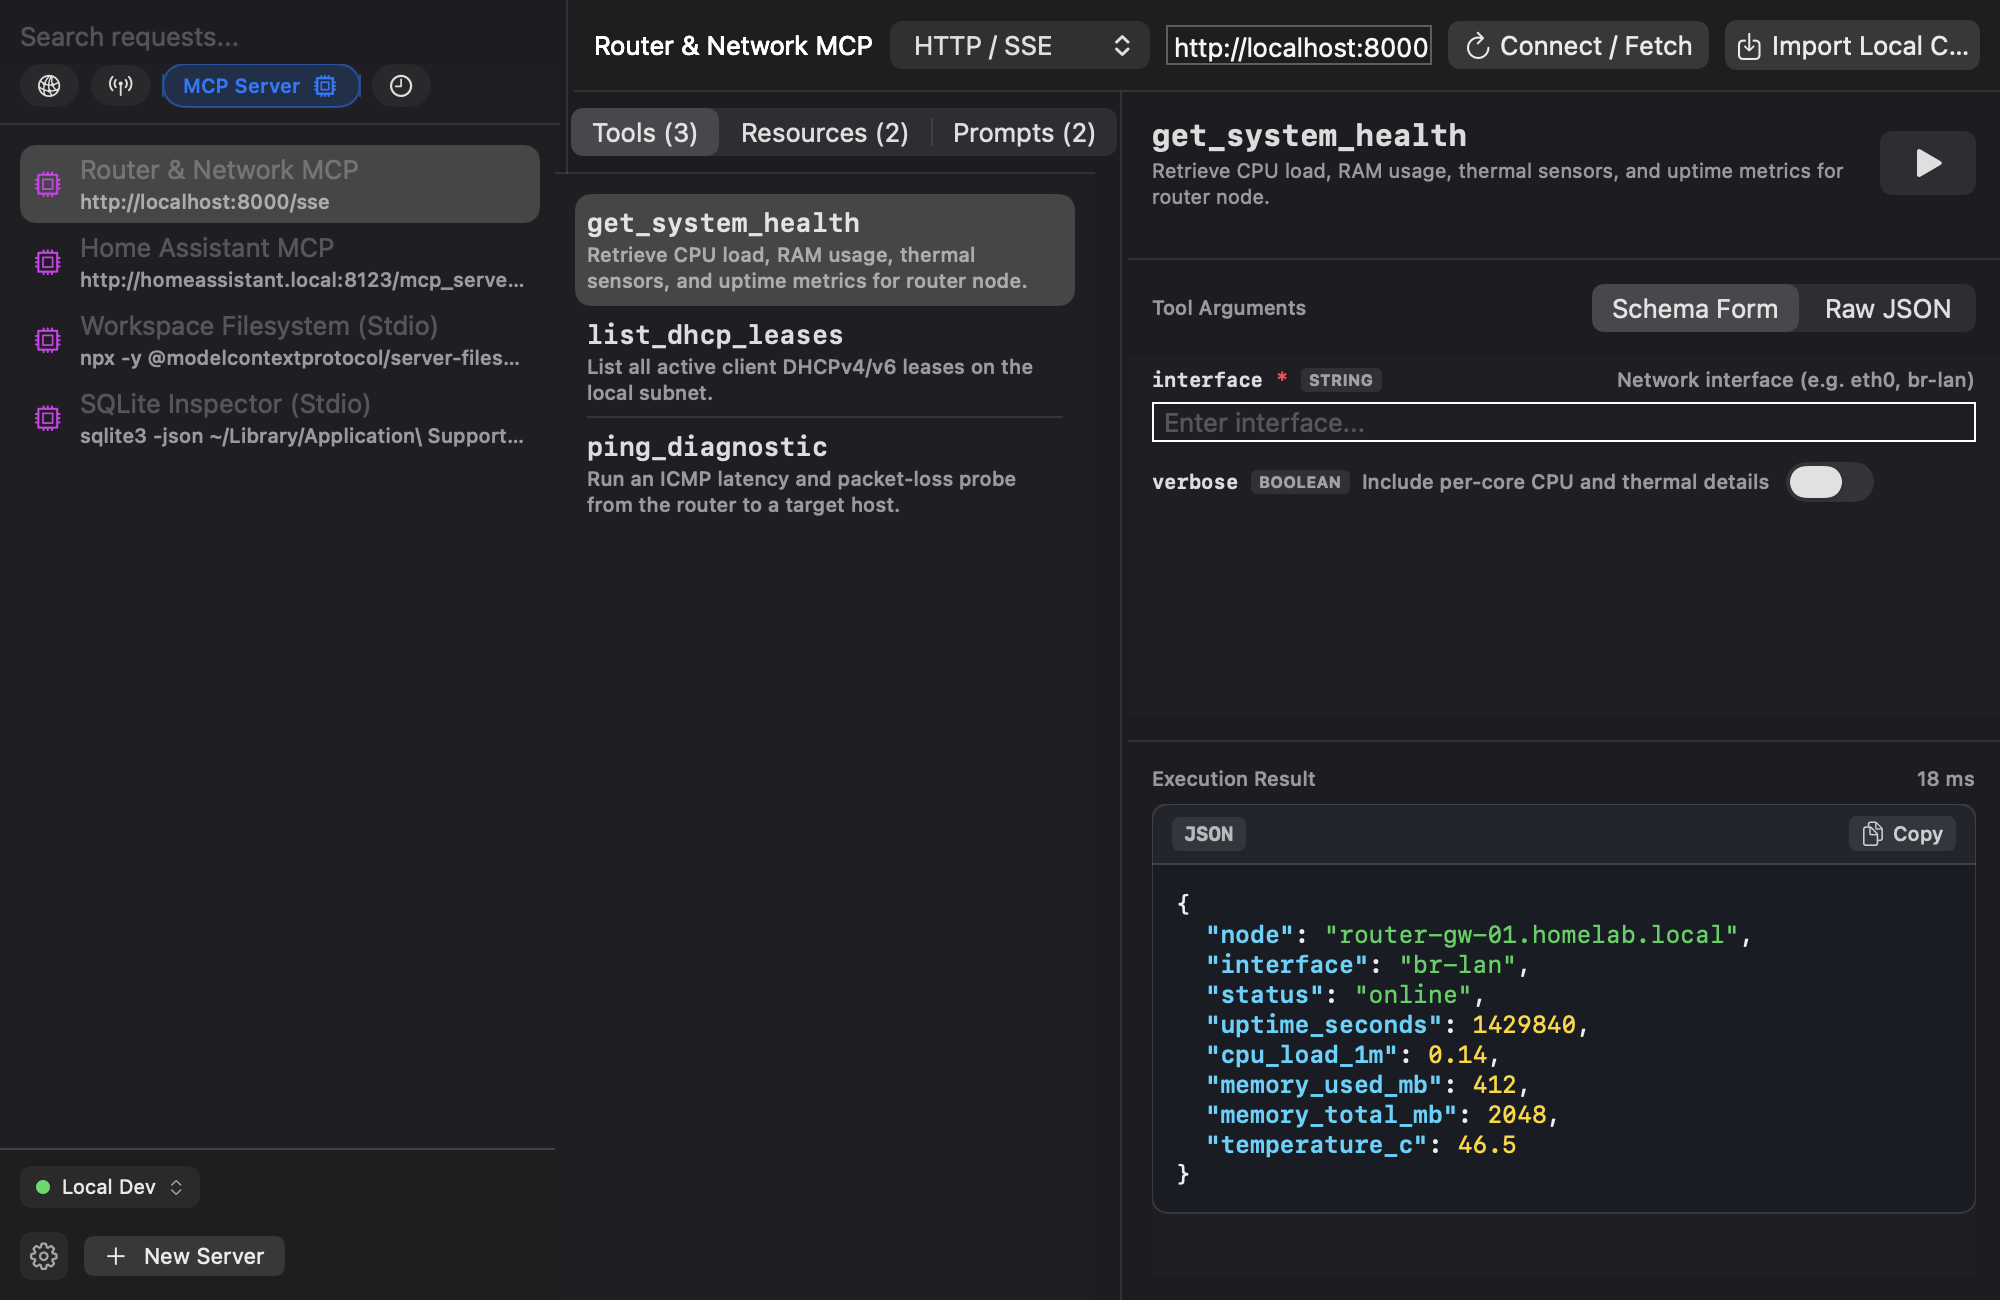
You are building or configuring Model Context Protocol (MCP) servers for AI agents (over HTTP/SSE or local stdio CLI commands) and want to inspect their schemas, test tool calls interactively, and read server resources.
Step-by-Step Instructions
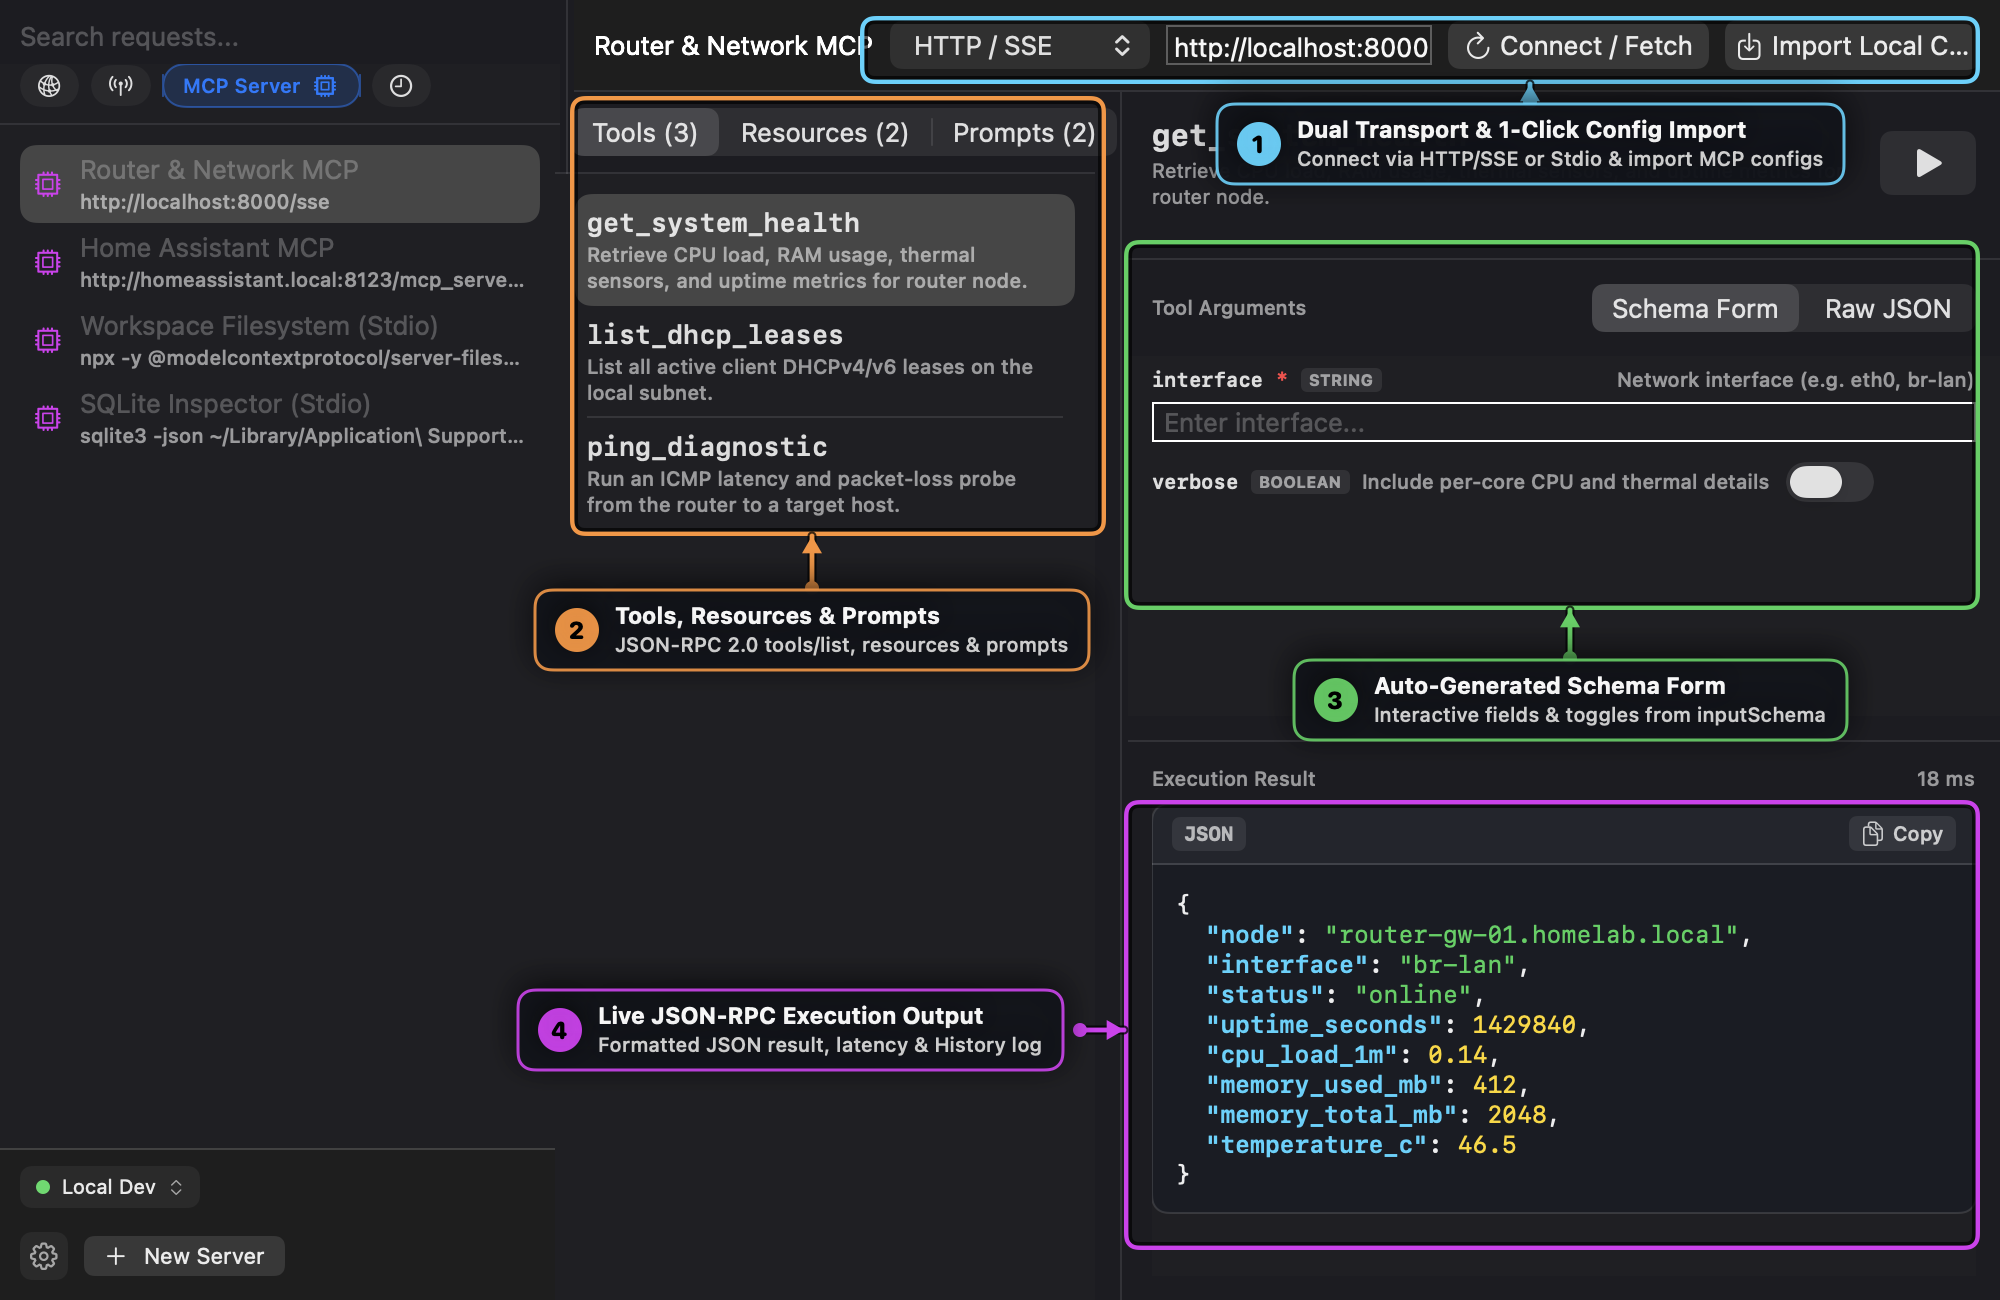
- Switch to the MCP Server tab in the sidebar.
- In the top bar (Callout ①):
- Choose HTTP / SSE (e.g.,
http://localhost:8000/sse) or Stdio Command (e.g.,npx -y @modelcontextprotocol/server-filesystem /Users/msjurseth/workspace). - Or click Import Local Configs to auto-import all MCP servers configured in
~/.gemini/antigravity-cli/mcp/,~/.cursor/mcp.json, and Claude Desktop.
- Choose HTTP / SSE (e.g.,
- Browse Tools, Resources, and Prompts in the left pane (Callout ②).
- Select a tool (e.g.,
get_system_health) and use the Auto-Generated Schema Form (Callout ③) to fill in typed parameters (interface,verbose) or switch to Raw JSON. - Click the green Play button to send the JSON-RPC 2.0
tools/callrequest and inspect the formatted result and latency in the Execution Result pane (Callout ④).
Recipe 5: Slicing Large Payloads with JSONPath & Auditing Regressions with Response Diff
Scenario
You want to isolate nested objects inside a large JSON payload without scrolling through hundreds of lines, and then verify exactly which fields changed between two executions of the same endpoint.
Part A: Live JSONPath Slicing
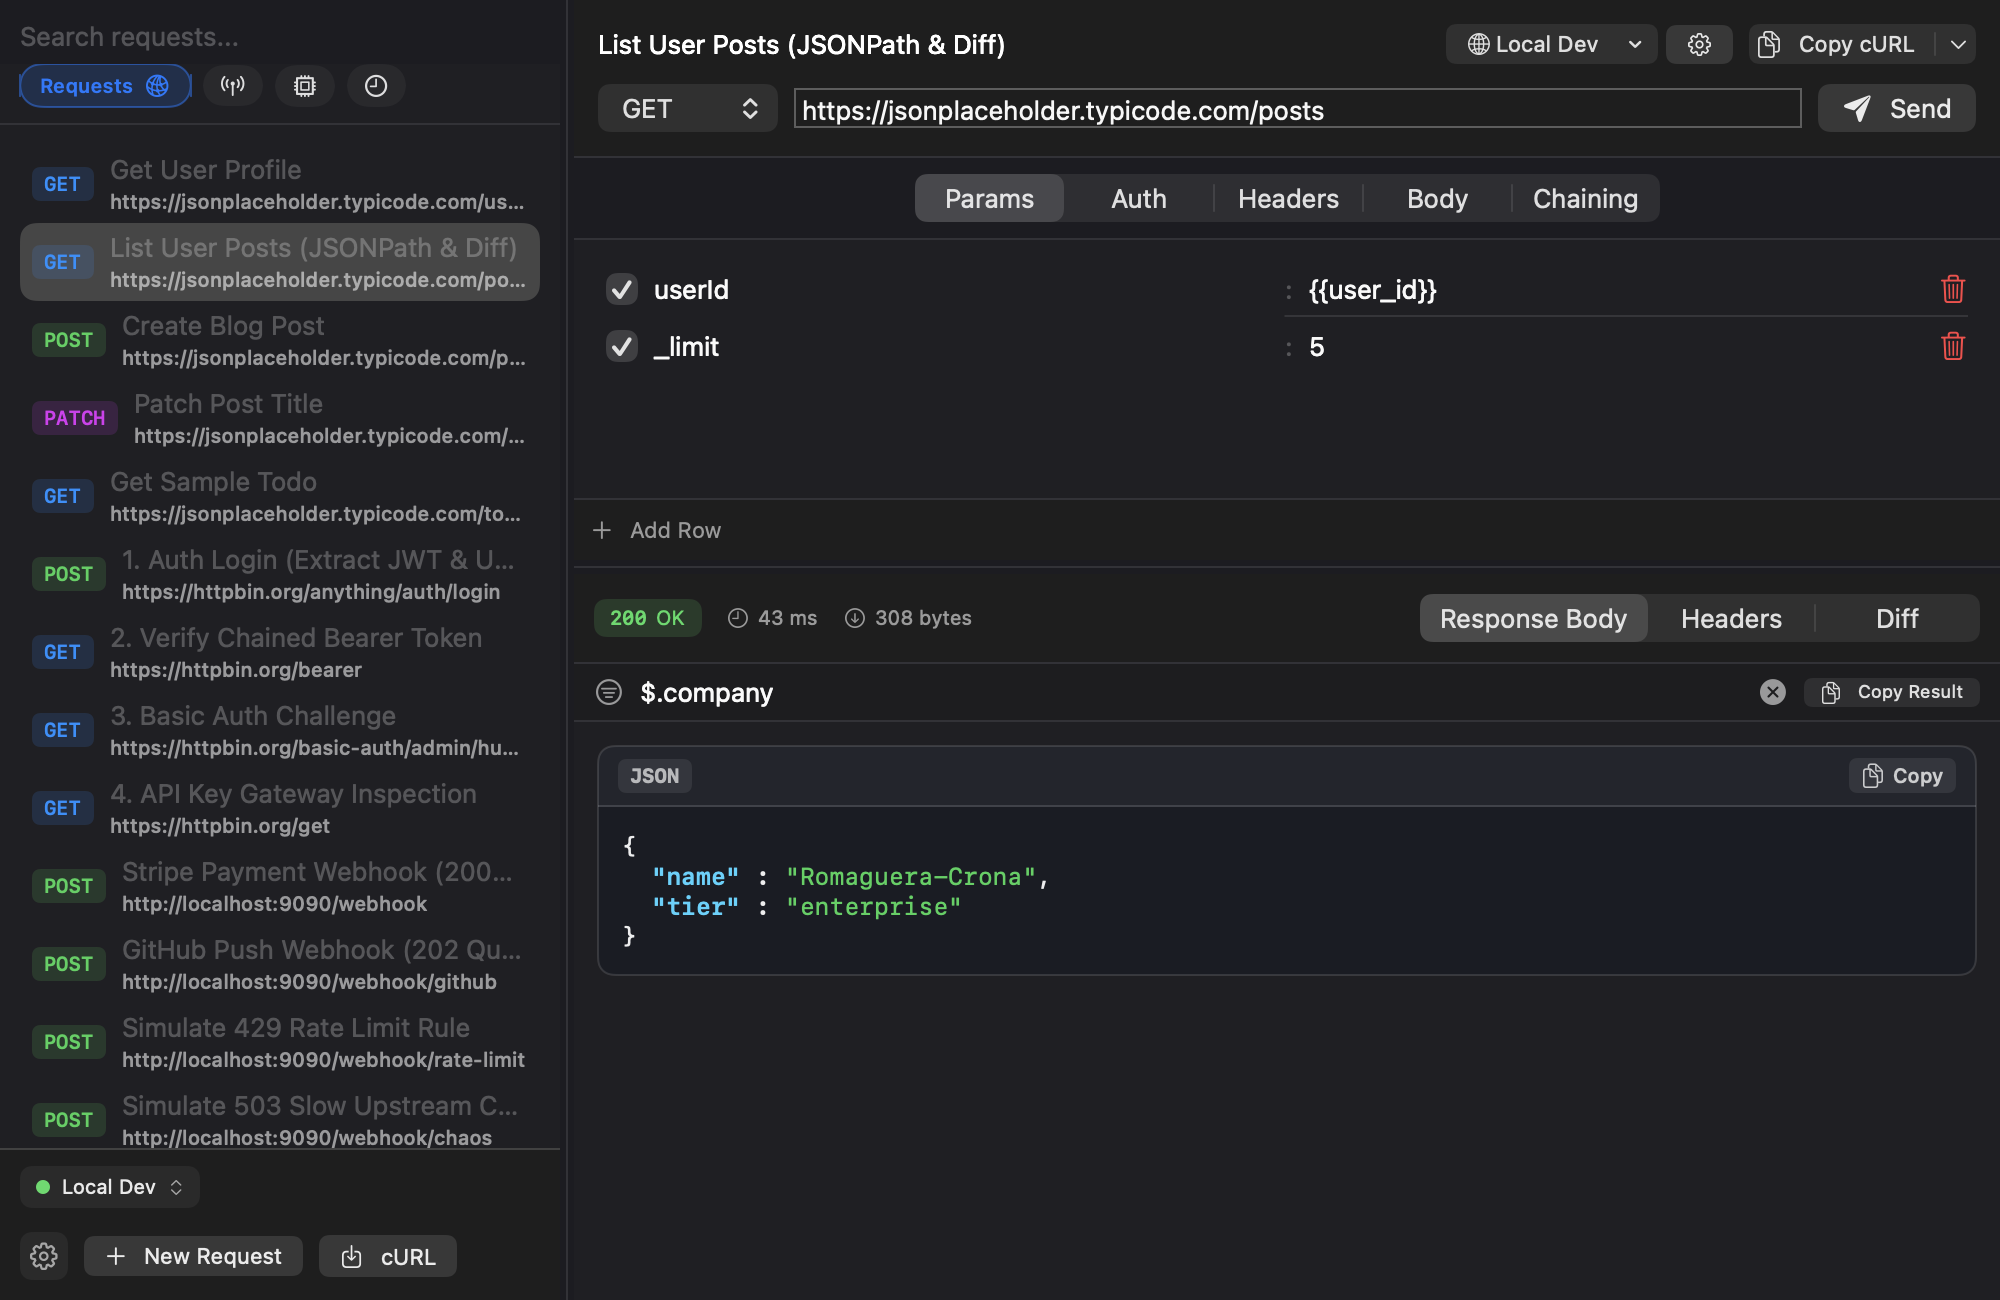
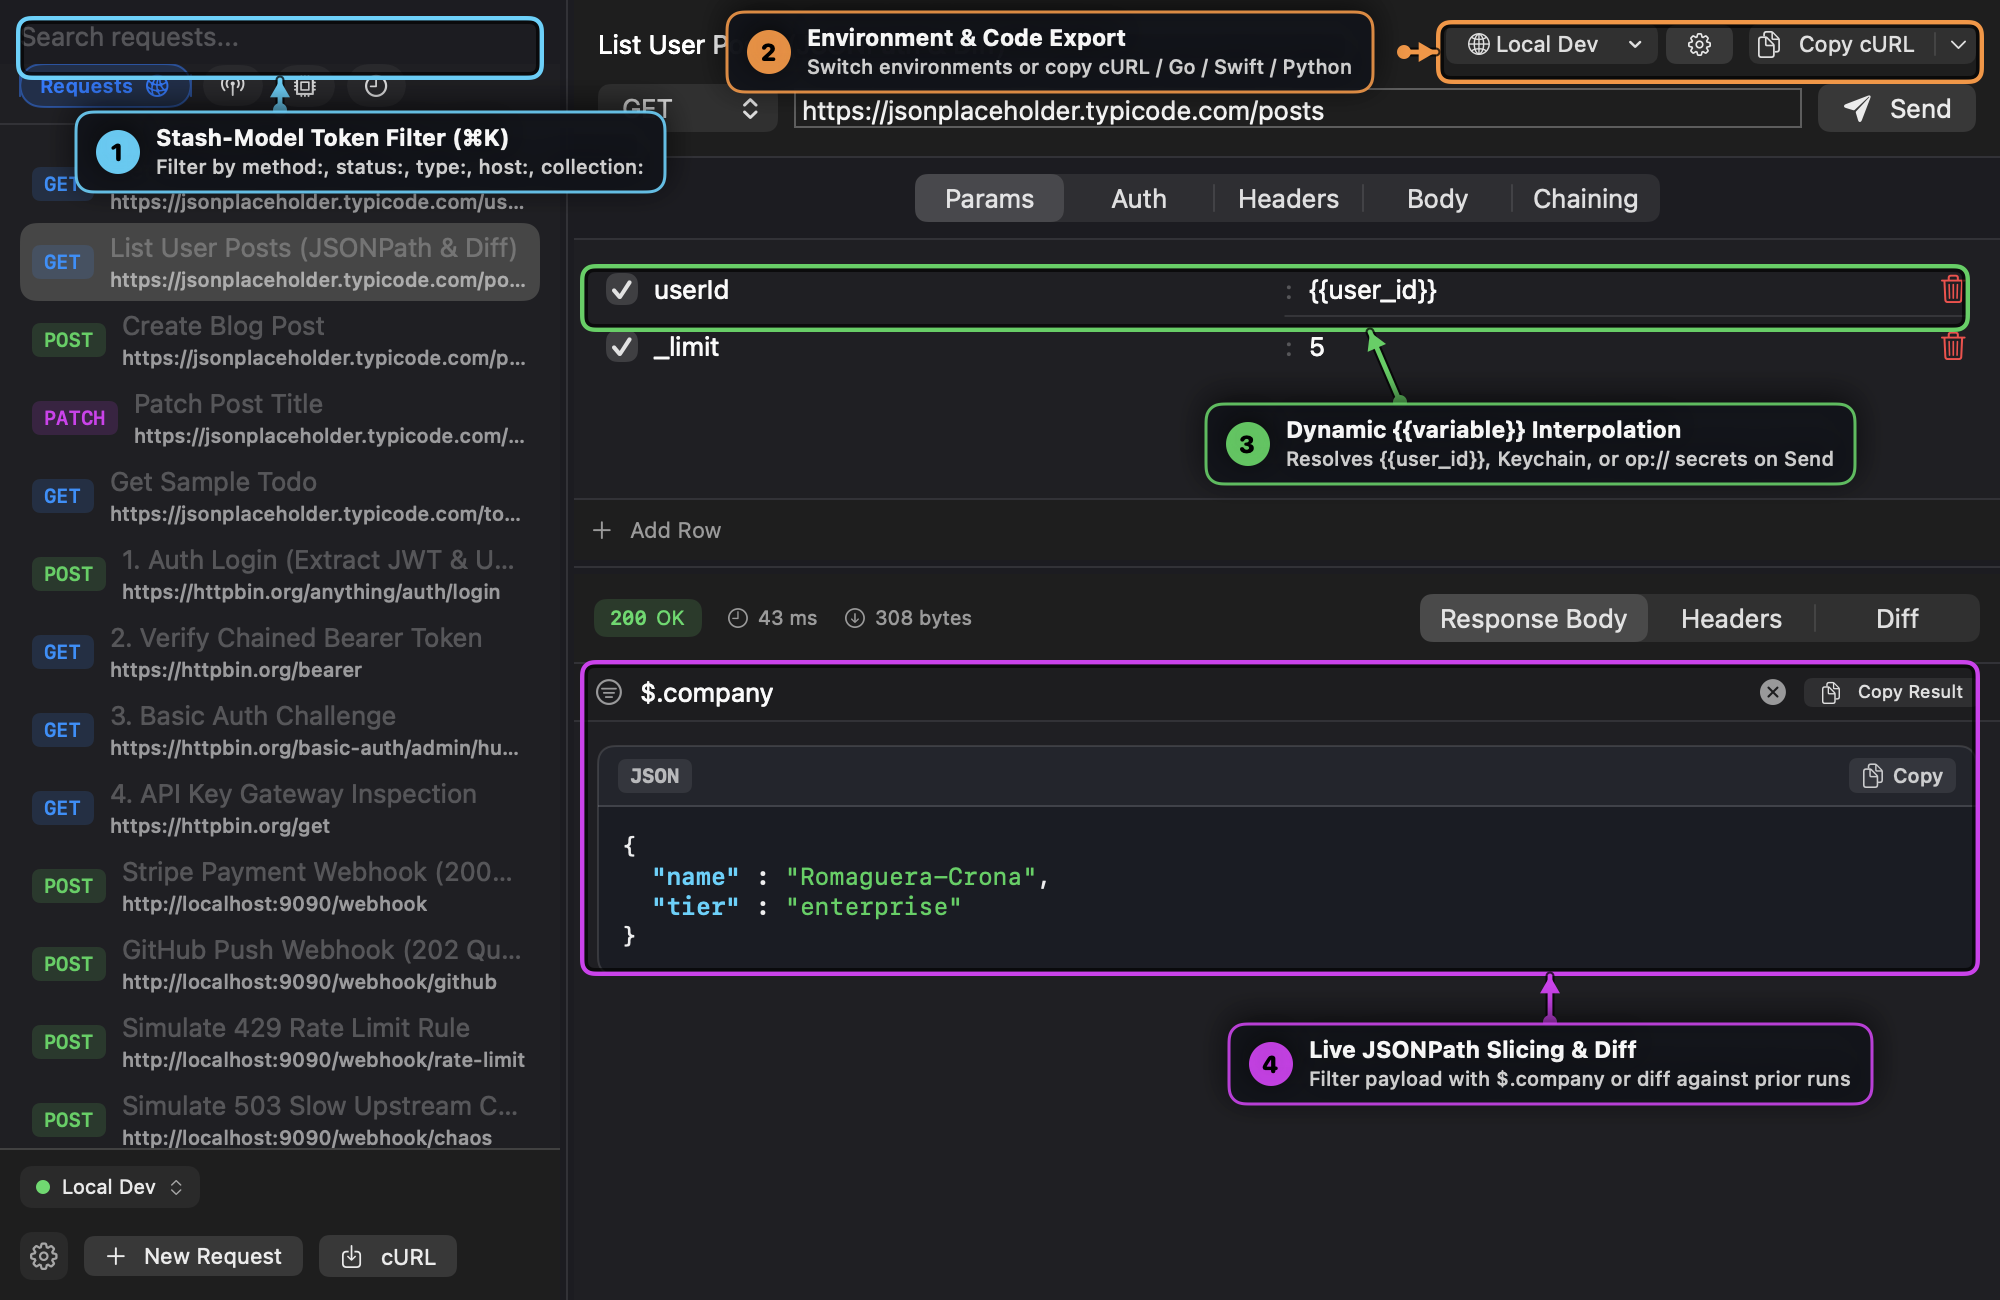
- Execute any JSON request (such as
Get User ProfileorList User Posts). - In the Response Body tab, type a JSONPath expression into the filter bar (Callout ④), such as:
$.company$.address.geo$[0].title
- Post immediately renders the sliced JSON result and provides a 1-click Copy Result button.
Part B: Line-by-Line Response Diffing
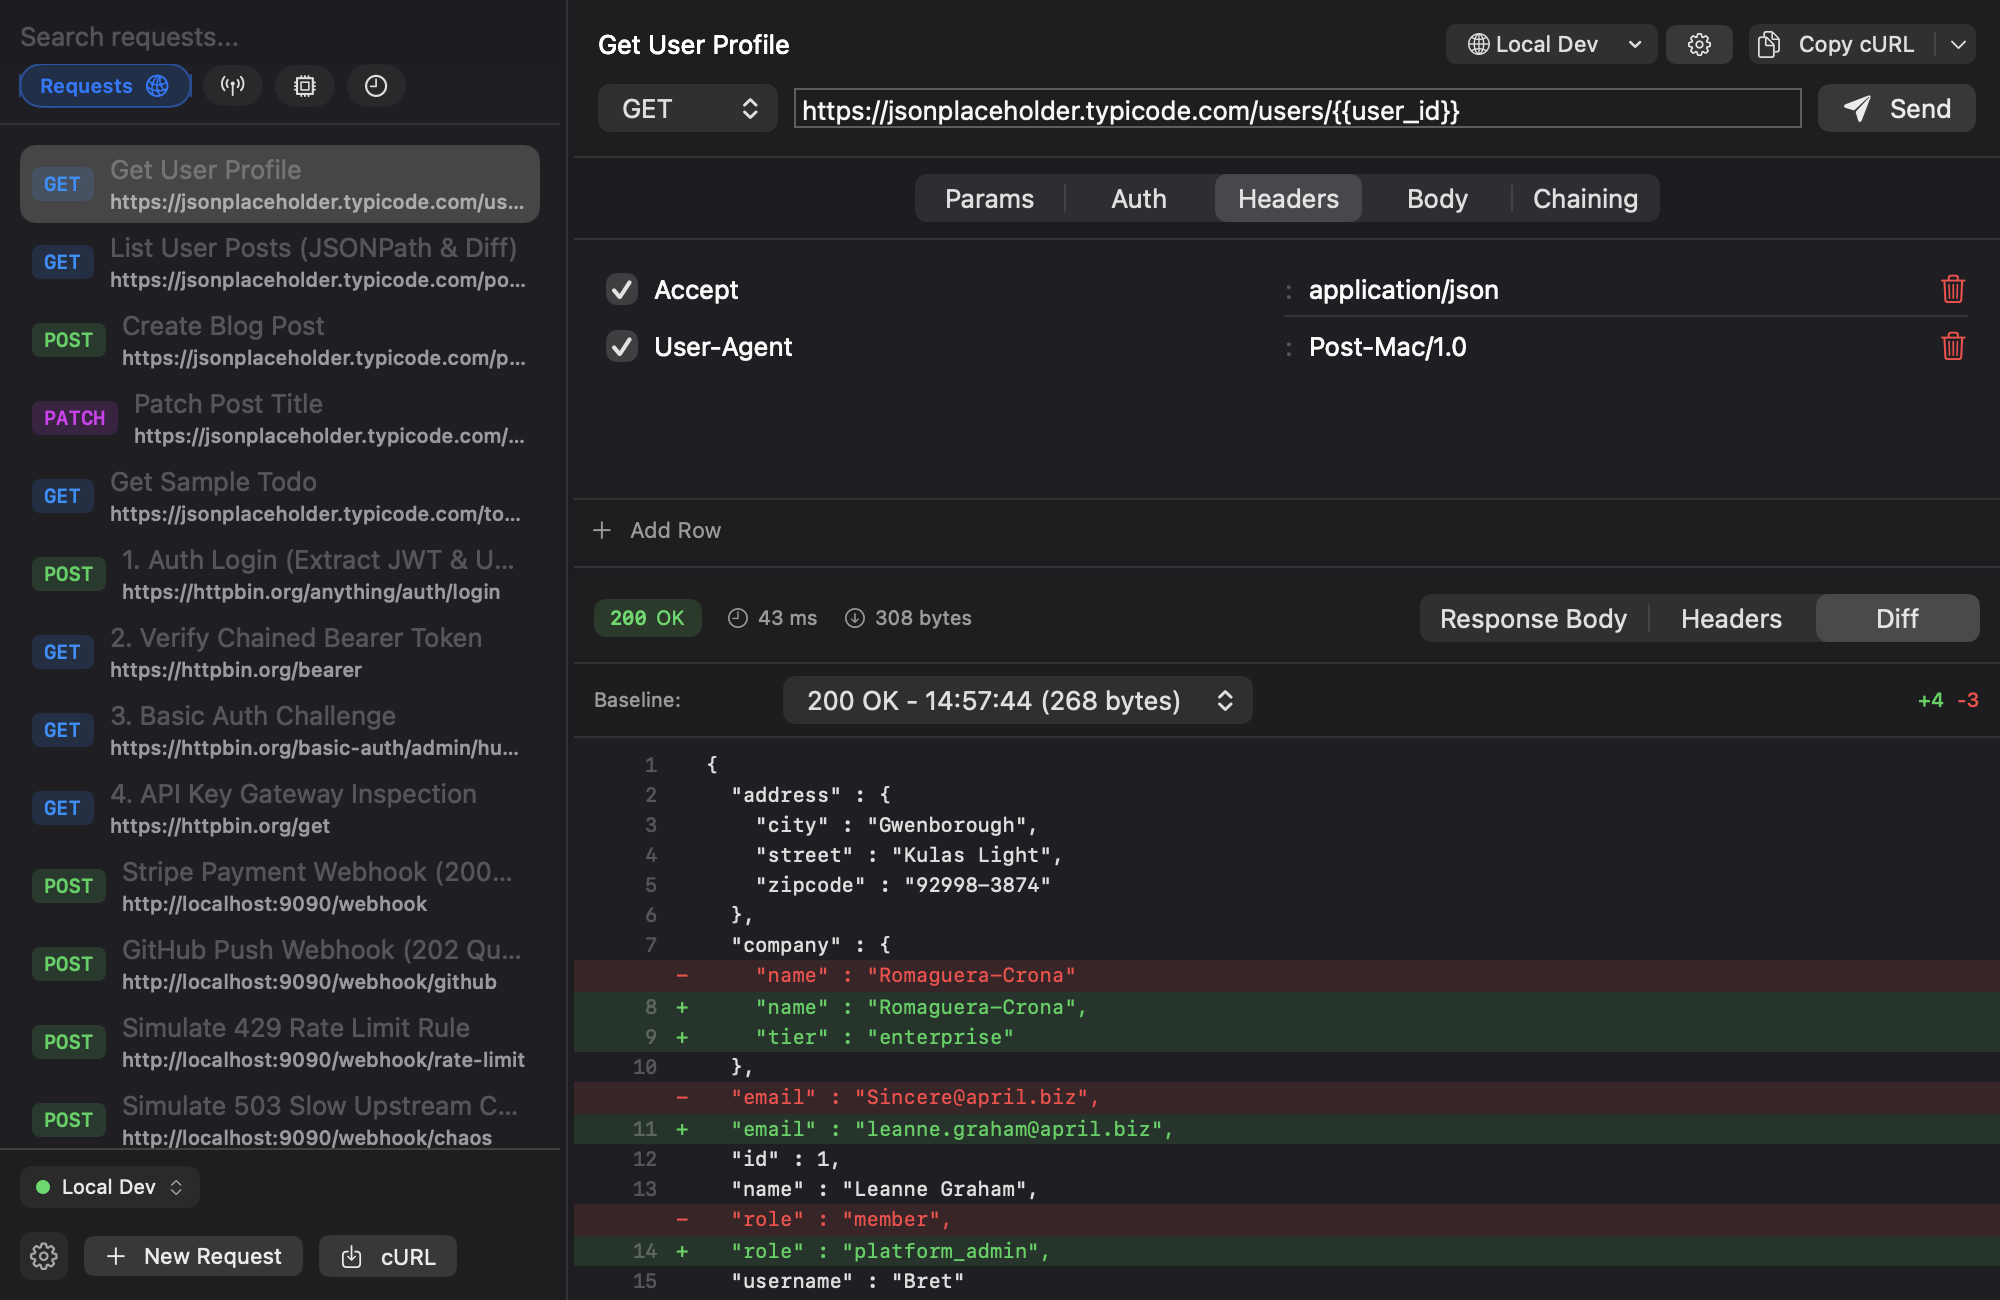
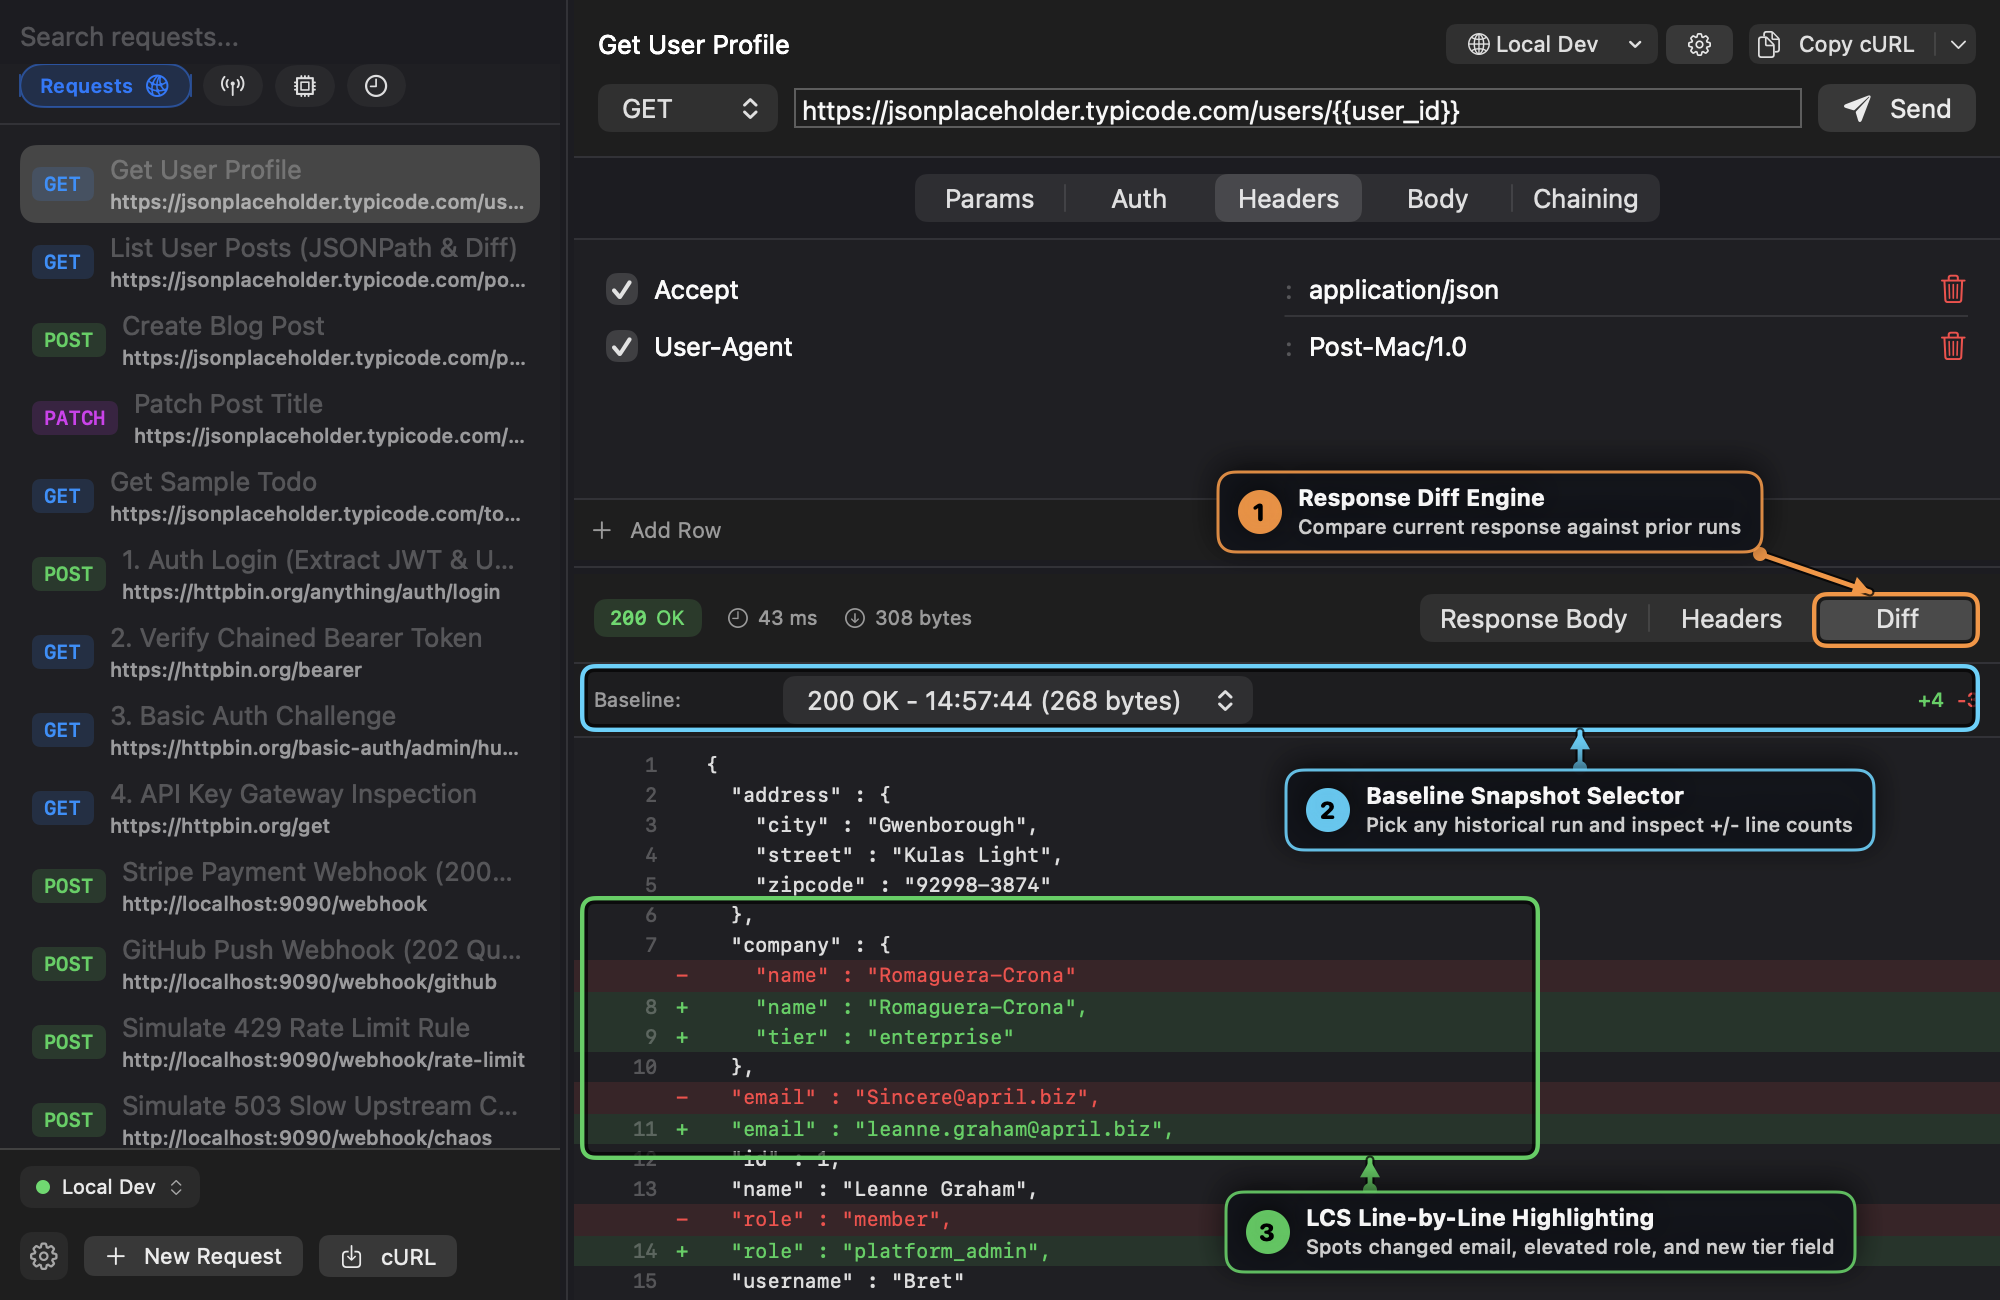
- Select
Get User Profileand switch the response pane to the Diff tab (Callout ①). - Pick a historical run from the Baseline dropdown (Callout ②) and note the
+4 -3line change summary. - Review the LCS Line-by-Line Highlighting (Callout ③), which clearly flags the changed
"email", the newly added"tier": "enterprise"field, and the role elevation from"member"to"platform_admin".
Recipe 6: Generating Production-Ready Go, Swift, and Python Clients
Scenario
Once a request works in the HTTP Workbench (including resolved {{variables}}, query parameters, custom headers, and Auth presets), you want clean, idiomatic client code ready to paste into your application.
Step-by-Step Instructions
- Select any request in the HTTP Workbench.
- Click the chevron on the Copy cURL split button in the top-right toolbar (Callout ② in the HTTP Workbench screenshot).
- Choose your target language:
- Copy cURL: Multi-line shell command with
-X,-H, and escaped--data-raw. - Copy Go (
net/http): Completehttp.NewRequestWithContextsnippet with headers, body buffer, anddefer resp.Body.Close(). - Copy Swift (
URLSession): Modernasync throwssnippet usingURLSession.shared.data(for:). - Copy Python (
httpx): Cleanhttpx.request(...)snippet.
- Copy cURL: Multi-line shell command with
Recipe 7: Keyboard-First Power Workflows (Stash-Model Token Filtering & Hotkeys)
Scenario
You want to filter dozens of requests and historical runs by HTTP method, status code, protocol type, or hostname without lifting your hands from the keyboard.
Step-by-Step Instructions
- Press
⌘K(or⌘F) to focus the search bar (Callout ① in the HTTP Workbench screenshot). - Press
Tabto open the Stash-model token dropdown (method:,status:,type:,host:,collection:). - Use
Tab/Down Arrow(orShift+Tab/Up Arrow) to move the highlight without mutating your typed text. - Press
Enteron a key likemethod:— Post insertsmethod:with no trailing space and immediately chains into the value dropdown (GET,POST,PUT,DELETE,PATCH). - Press
EnteronPOST— Post insertsmethod:POSTwith a trailing space and closes the dropdown so you can continue typing free-text search terms or pressTabfor another filter token (e.g.,status:429orcollection:Home).